---
title: "Magento 2 Go-Live Checklist: Turning on Your Site!"
source: "https://docs.nexcess.com/sites-stores/managed-magento/store-management/launch-magento-2/"
description: "Complete the Magento 2 Go-Live Checklist and take your ecommerce site to production! Leverage the power, scale, and functionality of the Magento 2 platform!"
vertical: "Sites & Stores"
date: "2022-02-22"
last_modified: "2026-07-23"
---
# Magento 2 Go-Live Checklist: Turning on Your Site!
## **Magento 2 Go-Live Checklist – Overview**
The **Magento 2** application is a popular open source ecommerce platform. In fact, its popularity is so broad that **Magento 2** is the most used **Content Management System (****CMS****)** to create online stores worldwide. It is renowned for its robust, scalable architecture. It is compatible with the latest technologies such as **PHP 7.x** (and greater), which means faster load times than **Magento 1**. Furthermore, **Magento 2** has many advanced features that allow the admin to update the ecommerce website automatically.
## **Magento 2 Go-Live Checklist – Guide**
This **Magento 2 Go-Live Checklist** will help you manage the go-live process with your application. Once you are familiar with the flexible sizing and pricing options offered with the different [**Managed Magento Hosting Plans**](https://www.liquidweb.com/magento-hosting/#pricing-link) to fit the size of your business, we are ready to dive into the necessary setup steps. We are here to guide you along the way to a successful go-live event with the **Magento 2 Go-Live Checklist.**
As you create a new **Magento 2** site, or after the domain content is migrated to **Nexcess**, you may follow our provided checklist to bring your **Magento 2** site to live status in production. In this **Magento 2 Go-Live Checklist**, we are outlining the step-by-step process to turn on your site. The checklist will help you keep track of the necessary steps to take the domain live.
The basic steps in the **Magento 2 Go-Live Checklist** are as follows:
1. **Setting Up Your Domain Name**
2. **Making Your Base URL Updates**
3. **Securing Your Site with a HTTPS Connection Setup**
## **Setting Up Your Domain Name**
1. Log in to your [**sites-portal.nexcess.com portal**](https://sites-portal.nexcess.com/login/) and pick the product plan you have with **Nexcess.**
2. Add your domain as the master domain from the panel. You will find the option via the **Nexcess Site Panel >> Domain Options >> Modify Master Domain** set of navigational options.
By renaming the master domain, you are replacing the temporary domain name of the application. So once the domain name is changed, reverting back to the temporary domain name is not possible:
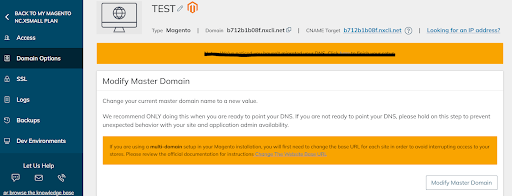Modify Master Domain Option
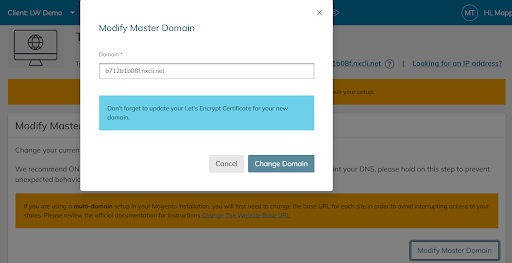3. Modify Master Domain Prompt to Change the Temporary Domain to Your Custom Domain Name
Once the domain has been updated, the new domain will show in the portal. The **Modify Master Domain** option will run a search and replace in the site’s database, which replaces any references using the temporary domain with references to the live domain. But to go live from the portal, the **DNS** will need to have been updated before changing the domain, and the **Let’s Encrypt SSL Certificate** must have been enabled in the portal.
## **Making Your Base URL Updates**
The base URL change to bring the store live is the next step in the **Magento 2 Go-Live Checklist** to bring your **Magento 2** store live. You may make the changes either from the application or via the Command Line Interface (CLI).
The base URL needs to have the temporary domain name replaced with your custom domain name. The following are the methods that could be used.
**Method #1:** From the **Magento Dashboard:** **Admin > Stores > Settings > Configuration**
**Method #2:** From **Command Line Interface (CLI)**:
```
bin/magento setup:store-config:set --base-url="http://sitedomain.com"
bin/magento setup:store-config:set --base-url-secure="https://sitedomain.com"
```
##
**Securing Your Site with a HTTPS Connection Setup**
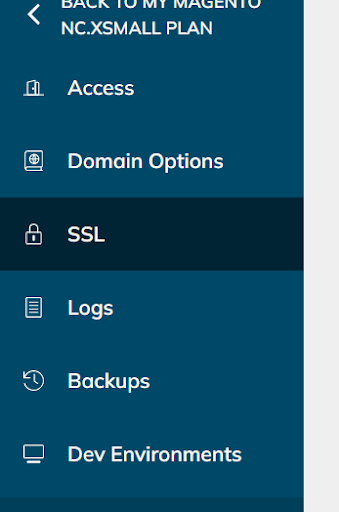
Securing the site by enabling **SSL** provided by **Nexcess** is the last step in the **Magento 2 Go-Live Checklist.** Your domain will be secured with the **HTTPS** protocol. Ensuring that the communication protocol of domain is protected has a significant role in keeping your domain genuine and secure. You may use the free **SSL** option from **Nexcess** (via the **Auto Let’s Encrypt Certificate**) or another **SSL** option for the domain. Ensure the domain is pointed correctly to the server using the **DNS A Record (DNS Address Record),** and the propagation is also completed ([**Check DNS Propagation**](https://docs.nexcess.com/sites-stores/portal/domains-and-dns/verify-dns-propagation/)). You may find the **SSL** option in the site panel as follows:
###
**Enabling Free SSL**
To [enable the auto **SSL** from the panel](https://www.liquidweb.com/help-docs/control-panel/nexcess/managed-woocommerce/store-management/enable-lets-encrypt/), make sure the domain does not have an **AAAA Record,** and that the **A Record** is pointed correctly to the server. Also, ensure that the **DNS** propagation of the domain is completed before you try to enable free SSL. The auto **SSL** is the same as the **SSL** provided from **Let’s Encrypt:**
Auto Let’s Encrypt Certificate
Once you enable the **SSL,** you may find your custom domain (with or without **WWW** version) would be listed in this area. You may slide the bar from left to right to select the domain for which you wish to enable the **SSL.**
## Conclusion
You have now completed the basic steps to take your site from development to live status.