

General
How to Create a Page in WordPress
You can use pages for content that rarely changes, such as About, Contact, or Services. Unlike blog posts, pages aren’t listed by date in your blog. This guide walks you through creating, publishing, and managing a page in WordPress.
Before you begin, sign in to your WordPress dashboard. The steps below use the block editor. Your theme and plugins may add settings or change how the editor looks.
Create your page
- In your WordPress admin sidebar, go to Pages > Add New (or click the Add New Page button at the top of the All Pages screen).
- Enter a descriptive title in Add title, such as About or Contact.
- Click below the title to start writing. Use the + block inserter to add headings, images, lists, or other content. Select a block to see its formatting options.
- Click Save draft if you want to finish the page later.
To return to a draft, go to Pages > All Pages and click its title.
Review your page settings
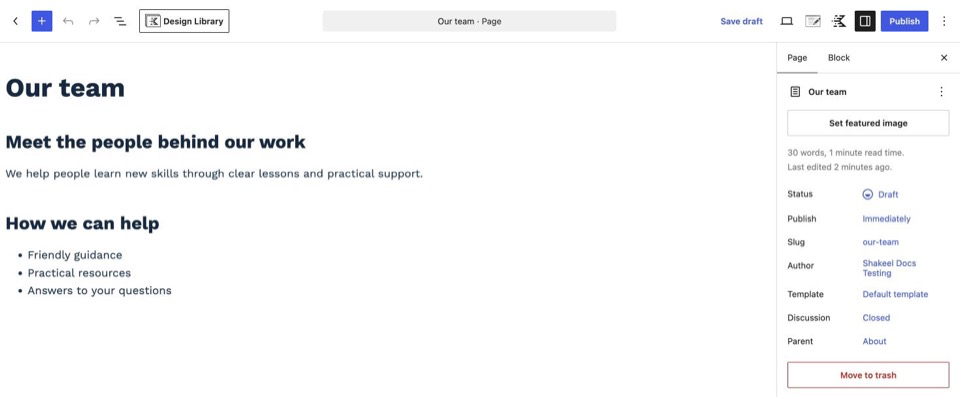
Open Settings in the top toolbar, then select the Page tab. Review the options you need before publishing:
- Visibility: Choose Public for everyone, Private for site administrators and editors, or Password protected for visitors who have the password.
- Featured image: Add an image if your design uses one. Your theme controls whether it appears on the page and where it is displayed.
- Slug: Review the part of the page’s URL based on its title.
- Template: Choose a layout supplied by your theme, or keep the default template.
- Discussion: Choose whether visitors can leave comments.
- Parent: Select an existing page if you want to make this a child page. For example, a Team page can sit under About.
Available options depend on your theme, editor, and account permissions. Older editors may group Parent, Template, and Order under Page Attributes. Page order does not automatically rearrange a custom navigation menu.
An example page with About selected as its parent:
Preview and publish
- Click Preview in the top toolbar to see how the page looks on Desktop, Tablet, or Mobile devices, or select Preview in new tab.
- When you’re ready, click Publish.
- Review the publishing date and visibility. To schedule the page, choose a future date and time. If WordPress shows a confirmation panel, click Publish again, or Schedule for a future date.
- After the page is published, open View Page to check the result.
Publishing a page does not automatically add it to your navigation menu. Add a link to the page in your site’s navigation menu under Appearance > Menus (or via the Navigation block in the Site Editor) so visitors can find it.
The same example page in a preview, with headings, text, and a list:

Edit and manage pages
Go to Pages > All Pages. Hover over a page title and click Edit (or click the title directly) to open it in the editor. Once you finish making changes to an already published page, click Update in the top-right corner to save them live.
Use Quick Edit to change the title, slug, date, password, parent, order, template, or status without opening the full editor. You can also make the page private or turn comments on or off. Click Update to apply those changes.
To change several pages at once, select their checkboxes, choose Edit from the bulk actions menu, and click Apply. Change the author, parent, template, comments, or status for all selected pages, then click Update.
Use Trash to remove a page you no longer need. For multiple pages, select them and use Move to Trash from the bulk actions menu.