

Solid Backups
Host-Specific Configuration for Kadence Backups
Coming soon: Solid Backups is becoming Kadence Backups. You may see both names used while we update the product, documentation, and customer experience.
Introduction
Kadence Backups enrollment asks you to pick a host and enter SSH/SFTP details (server address, port, WordPress path, username, and public key or password). Those values come from your hosting control panel, and the click path varies across providers.
This guide collects host-specific steps that were previously part of Getting Started with Kadence Backups. Use it alongside Step 3: Connecting to Your WordPress Host in that article.
For WP-CLI, wp-config.php, Phar, public keys, and IP allowlisting, see Server Requirements & SSH Configuration for Kadence Backups. If Test Server Connection fails, see Kadence Backups Troubleshooting SSH/SFTP Connection Issues.
Using Kadence Backups with your hosting provider
Nexcess
- Log in to your Nexcess Client Portal
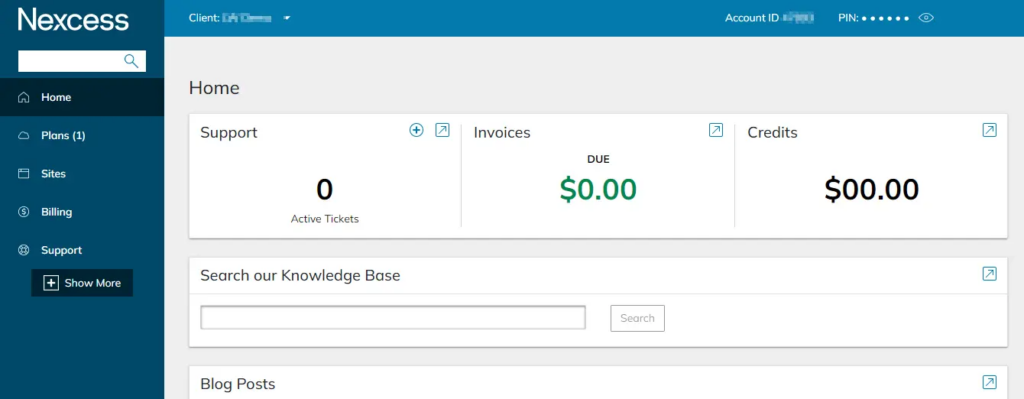
- Go to the Plans area in the user interface
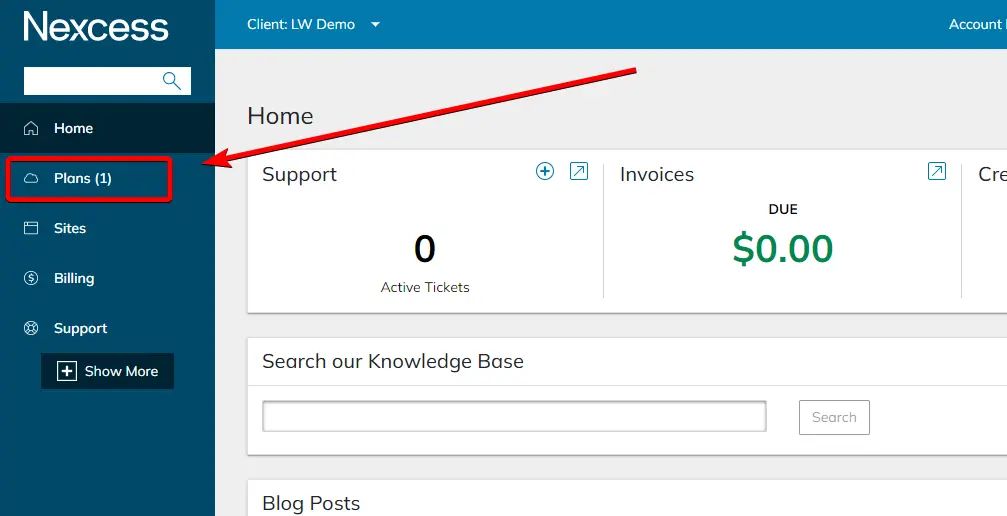
- There, you can see all your active plans and select the one that includes your site.
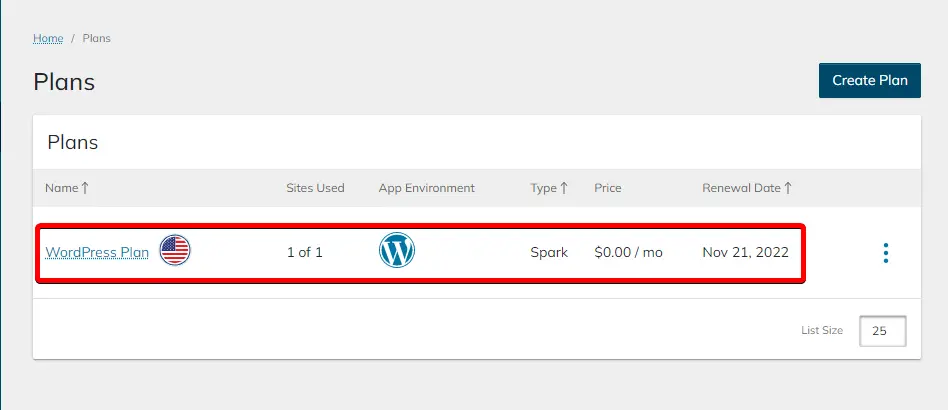
- Select the vertical ellipsis that can be found on the right-hand side to see your WordPress plan options and navigate to the Plan Dashboard
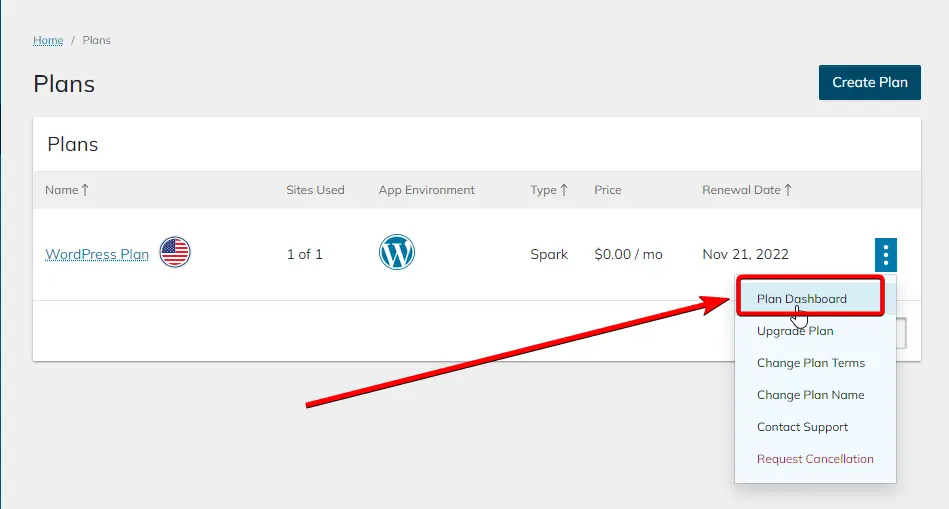
- Similarly, find the website you want to create SSH (Secure Shell) credentials for. Open site options by clicking the vertical ellipsis and navigating to Site Dashboard.
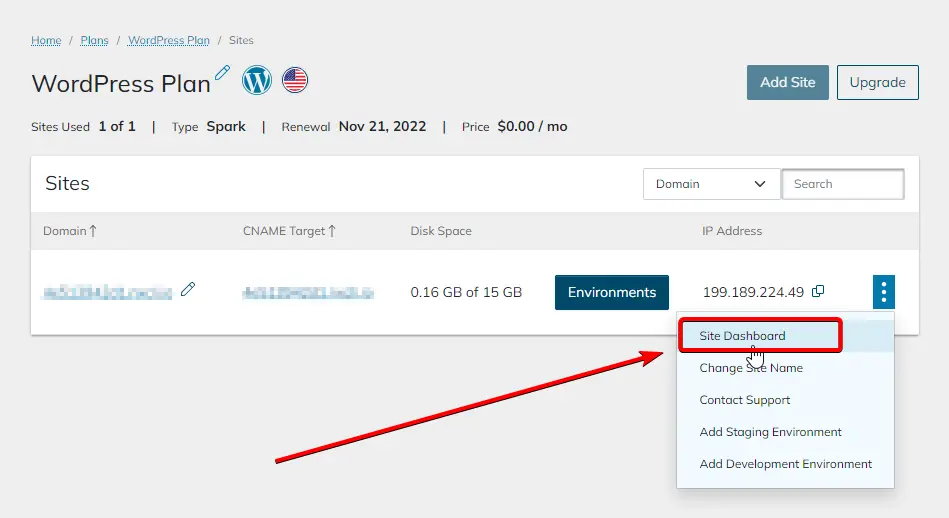
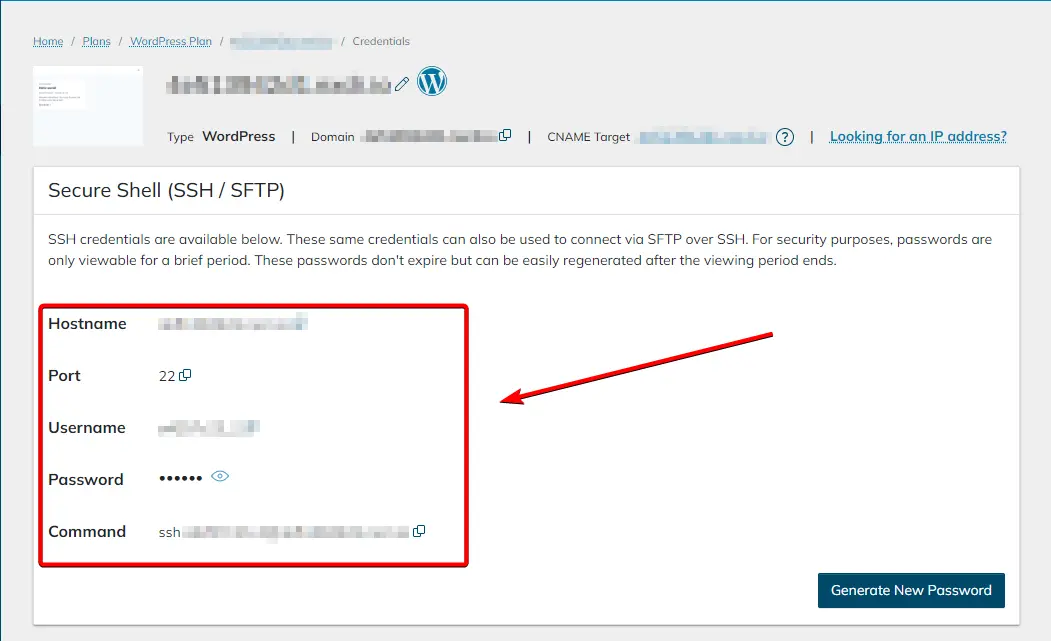
- In the Site Dashboard, you’ll find Secure Shell (SSH/SFTP) credentials near the top of the page. You can also change the password by clicking the Generate New Password button located in the bottom right portion of the Secure Shell (SSH/SFTP) box.
GoDaddy Managed
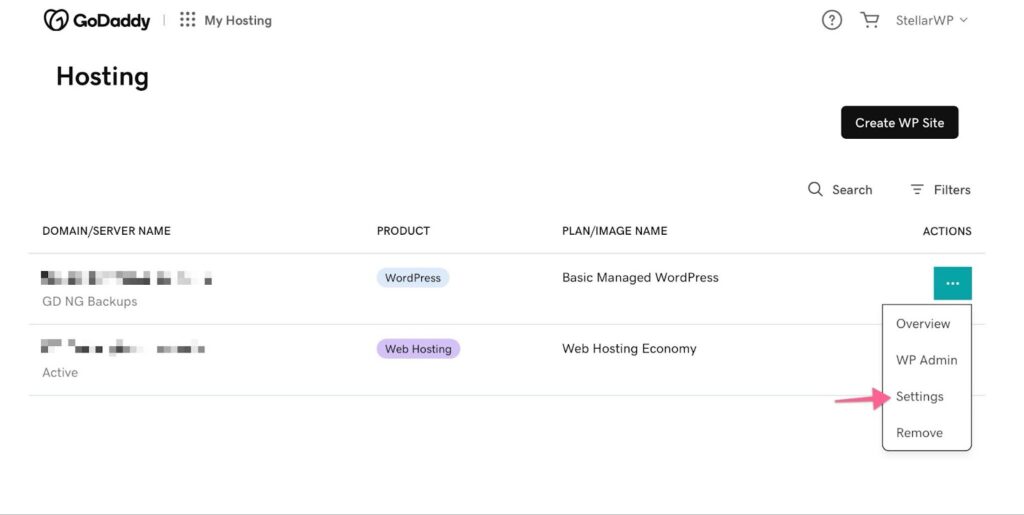
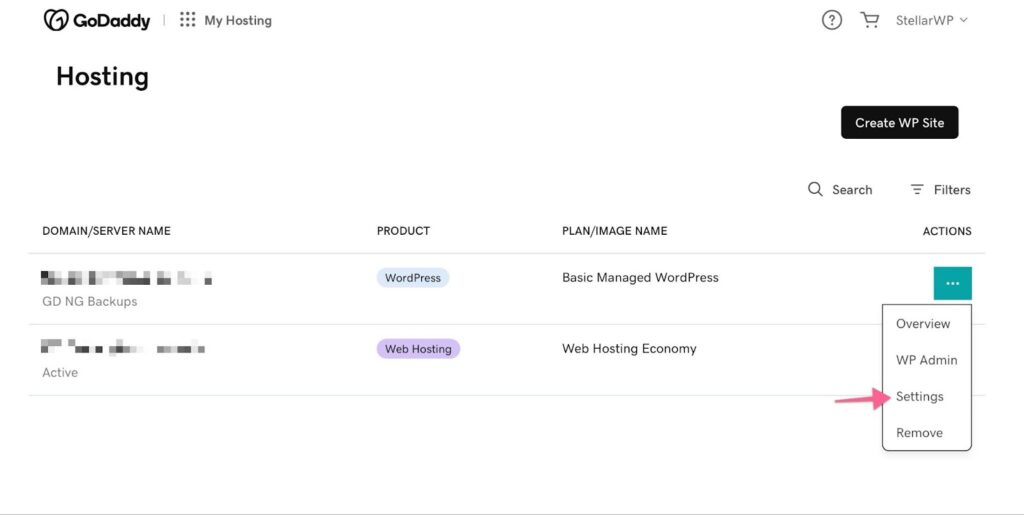
- Go to Hosting -> Actions -> Settings
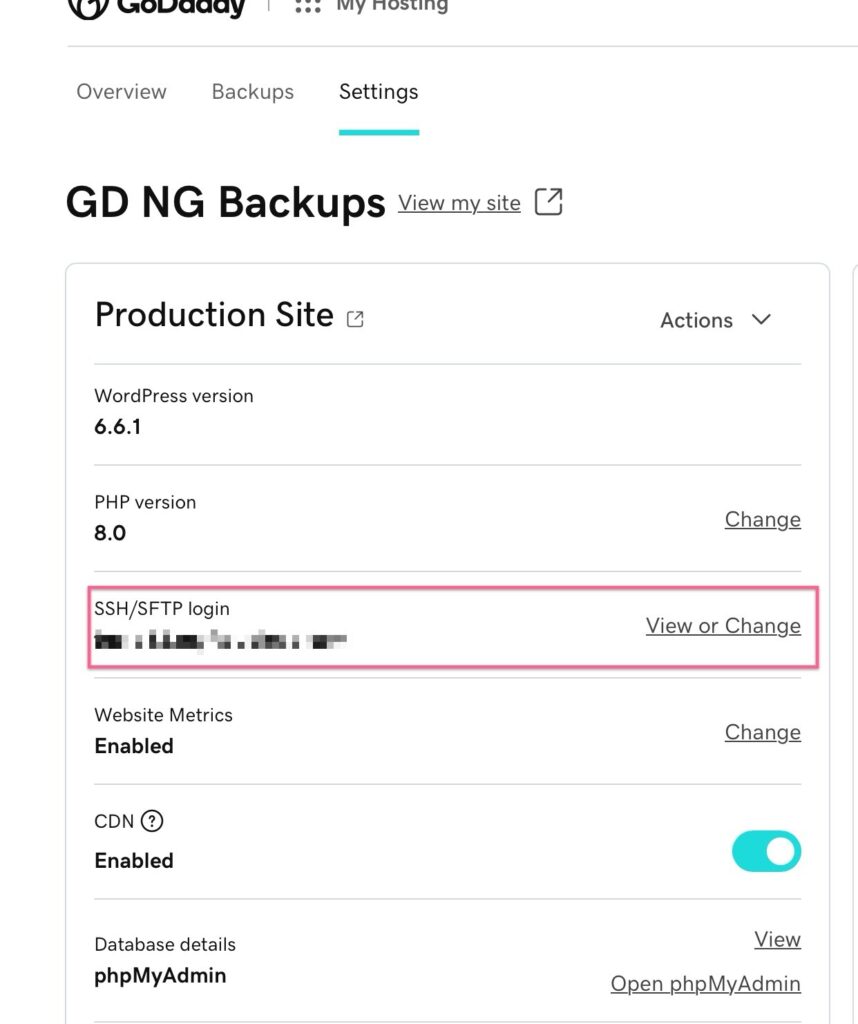
- Open the SSH/SFTP login section to create SSH/SFTP credentials
GoDaddy Shared
- Go to Hosting -> Actions -> Settings
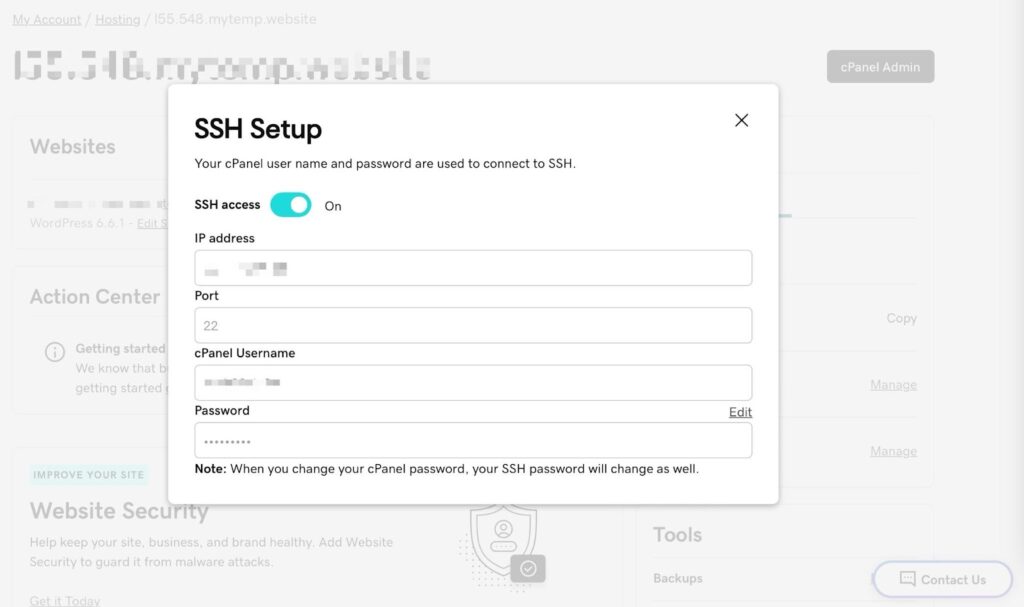
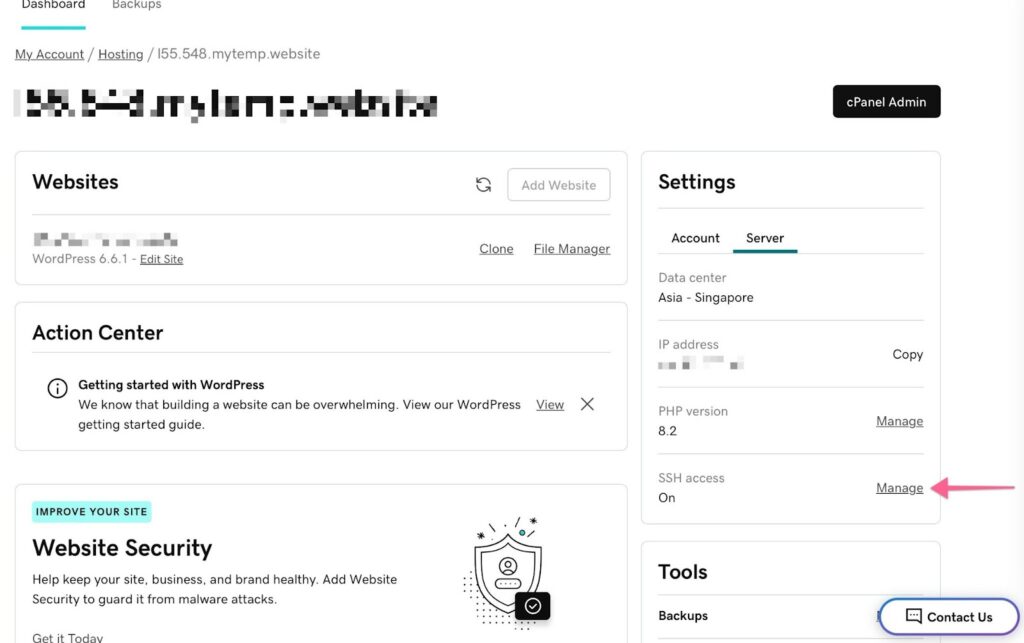
- Open Settings -> Server -> SSH access to enable SSH and get credentials
Siteground
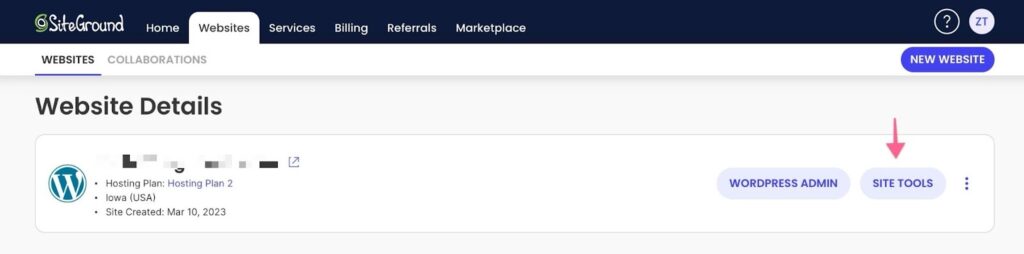
- Go to Home -> Website -> Manage
- Click “Site Tools”
- Go to Dev -> SSH Keys Manager and Import Kadence Backups’ Public key
- Once saved, click the saved key’s more info and choose “SSH Credentials”
- Paste the credentials into your Kadence Backups credentials form
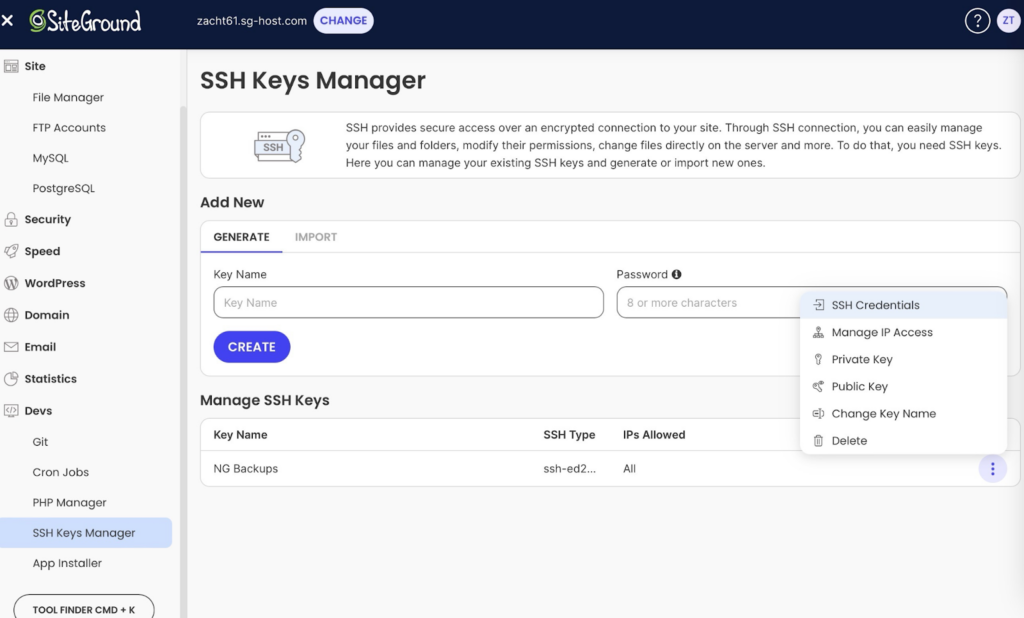
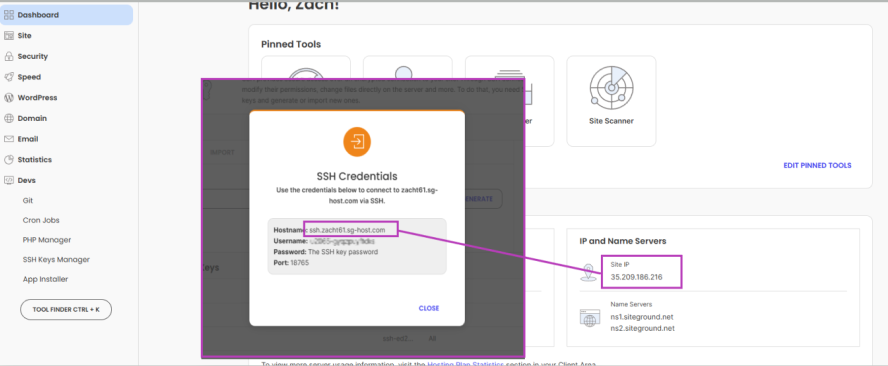
Note: If you come across the following error while connecting your Siteground website to Kadence Backups, use your website’s server IP address for the Server Address field in the Kadence Backups server credentials form instead of the “Hostname” from your SSH Credentials. Your IP can be found in Site Tools -> Dashboard -> IP and Name Servers.

BlueHost
- Log into your Bluehost Account Manager.
- Click the Hosting tab in the left-side navigation menu.
- Under Quick Links, select the CPANEL button to access the cPanel page.
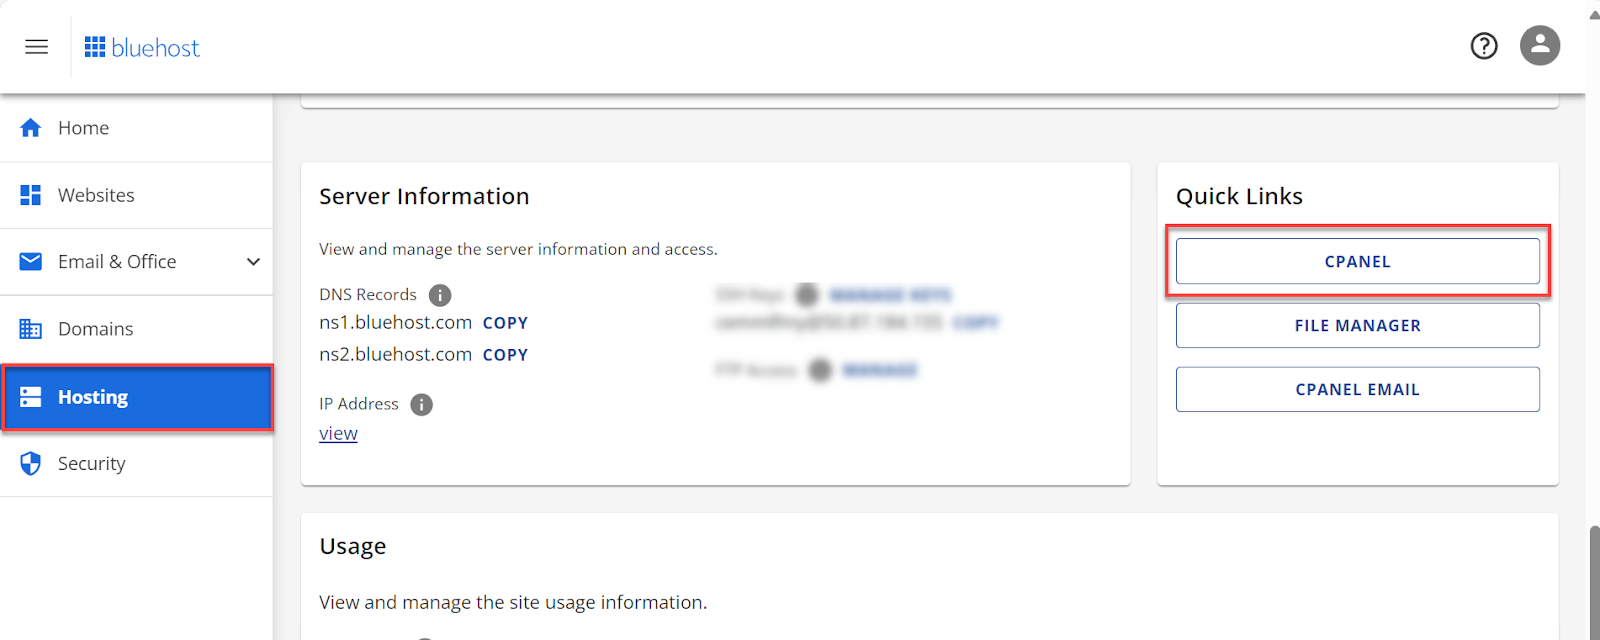
- Locate the Current User and Shared IP Address and use those in the NextGen Server Username and Server Address fields respectively. Use port 22 for SSH connections on Bluehost.

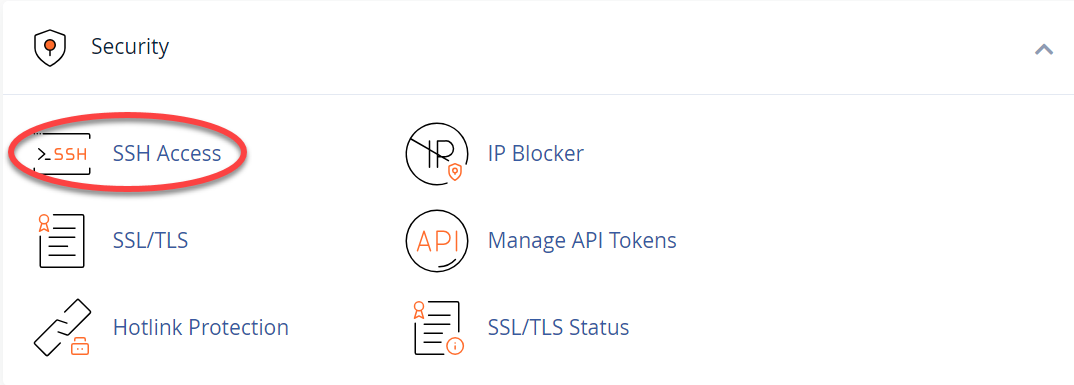
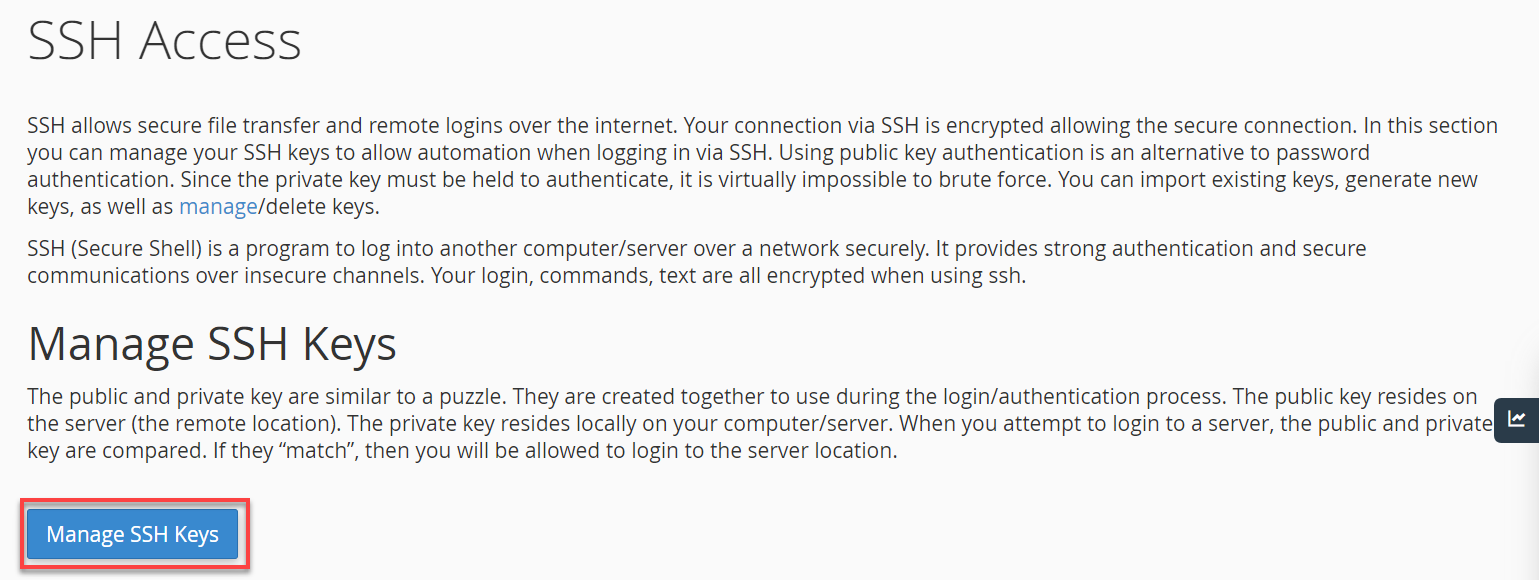
- Scroll down and locate the Security section, then click SSH Access.
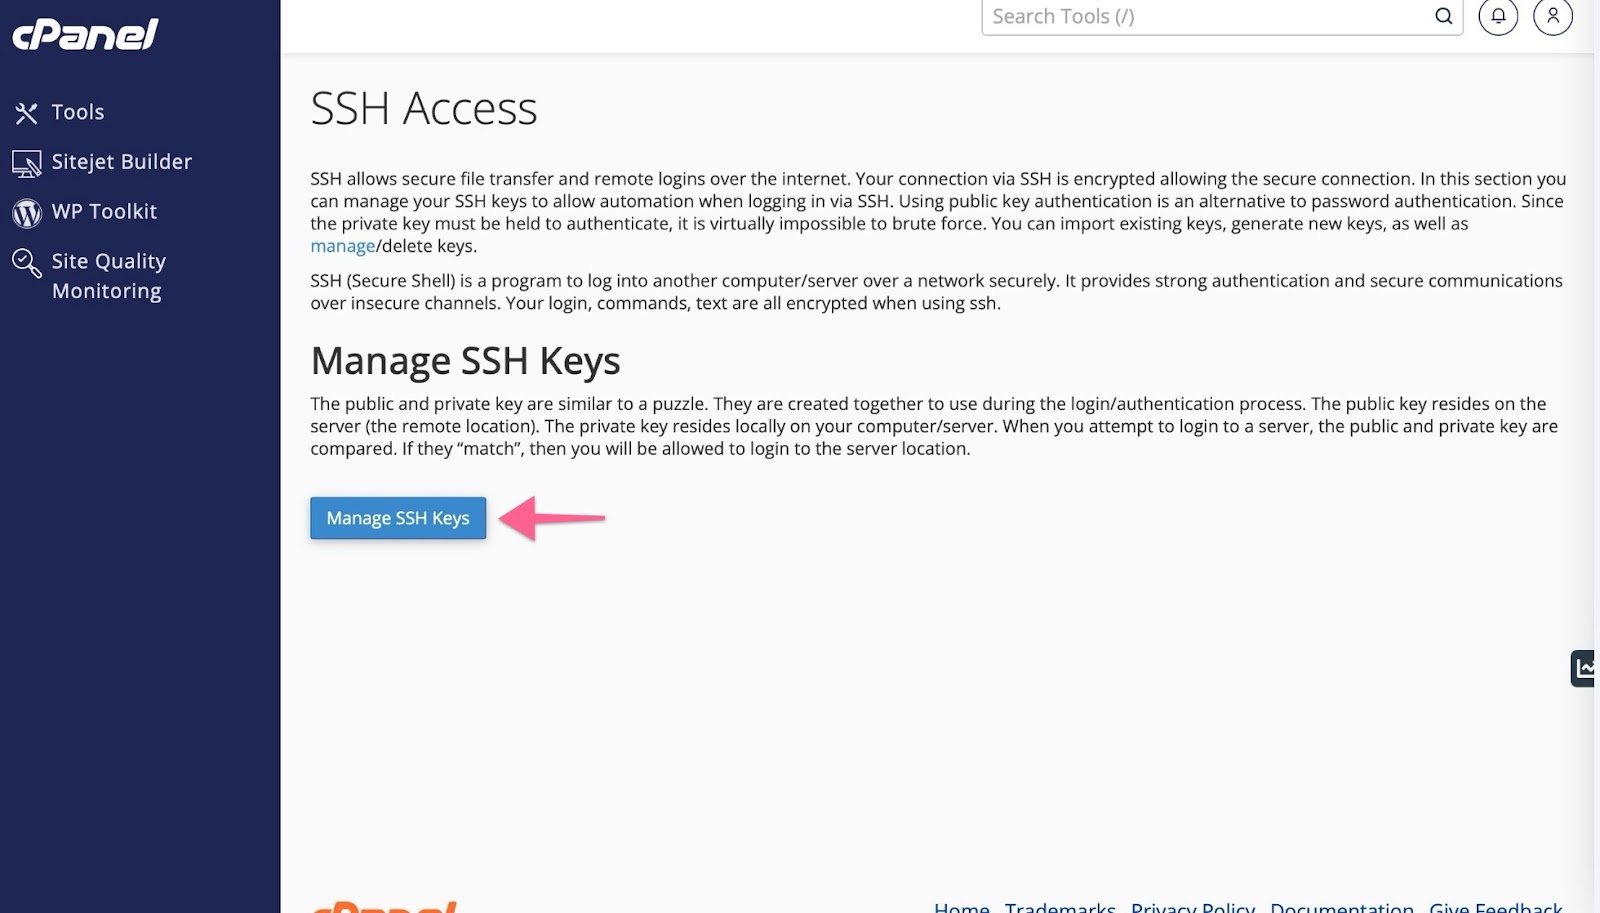
- Click Manage SSH Keys.
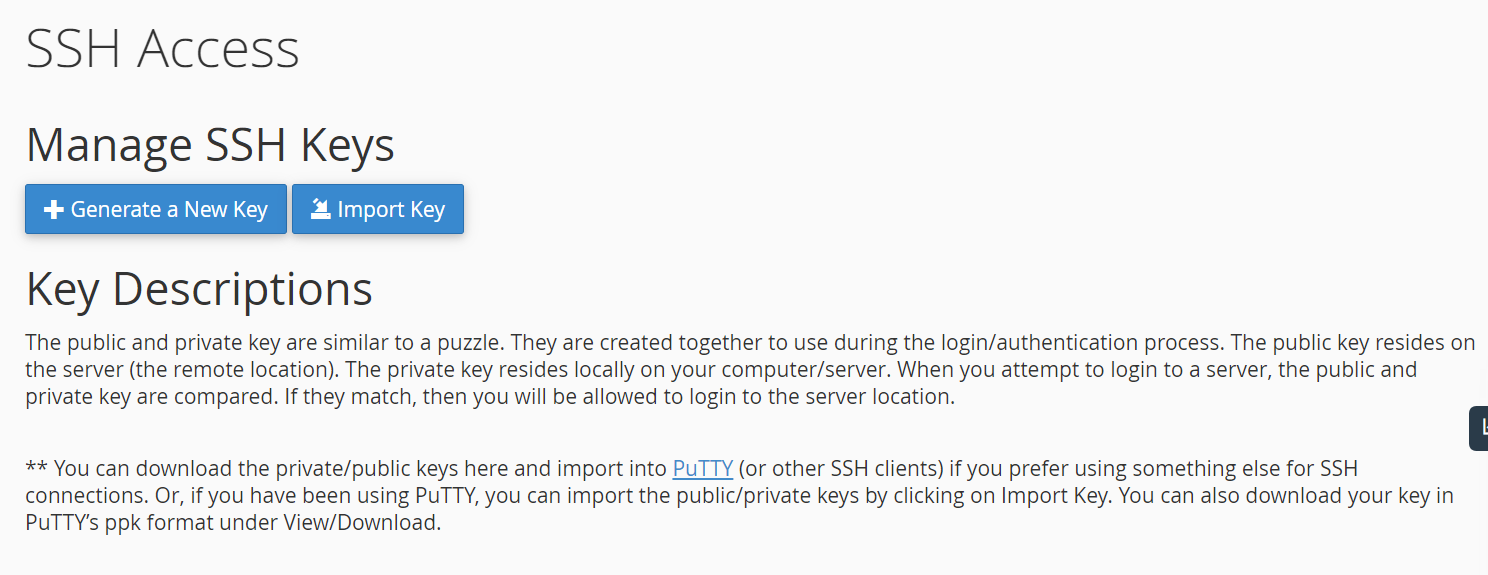
- Import Key – Import the NextGen SSH Key as a public key here and make sure to authorize it afterward.

Additional tips on configuring cPanel can be found here.
IONOS
How to find the WP installation path
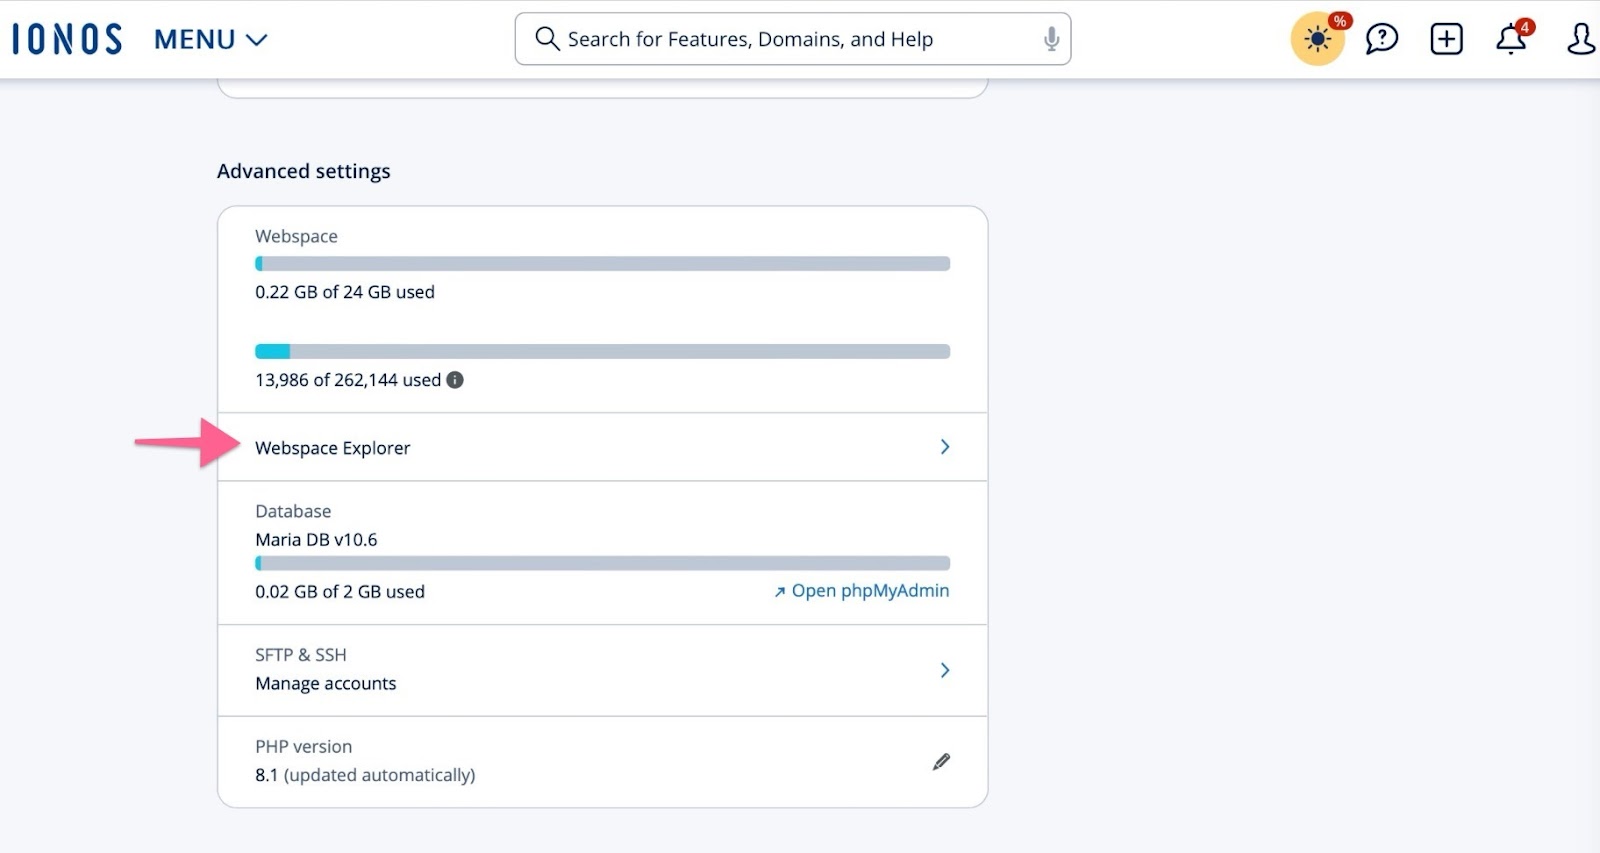
- Go to Websites & Stores -> Settings -> Advanced settings -> Webspace Explorer
- Select the “wordpress” folder and the “Path” link at the top of the screen.
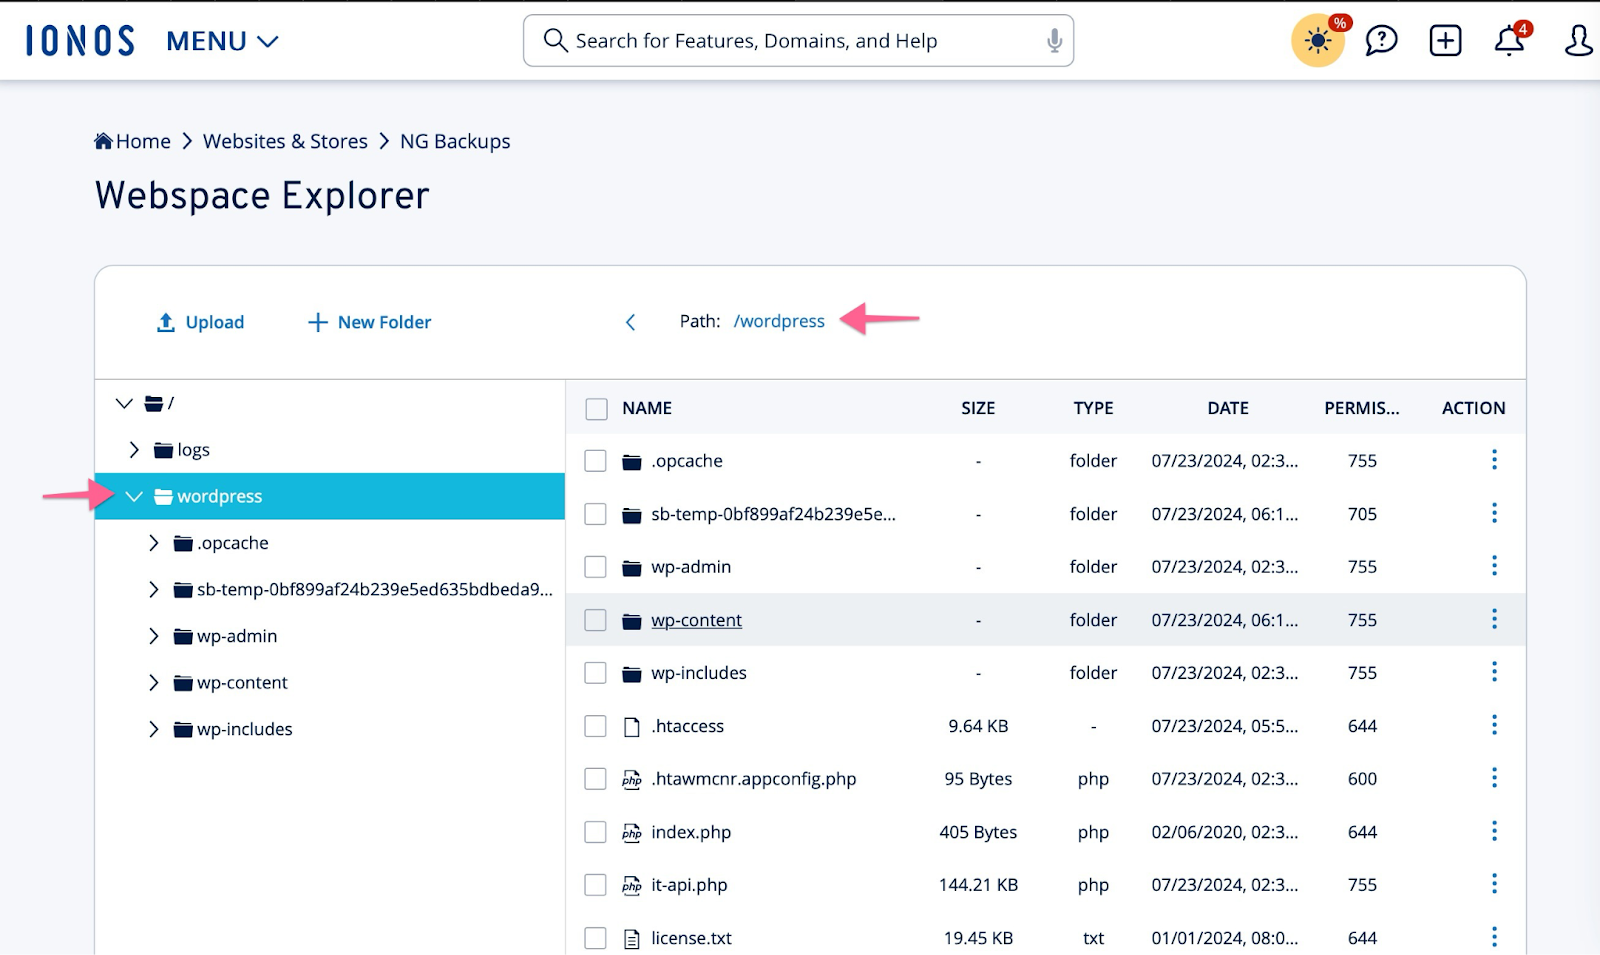
- Copy the absolute path starting from (and including)
/homepages/..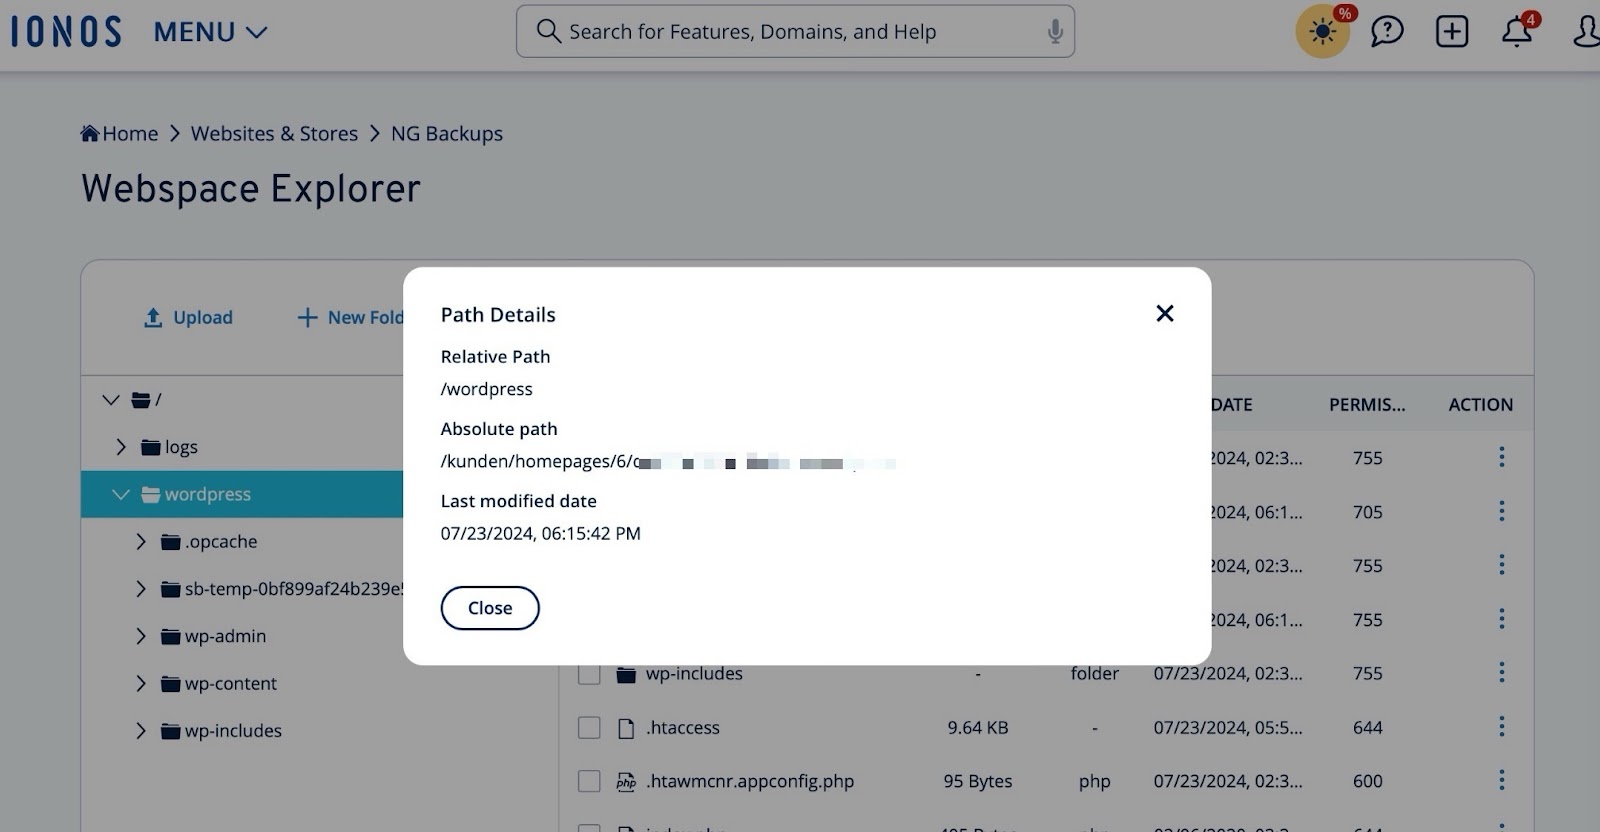
How To Find IONOS Credentials
- Go to Websites & Stores -> Settings -> Advanced settings -> SFTP & SSH
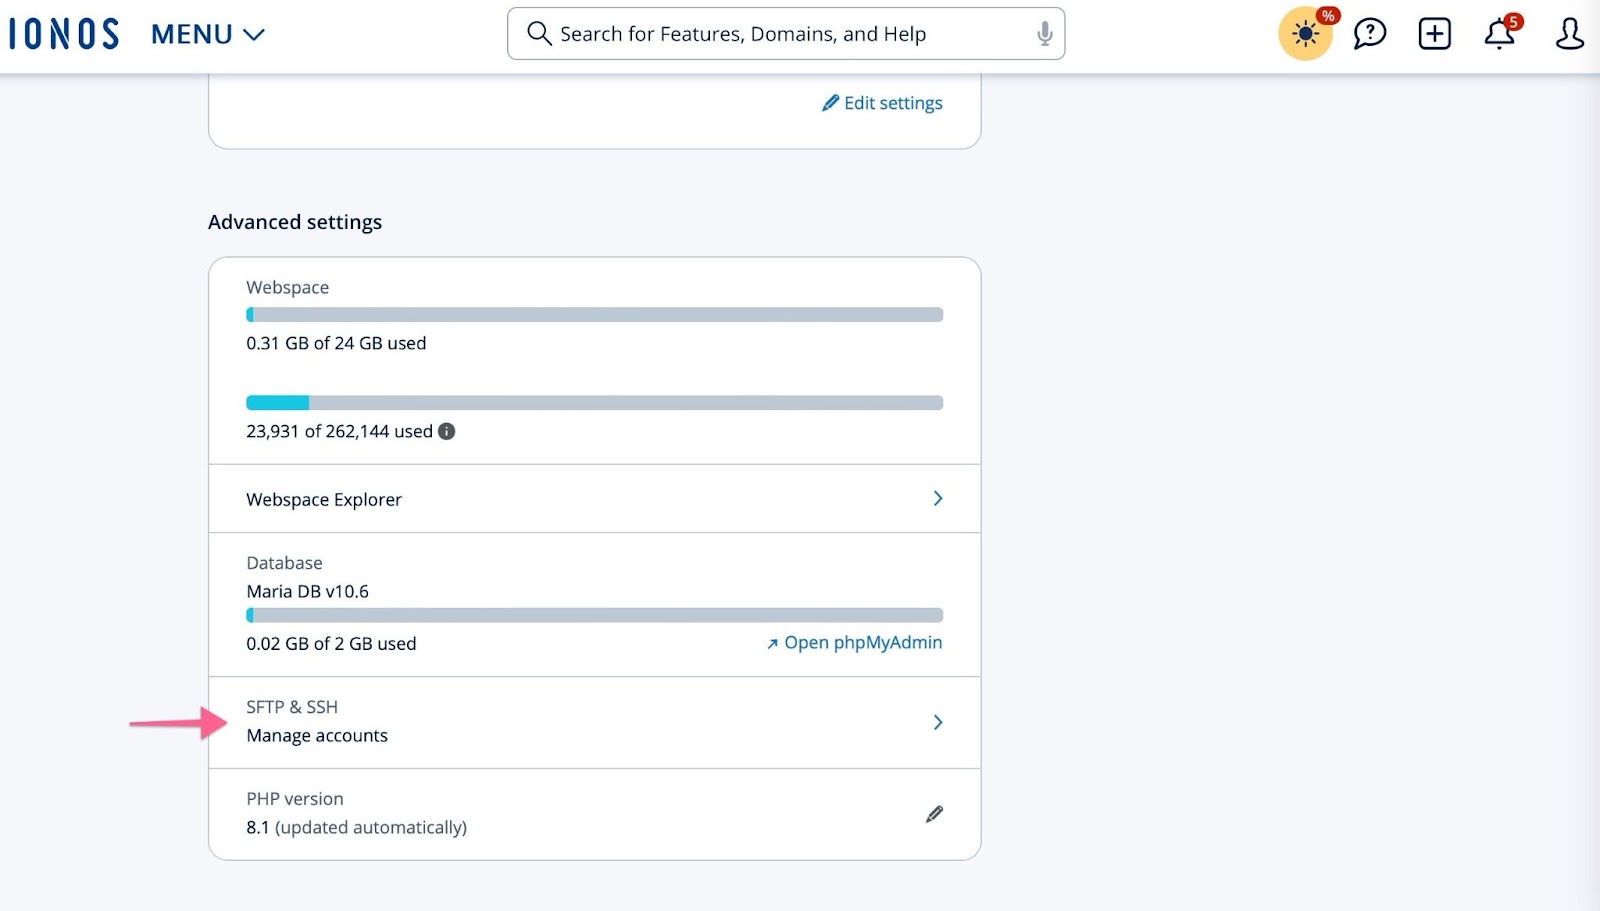
- In the FTP account row, select More -> Show connection data
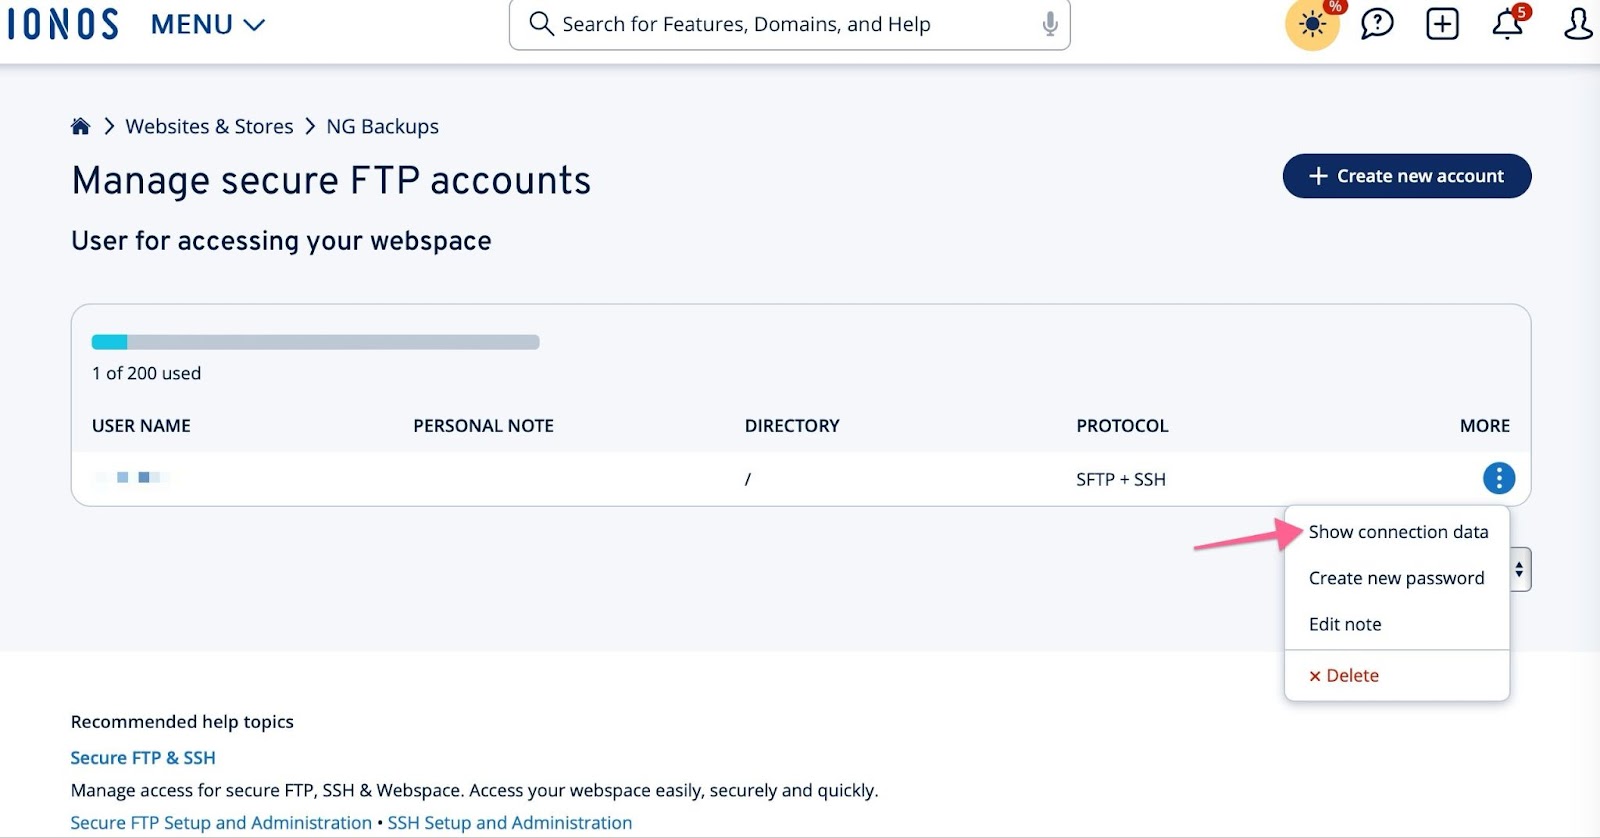
- Copy those details into the username/password fields (as well as the port) and enter them in the Kadence Backups settings.
GreenGeeks
- Log in to GreenGeeks. From your dashboard, click the “cPanel” button next for the account you want to edit.
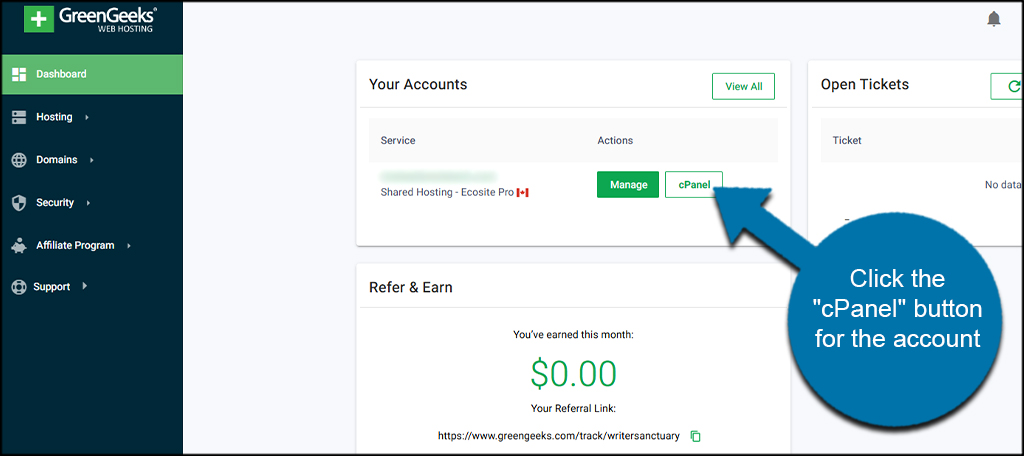
The cPanel URL contains your server information. Everything afterhttps://and before:2083is the hostname.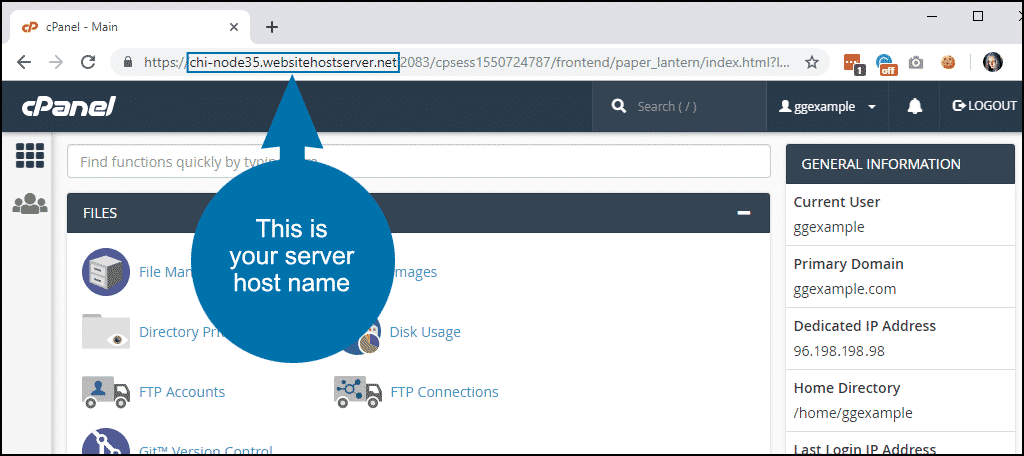
- Scroll down this page and follow the guidance in the “Hosts that Use cPanel” section below.
- Note: if you do not already have SSH/SFTP enabled on your server, you may have to open a support ticket to have it enabled.
VentraIP
- Ensure SSH/SFTP Access is enabled by following VentraIP’s guide: Enabling SSH and SFTP access on a hosting service.
- Set the connection port to 2683 (instead of the default 22).
- Use the provided Hostname by VentraIP.
- In your hosting control panel, look for your server hostname (e.g.,
s222…) and use this in the NextGen connection settings.
- In your hosting control panel, look for your server hostname (e.g.,
- Whitelist Kadence Backups IPs
- Add Kadence Backups IP addresses listed here to your hosting firewall/allowlist.
- Check ModSecurity Rules (Advanced)
- If ModSecurity is blocking connections, rules can be whitelisted through the VentraIP control panel or via
.htaccess. See Troubleshooting with ModSecurity for details. - Some customers have reported ModSecurity rule 225170 blocking Kadence Central requests.
- If ModSecurity is blocking connections, rules can be whitelisted through the VentraIP control panel or via
- Test the Connection
- After applying these changes and adding your server credentials in the NextGen connection settings, test the backup connection to confirm it’s working

Other Hosts
Review the list of Kadence Backups Verified Hosts.
Hosts that Use cPanel
To connect Kadence Backups to hosts that use cPanel (including a self-managed VPS running WHM and cPanel), there are a few configuration requirements:
- SSH access must be enabled
- WP-CLI must be installed & available in the cPanel account(s) hosting the site(s) you plan to back up.
- If ConfigServer Security & Firewall (or other server-based firewall or abuse detection system) is running in WHM, the Kadence Backups IP addresses must be added to the allowlist
Enable SSH Access
By default, SSH access is disabled in cPanel.
If you have access to WHM
- Navigate to Account Functions -> Manage Shell Access
- Set “Normal Shell” for each cPanel account that hosts a site you plan to back up
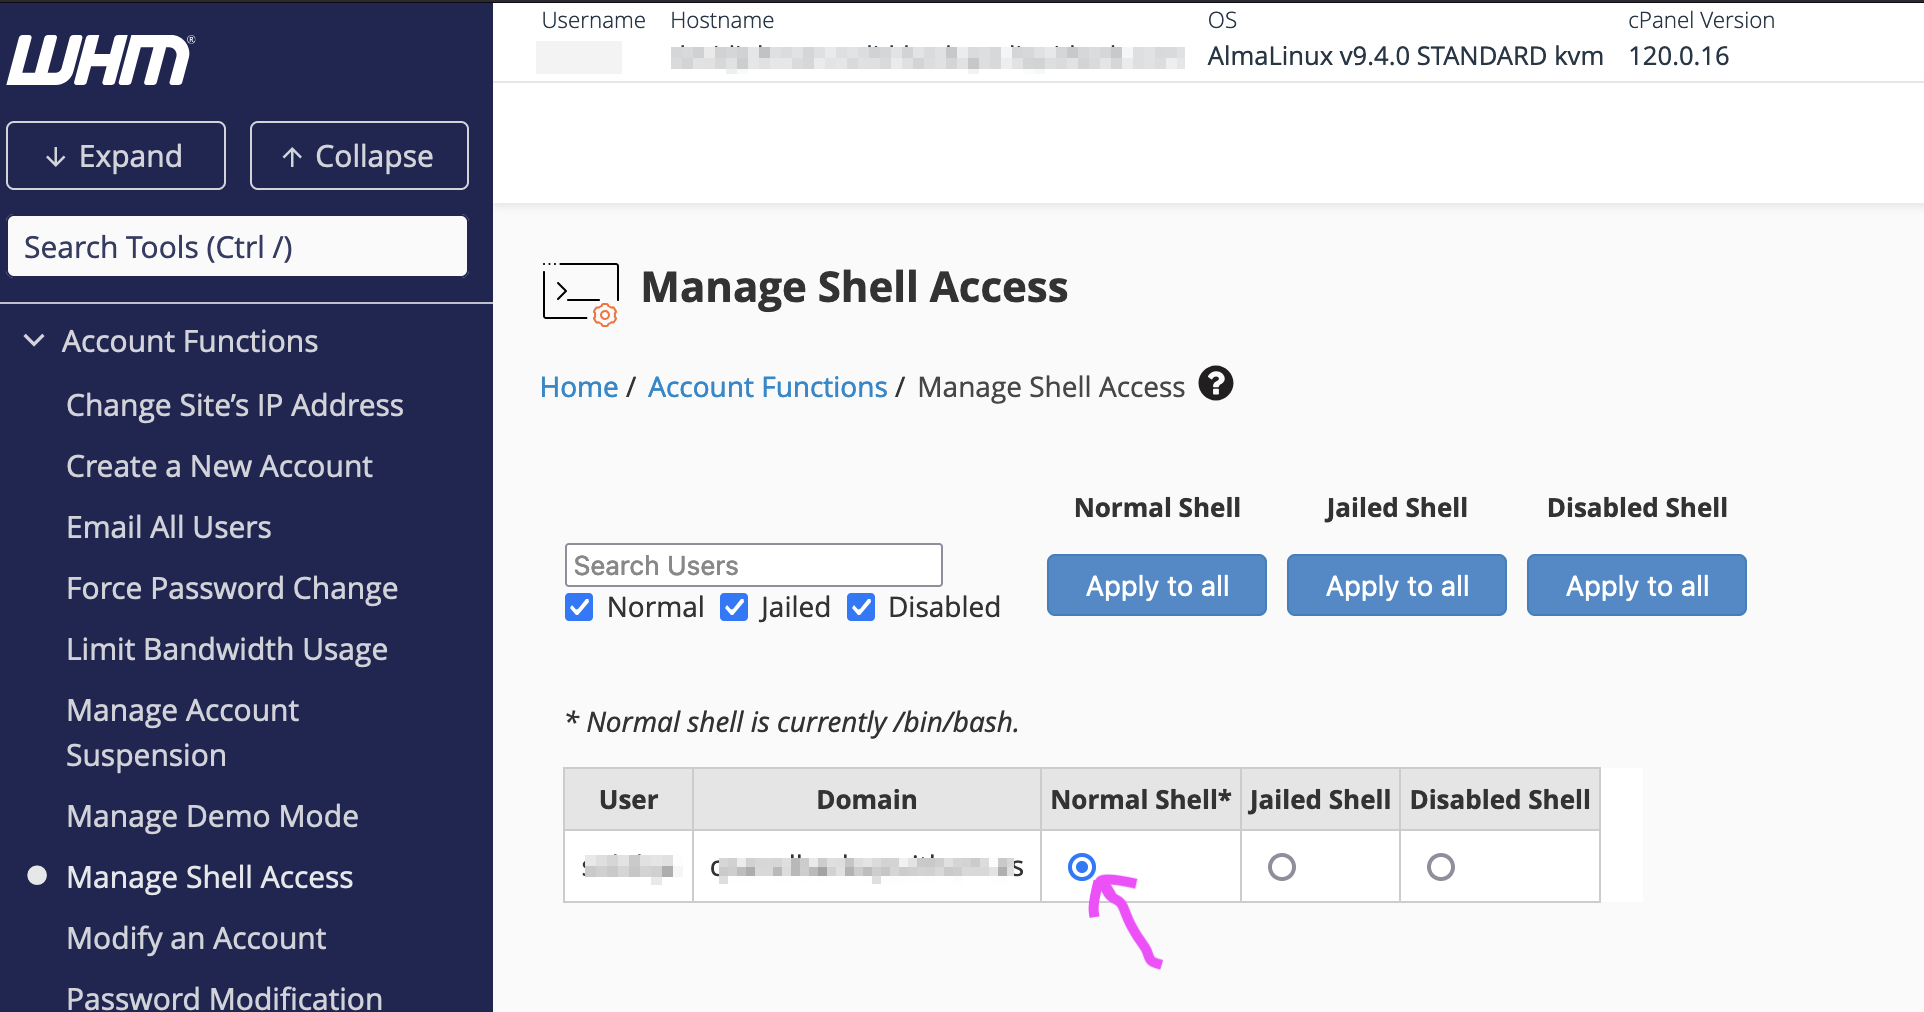 For more details, see https://docs.cpanel.net/whm/account-functions/manage-shell-access/
- Recommended: Disable Password Authentication at Security Center -> SSH Password Authorization Tweak.
Warning: This will block all password-based SSH access for WHM and all cPanel accounts. SSH keys must be configured for WHM and each cPanel account you wish to access via SSH. For more information, see https://docs.cpanel.net/whm/security-center/ssh-password-authorization-tweak/) - Add SSH keys for root access to WHM and, as needed, for each cPanel account you wish to access via SSH (see below).
If you do not have access to WHM
Some notes related to specific hosts are below. You may need to check with your hosting provider to determine how to enable SSH for your cPanel account.
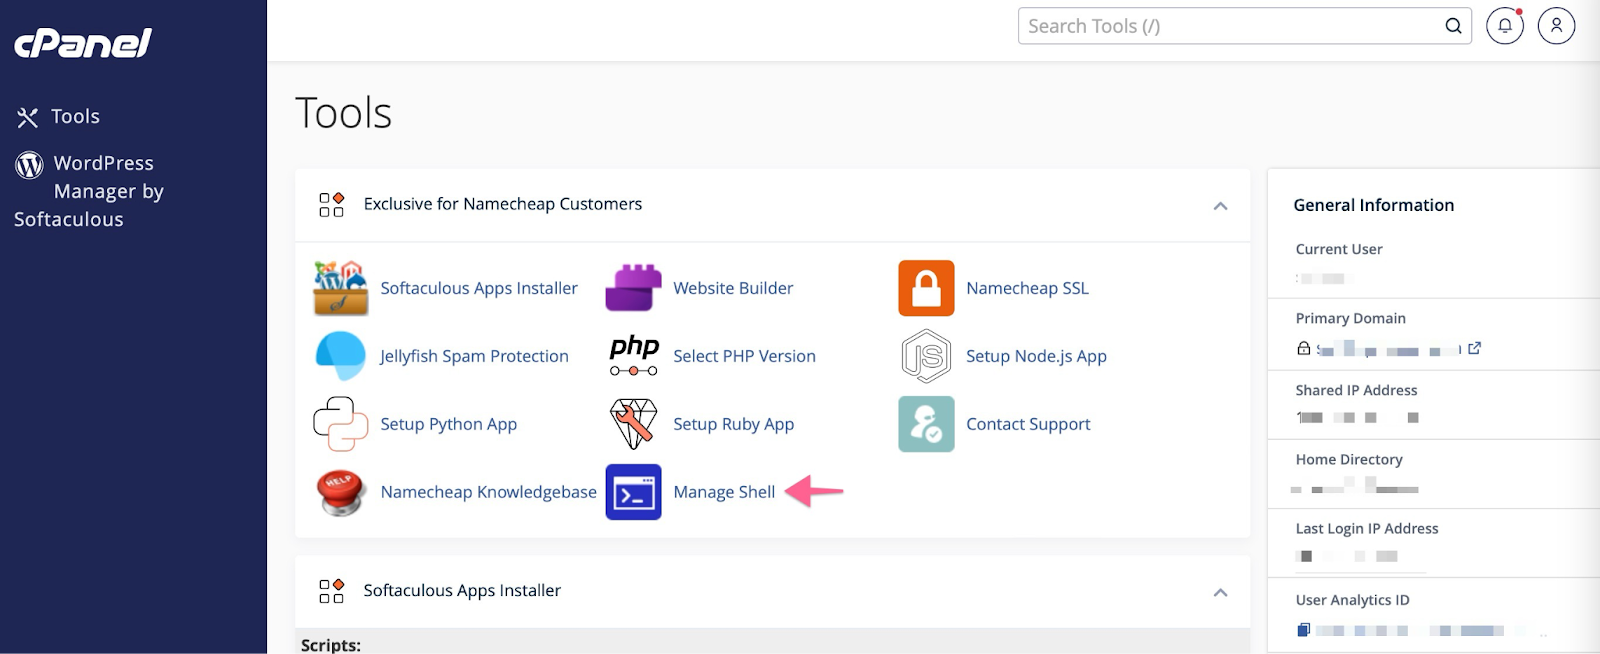
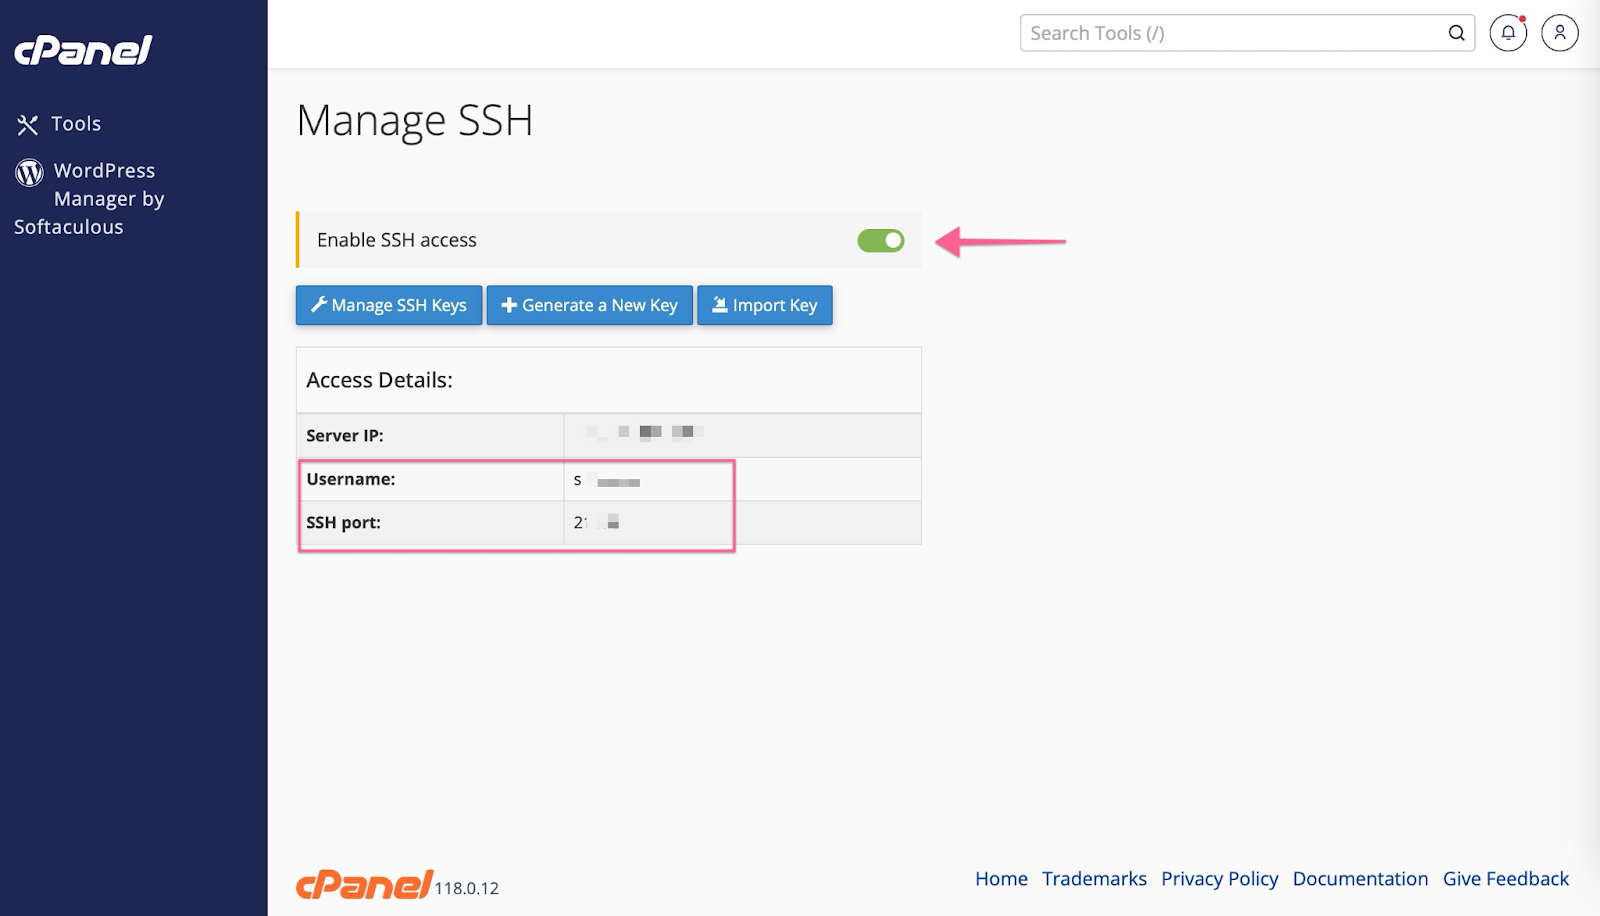
Namecheap:
Go to Manage Shell and then click Enable SSH access
Mochahost
Contact the Mochahost technical support team to enable SSH support for you.
How to Add and Authorize SSH Keys in cPanel
- Search for SSH from the cPanel home page. You should see a screen similar to this and click Manage SSH Keys:
- Click the Import Key button to add the public key provided by Kadence Backups. (Note that Kadence Backups will provide a unique public key for each site that you enroll.)
- Enter a descriptive name for the key
- Leave the “Private Key” box empty
- Paste the public key provided by Kadence Backups into the “Public Key” box.
- Save the key
- From the “Manage SSH Keys” screen, locate the new key in the list and click “Manage” as shown here:
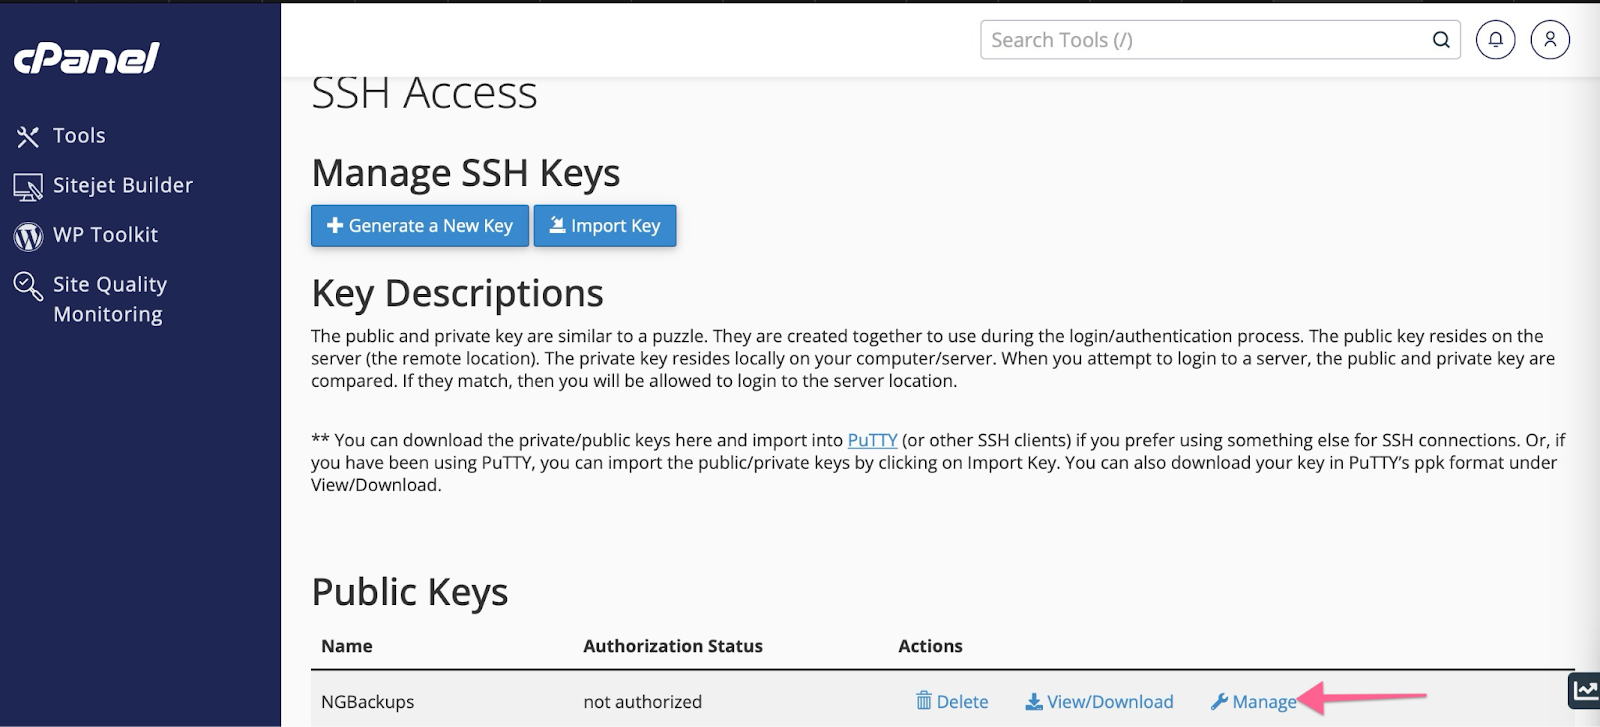
- Click “Authorize Key”
When keys and allowlists are in place, return to “Getting Started with Kadence Backups” and complete Test Server Connection.
Running into more issues? These links may help you: