

Solid Security
Kadence Security Global Settings and Notifications
Coming soon: Solid Security is becoming Kadence Security. You may see both names used while we update the product, documentation, and customer experience.
Once you’re up and running with Kadence Security (formerly Solid Security), it helps to understand how Security → Settings is organized.
The Settings area is your command center for global options, feature modules, notifications, user groups, and advanced hardening. This article covers Global Settings and Notifications. For the other tabs, see:
- Kadence Security Features Settings — Features tab (Login Security, Firewall, Site Check, Utilities)
- Kadence Security User Groups and Advanced Settings — User Groups and Advanced tabs
In wp-admin, open Security → Settings. Save changes after each tab when you’re done editing.
Global Settings
The Global tab contains plugin-wide options and controls how Kadence Security identifies visitors, logs events, and writes rules to server files.
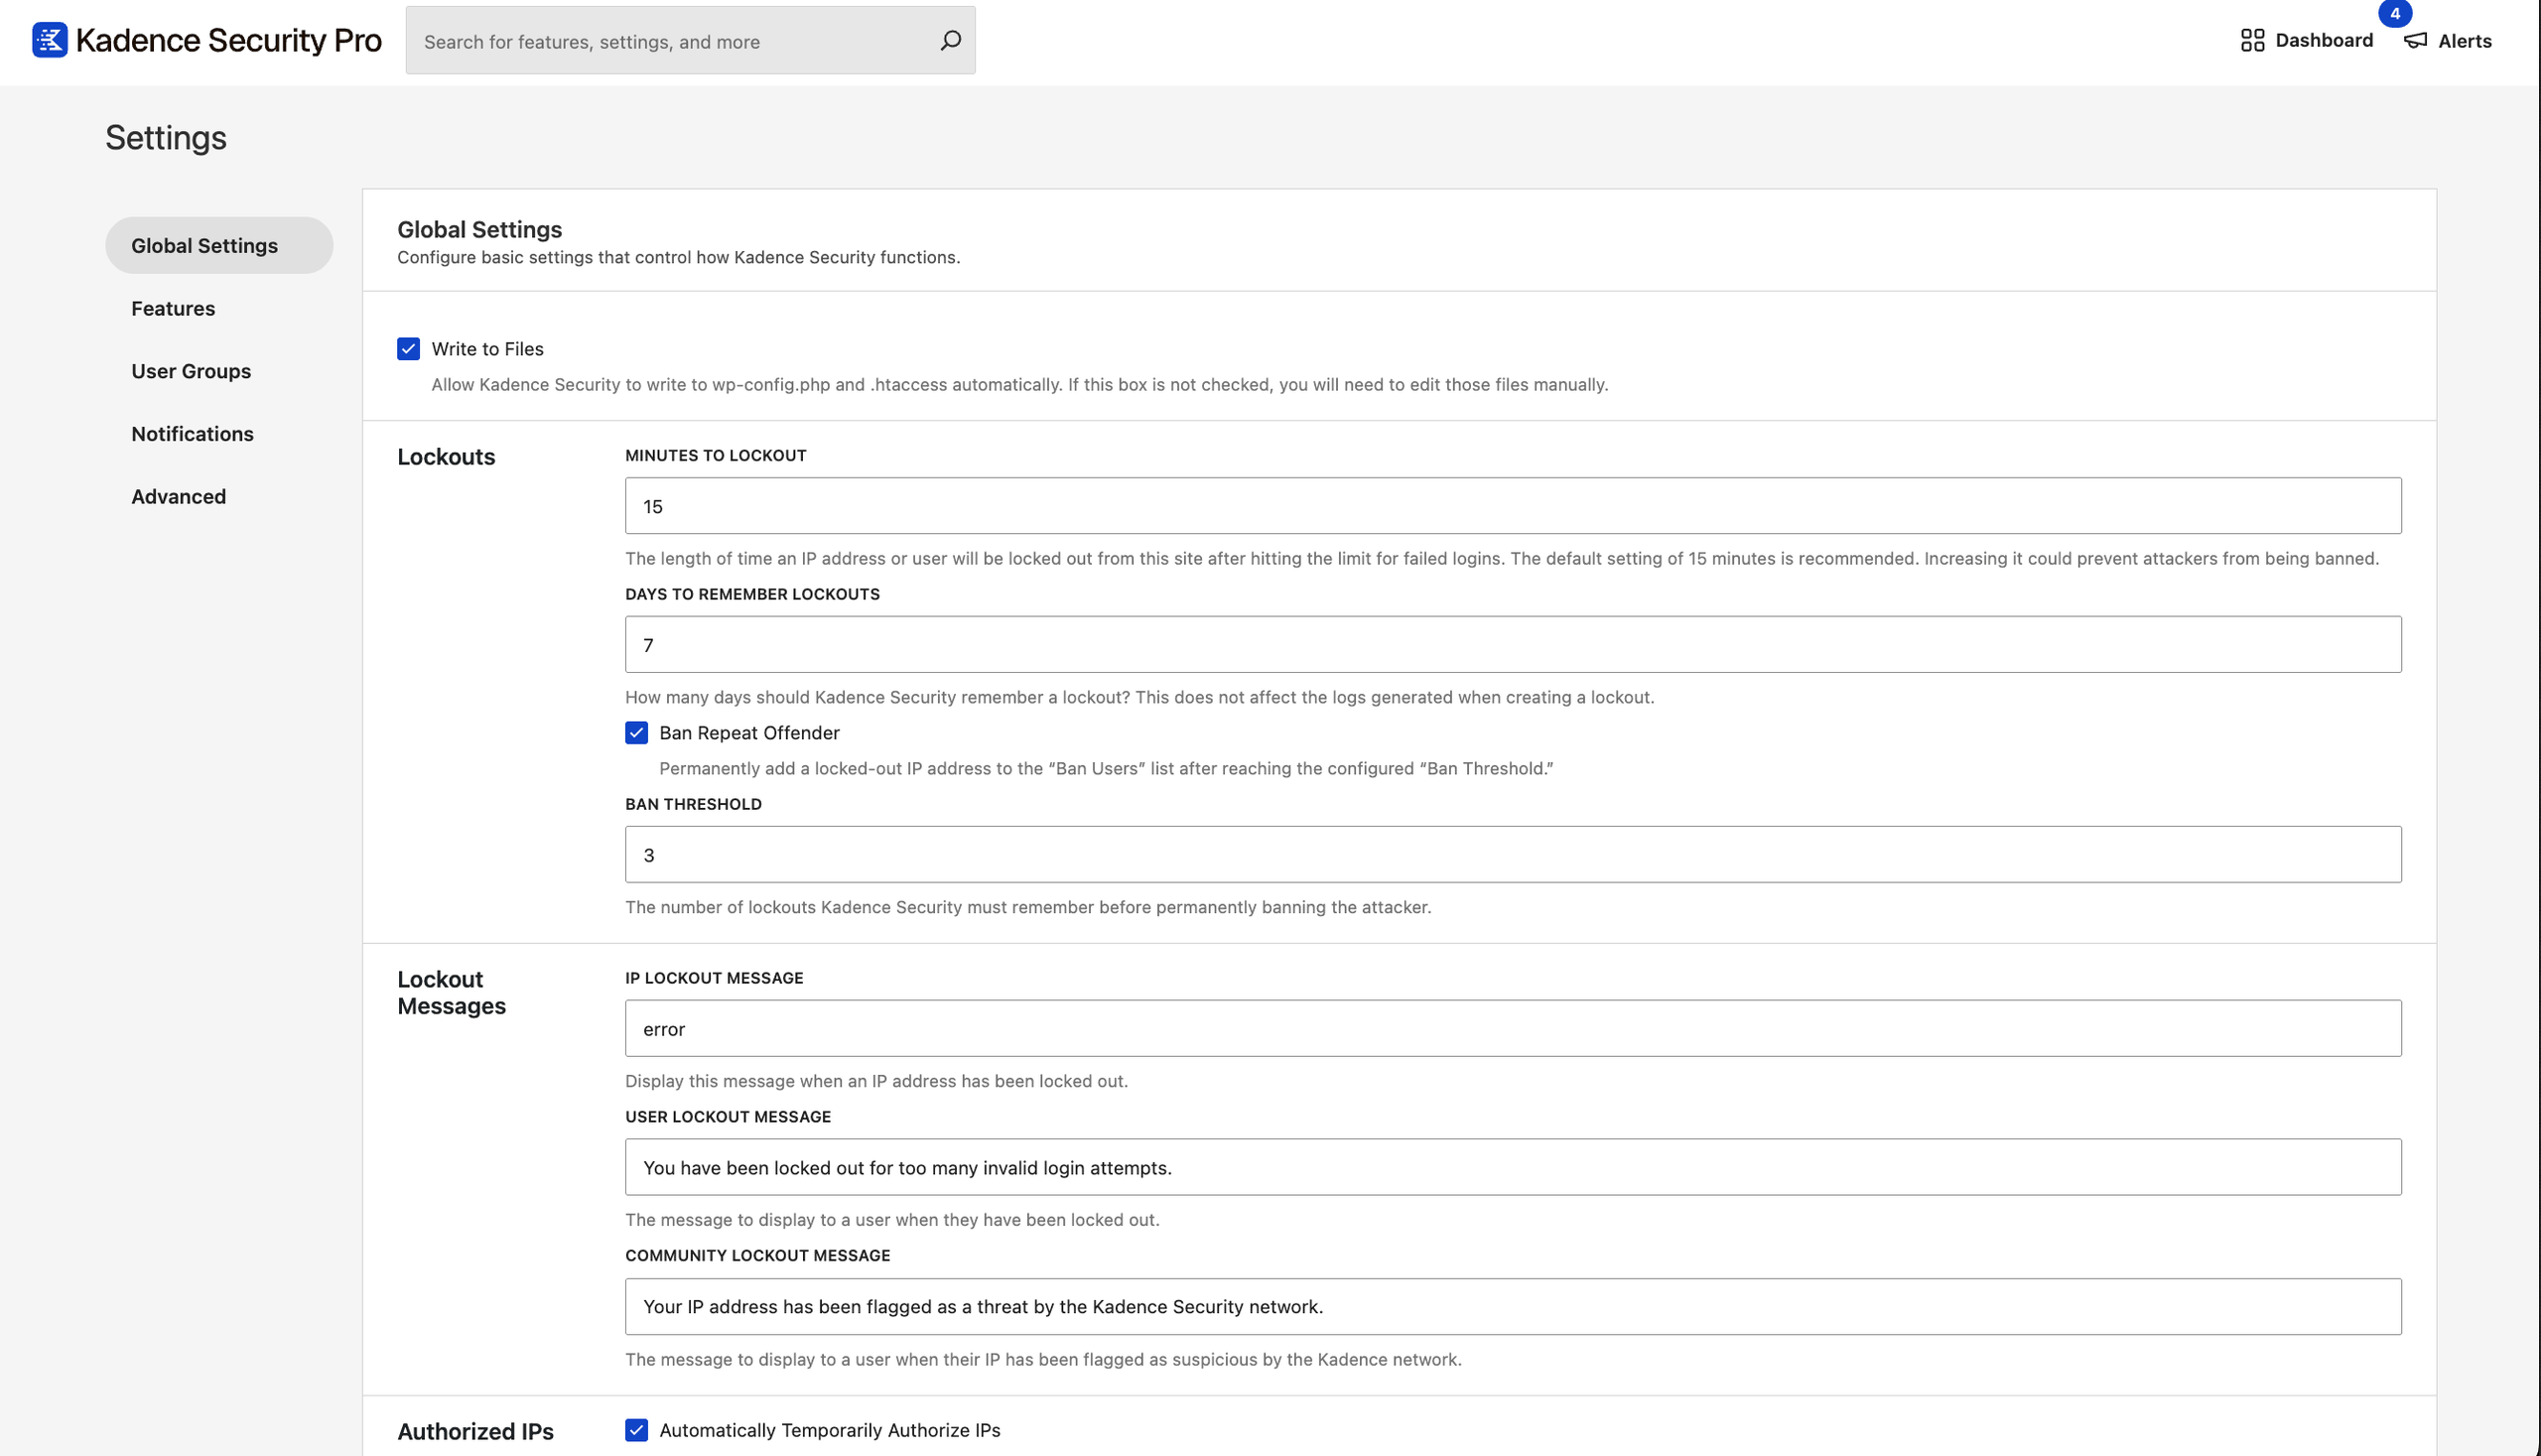
Write To Files
Write To Files lets Kadence Security update wp-config.php and .htaccess (or your configured NGINX rules path).

How It Works: When enabled, Kadence Security runs an hourly “flush” job that regenerates and writes security rules. When disabled, that flush does not run.
Risks: On low disk space, a failed write can truncate config files and break the site.
Best Practices:
- Leave Write To Files enabled in most cases (default on) and ensure adequate disk space.
- If you’ve experienced issues related to the file writing functionality (e.g., leaving config files empty or in an unfinished state), disable the Write To Files setting. Existing rules in wp-config.php/.htaccess remain intact, and the plugin will continue to work. On NGINX, rules use your configured path and may require a reload.
- Maintain a known-good version of
wp-config.phpand.htaccessto restore quickly if something goes wrong. - If Kadence Security adds directives while Write To Files is off, add them manually under Security → Tools. See All About Kadence Security’s Tools.
Lockouts
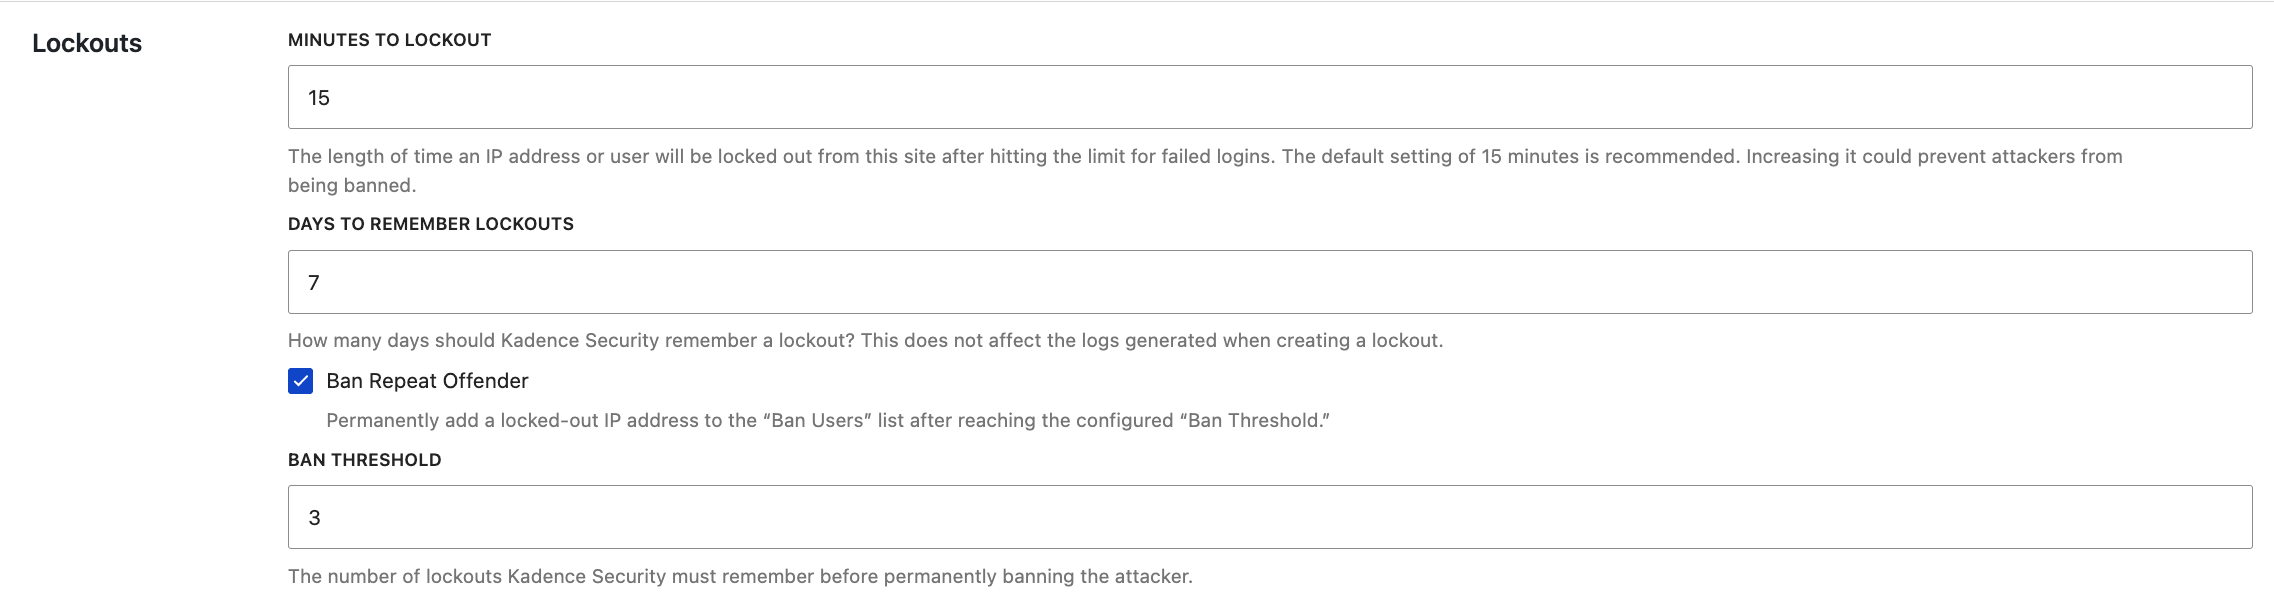
In Lockouts, you can configure Site Lockout behavior:
- How long a host or user stays locked out after too many bad logins
- How long Kadence Security should remember a lockout
- How many attempts are allowed before a permanent ban
The default configured values per setting are recommended for most sites, so you can leave them as is.
For information on releasing lockouts, see “Releasing Site Lockouts” in Solid Security.
Lockout Messages
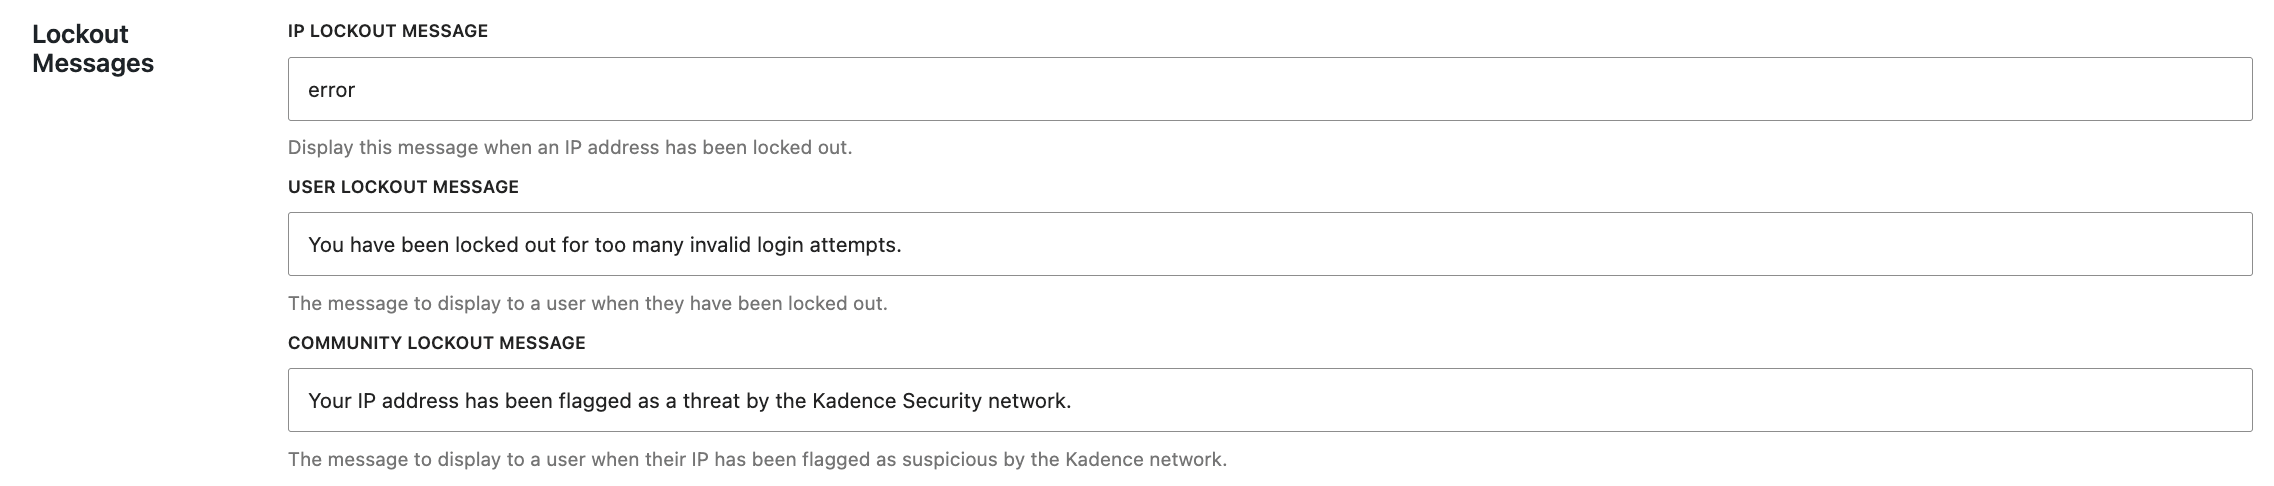
Lockout Messages lets you customize the messages the users will see when they encounter a lockout:
- Host Lockout Messages: The message shown to a locked-out IP address.
- User Lockout Message: The message shown when a username is locked out.
- Community Lockout Message: The message shown when an IP is flagged by the Kadence Security network.
Note: If the lockout screen displays the text “error“, this is not an indication of a system error. It is a fallback message that appears when a host/IP lockout occurs independently of a specific user. In this case, the User Lockout Message does not apply, so the plugin defaults to the general message, which displays the “error” text if no custom message has been set.
Customizing the Lockout Screen
Out of the box, Kadence Security does not ship a full lockout page template editor. However, the default lockout text can be customized under Lockout Messages to provide more branded or user-friendly messaging.
For visual customizations, such as adding a logo, you can use the following hooks:
itsec_lockout_template_before_actions– Inserts content before the action links on the lockout screen.itsec_lockout_action_links– Adds custom links or elements within the action section of the lockout screen.
You can use these hooks with a small must-use (MU) plugin or a custom code snippet to adjust the lockout screen’s appearance.
Authorized IPs
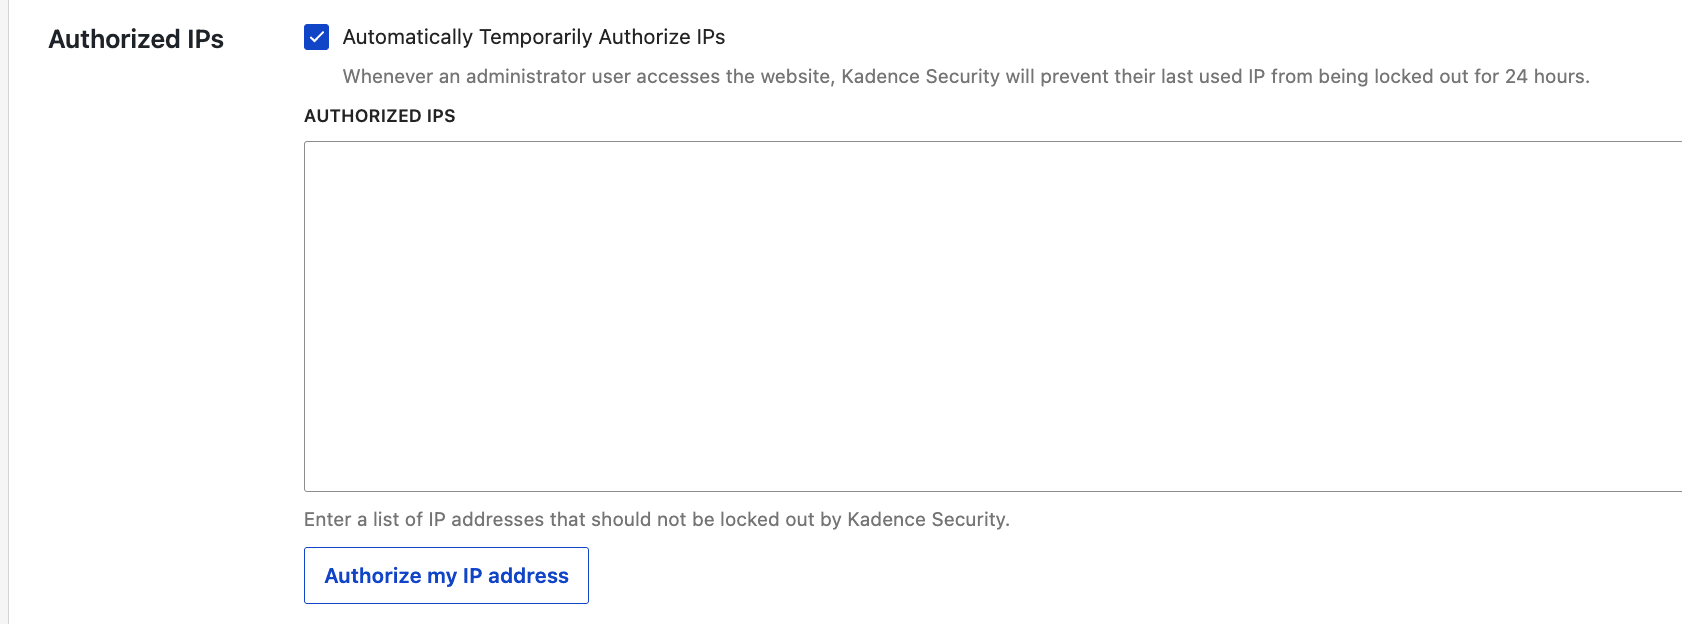
Authorized IPs lets you allowlist IP addresses to prevent getting locked out by Kadence Security after triggering the Site Lockout conditions.
The list accepts single IP addresses (IPv4/IPv6) and IP ranges as input. To whitelist an IP range, use either the wildcard or CIDR notation formats. The IPs and IP ranges should be entered on separate lines.
Using the wildcard format is recommended, and here’s an example of how to:
For:
64.233.160.0 64.233.191.255
Will be using a wild card since it’s including the whole range:
64.233.160.*
If using CIDR notation, a range like 64.233.160.0/24 can be added directly.
Automatically Temporarily Authorize Hosts: When enabled, users in the Administrator role are not locked out for 24 hours after a successful login.
See also All about Firewall with Kadence Security for firewall ban lists and dashboard IP bans.
Logging
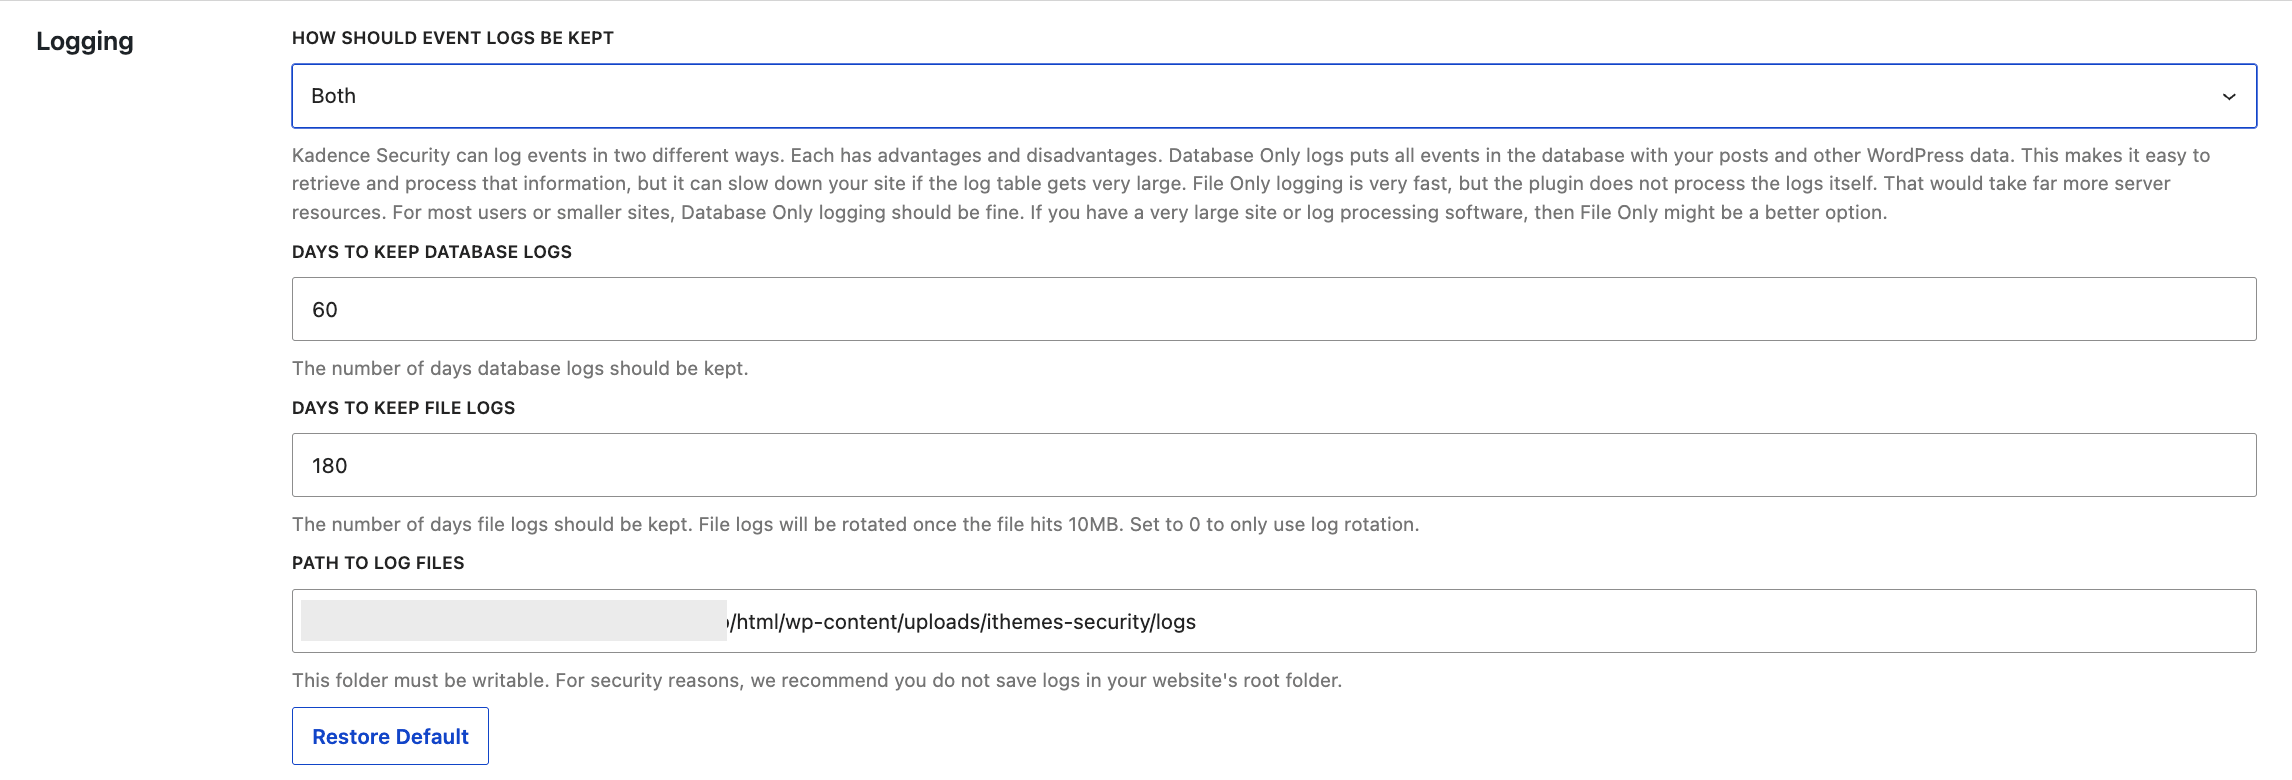
In Logging, you can choose how event logs are stored (File, Database, or both), retention, and file path. The default configured values per setting are recommended for most sites, so you can leave them as is.
For reviewing log details, see Security Logs.
IP Detection
Kadence Security relies on IP Detection to identify visitors, apply firewall rules, and enforce lockouts. Correct configuration matters if your site is behind a proxy service like Cloudflare or a load balancer.

Proxy Detection options
- Security Check Scan (Recommended) – API check to recommend the correct configuration.
- Cannot see this option? On Basic, enable Security Check Pro under Security → Settings → Features → Utilities first if this option is missing.
- Unconfigured – Uses proxy headers in a fixed order. In earlier versions of Kadence Security, this option was labeled “Automatic (Insecure)”.
- Warning: choosing this option disables certain Firewall features because it is susceptible to IP spoofing.
- Manual – Choose the HTTP header that contains the client’s real IP. If using a Proxy service, make sure to configure the correct header, such as
CF-Connecting-IP. - Disabled – In cases where no Proxy is set up on the server, select this option. It ensures that the system consistently reads from
REMOTE_ADDR
Correct IP Detection Behind Cloudflare
If your site uses Cloudflare, configure IP Detection to the correct header to ensure that Kadence Security is reading the right header:
- Set Proxy to Manual.
- Choose the header:
HTTP_CF_CONNECTING_IP(Cloudflare best practice). - Avoid relying on
HTTP_X_FORWARDED_FORunless you’ve confirmed that it matches the true client IP.
Why High-Volume Traffic May Not Appear in Kadence Security Logs
If you’re seeing traffic spikes in your Cloudflare, Statify, or hosting provider tools but not in Kadence Security, this behavior is expected, and here’s why: Kadence Security logs security events (violations, lockouts, scans), not every page view. Cloudflare or hosting analytics can show higher volume than Security → Logs or dashboard firewall counts.
Other

The Other section on the Global tab includes options unrelated to lockouts, logging, or IP detection.
Hide Security Menu in Admin Bar – When enabled, this removes the Security Messages menu from the WordPress Admin Bar. Notifications will only appear on the Kadence Security dashboard and settings pages.
Allow Data Sharing – When enabled, Kadence Security shares anonymous usage data with Liquid Web, the company behind Kadence Security, to help improve the product.
Once you’ve covered the Global Settings, don’t forget to save your changes!
Notifications
The Notifications area lets you manage and configure email notifications from Kadence Security across various modules.
The first thing you see on the Notifications page is an option to change the From Email address and the Default Recipient list.
| FROM EMAIL | Kadence Security will send notifications from this email address. Leave blank to use the WordPress default. |
|---|---|
| Default Recipients | Set the default recipients for any admin-facing notifications. |
It is best to leave the FROM EMAIL field blank unless you are using something like [email protected] instead of your admin user email to avoid failures.
You can also use third-party services such as Sendgrid, Postmark, Mandrill, etc., and/or use an SMTP plugin to better handle emails and avoid email delivery issues.
If Kadence Security notifications are enabled but mail never arrives, confirm Settings → General admin email, then see Understanding Email Deliverability in WordPress and Troubleshooting Common Email Problems for troubleshooting tips.
Email Notifications
Security Digest
During periods of heavy attack, Kadence Security can generate a lot of emails. Enabling Security Digest will reduce the number of emails sent so you can receive a summary of lockouts, file change detection scans, active and mitigated vulnerabilities, and privilege escalations.
Note: You will need to disable the Lockout Notification if you do not want to receive a notification for each lockout.
Site Lockouts
Enabling Site Lockouts will send you emails when a user or host is locked out of your website.
The Site Lockout Notification is “all or nothing” and if your site is experiencing a DDOS-style attack or other bot-driven login attack, having the Site Lockout Notification enabled can trigger an alarming number of emails. First: don’t panic. A Site Lockout Notification is a great sign that Kadence Security is working. Next: there’s no danger in disabling this notification and relying on your dashboard for keeping track of lockouts.
Database Backups
The Database Backups notification will send a copy of any backups to the email addresses you listed as the recipient. This is only available when the Database Backups module is activated and configured.
If you use Kadence Backups or another backup solution for full-site backups, you may rely on that product’s alerts instead of this notification.
File Change
The File Change module sends a File Change email containing a file scan report after changes are detected relative to the previous day’s scan. This is only available when the File Change module is activated and configured.
Unrecognized Login
When the Trusted Devices module is active, you can enable the Unrecognized Login email notification to have Kadence Security send registered users a notification when a login occurs from an unrecognized device.
Learn more: Understanding Trusted Devices in Solid Security.
Settings Export
The Import Export module sends an email with the settings export file attached.
Magic Links Lockout Bypass
The Magic Links module sends an email with a Magic Link that bypasses a Site Lockout.
Note: The default email template already includes the
login_urltag.
Site Scan Results
The Site Scan Scheduling module (listed under Features → Site Check as Scheduled Site Scan) sends an email if it discovers an issue or has repeated difficulty conducting the scan.
When Scheduled Site Scan is enabled, automatic site scans run 4 times per day on Basic and hourly on Pro. Emails are not sent on every scan. Site Scan Results notifications are sent when a scan finds issues that warrant a warning, when the site scanner detects a plugin or theme with a known vulnerability that meets your Vulnerability Notification Threshold and was not identified in the previous scan, or when repeated scan failure is detected.
You can turn this notification on or off and choose recipients on the Notifications tab; threshold options are under Scheduled Site Scan on the Features tab.
For more on scans and scheduled scanning, see All about Kadence Security Site Scans.
Passwordless Login
The Passwordless Login module sends an email with a link to log in automatically.
Note: The default email template already includes the
login_urltag as a button.
Two-Factor Email
The Two-Factor Authentication module sends a Two-Factor Email containing the Two-Factor Authentication Code to users who use email as their two-factor provider.
Two-Factor Email Confirmation
The Two-Factor Authentication module sends the Two-Factor Email Confirmation to users when they are setting up Two-Factor, containing the Authentication Code. Try to keep the email similar to the Two-Factor Email.
Note: Disabling this email will disable the Two-Factor Email Confirmation flow.
Two-Factor Reminder Notice
The User Security Check module allows you to remind users to set up Two-Factor Authentication for their accounts by sending a Two-Factor Reminder Notice email.
Inactive Users
The User Security Check module sends you a list of users who have not been active in the last 30 days via the Inactive Users email, so you can consider demoting or removing inactive users.
Automatic Updates Info
The Version Management module will send the Automatic Updates Info email with details about any automatic updates that have been performed.
Old Site Scan
The Version Management module will send the Old Site Scan email if it detects outdated WordPress sites on your hosting account. A single outdated WordPress site with a vulnerability could allow attackers to compromise all the other sites on the same hosting account.
Which emails should I enable?
Depending on how your site is set up, you may want to stop receiving certain notifications while keeping track of important ones so you stay informed without overwhelming your inbox.
In that case, here are the recommended notifications to keep enabled:
- Security Digest: Receive a daily or weekly summary of Site Lockouts, File Change scans, Vulnerabilities, and Privilege Escalation notices, so you’re aware of key security events without getting constant emails.
- Site Lockouts: Get notified when someone is locked out of your site due to excessive login failures or security rules.
- Site Scan Results: Stay updated on any vulnerabilities found during scheduled site scans.
- All 2FA Emails: Required when Two-Factor Authentication is enabled, so users can receive their authentication codes.
On the other hand, the below are optional and can be adjusted based on what you want real-time emails for:
- Database Backup: Enable if you use the built-in database backup feature. If you use a separate backup plugin that sends its own alerts, this is not needed.
- File Change: Optional, as Security Digest can be enabled instead. Note that Security Digest only shows a brief message about detected file changes, so you’ll have to look at the Security Logs to see the full list of detected changes.
- Settings Export: Alerts you if someone exports your security settings. Mainly useful for admins managing larger teams.
- Inactive Users: Helpful for sites with multiple users, so you can track and manage stale accounts.
- Automatic Updates Info: Useful if you don’t already get automatic update notifications from your hosting provider, WordPress core, or other plugins. Otherwise, this may send duplicate information.
Related: Kadence Security Features Settings · Kadence Security User Groups and Advanced Settings · Security Logs · All about Kadence Security Site Scans · Kadence Security Two-Factor Authentication (2FA) Settings Guide