

Solid Security
All about Kadence Security Site Scans
Coming soon: Solid Security is becoming Kadence Security. You may see both names used while products, documentation, and customer experiences are updated.
The Site Scans page is where you can run a manual site scan and review the results. In wp-admin, go to Security → Site Scans to access it.
Kadence Security’s Site Scanner scans your site for security issues found in these areas:
- Vulnerable Plugins
- Vulnerable Themes
- WordPress Core Vulnerabilities
- Two-Factor
- Password
- Inactive Users
- Rogue Installs
- Checks if Google Safe Browsing has flagged your site as containing malware (Site Blacklist Status)
To run a manual Site Scan, go to the Site Scans page and select the “Start Site Scan“ button:
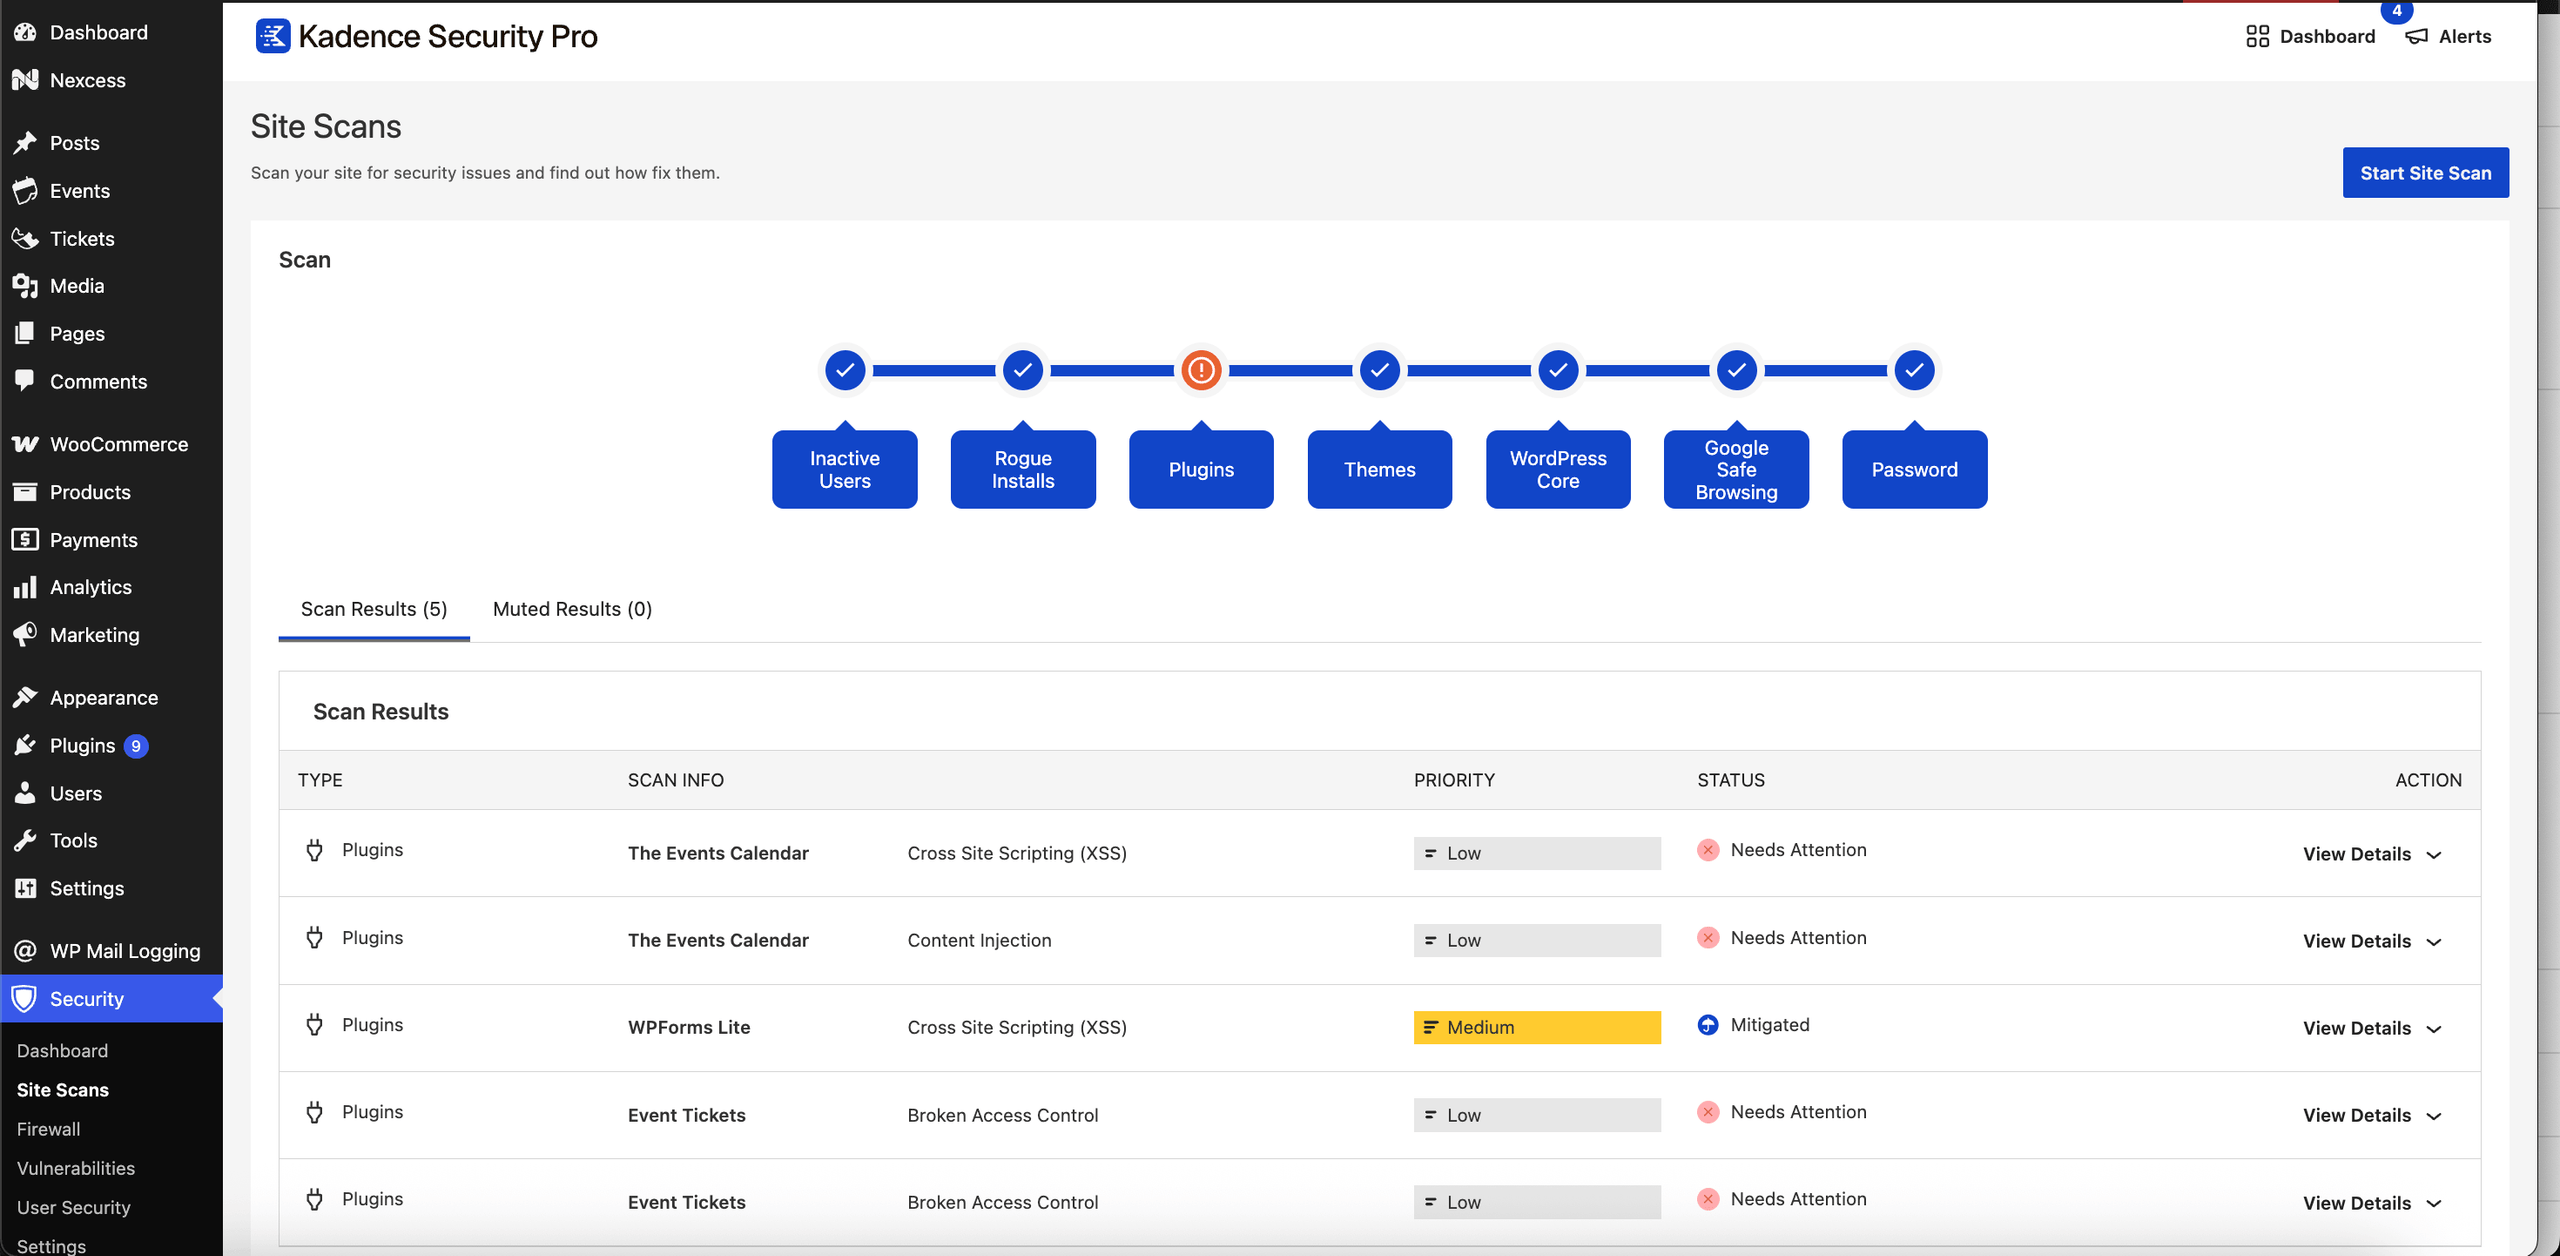
To view the results of previous Site Scans, visit the Security Logs page. For more details, see Security Logs and Diagnosis Tips: Raw Details of Site Scanner Logs.
What to do when the Site Scan finds an issue
Some issues surfaced by a site scan are false positives, or known risks that you may be intentionally taking. So the first action point when the Site Scan feature of Solid Security finds an issue is to take a deep breath: not all issues are worth immediate action.
Select the “View Details” dropdown to view additional details and recommended actions. You’ll also have the option to mute a security issue.
Here’s a brief rundown of the various checks and steps taken during a Site Scan, and what you can do to resolve issues that arise during that step.
Inactive Users
The Inactive Users check lists all site users that have been inactive for more than 30 days.
What to do: Review the identified inactive users and demote or remove them from the site.
Rogue Installs
The Rogue Installs check identifies “Rogue Installs” or old WordPress files/installations that are no longer in use and are on the same server. It’s uncommon for multiple copies of WordPress to be installed in the same root directory or nested into another directory within your WordPress site’s files, and this check detects those rogue installations.
What to do: Check the identified old sites and, if the site is still in use, update the installed WordPress version, plugins, and themes. You may also opt to delete or remove the rogue install via your web host’s file manager.
Plugins/Themes
The Plugins/Themes section lists all outdated and vulnerable plugins, themes, and WordPress core, along with their severity. For vulnerable plugins/themes, the severity column will display a Patchstack Priority vulnerability score that reflects the real-world risk the vulnerability poses to your site, helping inform your decision-making.
What to do: The most important thing is to look for an update. Most known vulnerabilities have updates available, and simply updating to the latest version will resolve the issue.
If no update is available, you have some trade-offs to weigh: first, check whether the plugin/theme is actively supported. For plugins or themes hosted on the official WordPress Plugin or Theme Directory, you can see when they were last updated. For other plugins, you may need to contact the developer. For non-major vulnerabilities, you may opt to leave the plugin/theme active. For more major ones, you might consider an alternative.
If you’re using Kadence Security Pro (formerly Solid Security Pro), you’ll have access to Patchstack Virtual Patching, which is a feature that can be enabled in Security → Settings → Features. See Vulnerability Protection with Kadence Security and All about Firewall with Kadence Security.
In many cases, virtual patches are available to mitigate identified vulnerabilities. In the event that a virtual patch is available for a particular vulnerability, Kadence Security Pro automatically applies it if the feature is enabled, protecting your site until the plugin/theme vendor releases an update to resolve the issue.
The Software Support team is more than willing to weigh in on specific vulnerabilities if you need additional insight beyond what the Patchstack Priority score provides. You can definitely reach out for clarification via your Software Portal support channels.
Also, if you are aware of the issue or otherwise no longer want to be notified about it, you can mute the issue.
If the site is connected to Kadence Central, vulnerability visibility may also appear in the Central Vulnerabilities view after the site completes its scan.
WordPress Core
The WordPress Core check looks for known WordPress Core vulnerabilities.
What to do: Ensure your installed WordPress Core is up to date.
Google Safe Browsing
The Google Safe Browsing step checks whether your site has been added to Google’s Safe Browsing Blocklist.
What to do: Follow these five key steps if your site is flagged as “deceptive” by Google’s Safe Browsing service:
- Scan your site for vulnerabilities and malware.
- Update or remove vulnerable themes and plugins.
- Find and remove any malware from your site.
- Submit a request to Google to have the warning flag removed. (To do this, navigate to the Google Search Console, go to Security & Manual Actions → Security issues, and select the button that says “Request Review.”)
- Confirm you are no longer on Google’s Blocklist.
Two-Factor
The Two-Factor audit lists all site users that have administrator-like capabilities but do not have Two-Factor enabled.
What to do: Send the user a Two-Factor Authentication Reminder email notification.
Password
The Password check lists all site users that have administrator-like capabilities but are using insecure passwords. Note that your passwords are not stored anywhere, so this check only finds insecure passwords that were made after that Kadence Security feature was enabled, so there may be false positives or inconclusive results if you have only recently installed Kadence Security and have not forced a password change.
What to do: Enable Strong Passwords in the User Groups settings to require users to create strong passwords.
How to activate automatic Site Scans?
To activate automatic scanning, navigate to Security -> Settings -> Features -> Site Check, and toggle the Scheduled Site Scan module ON.
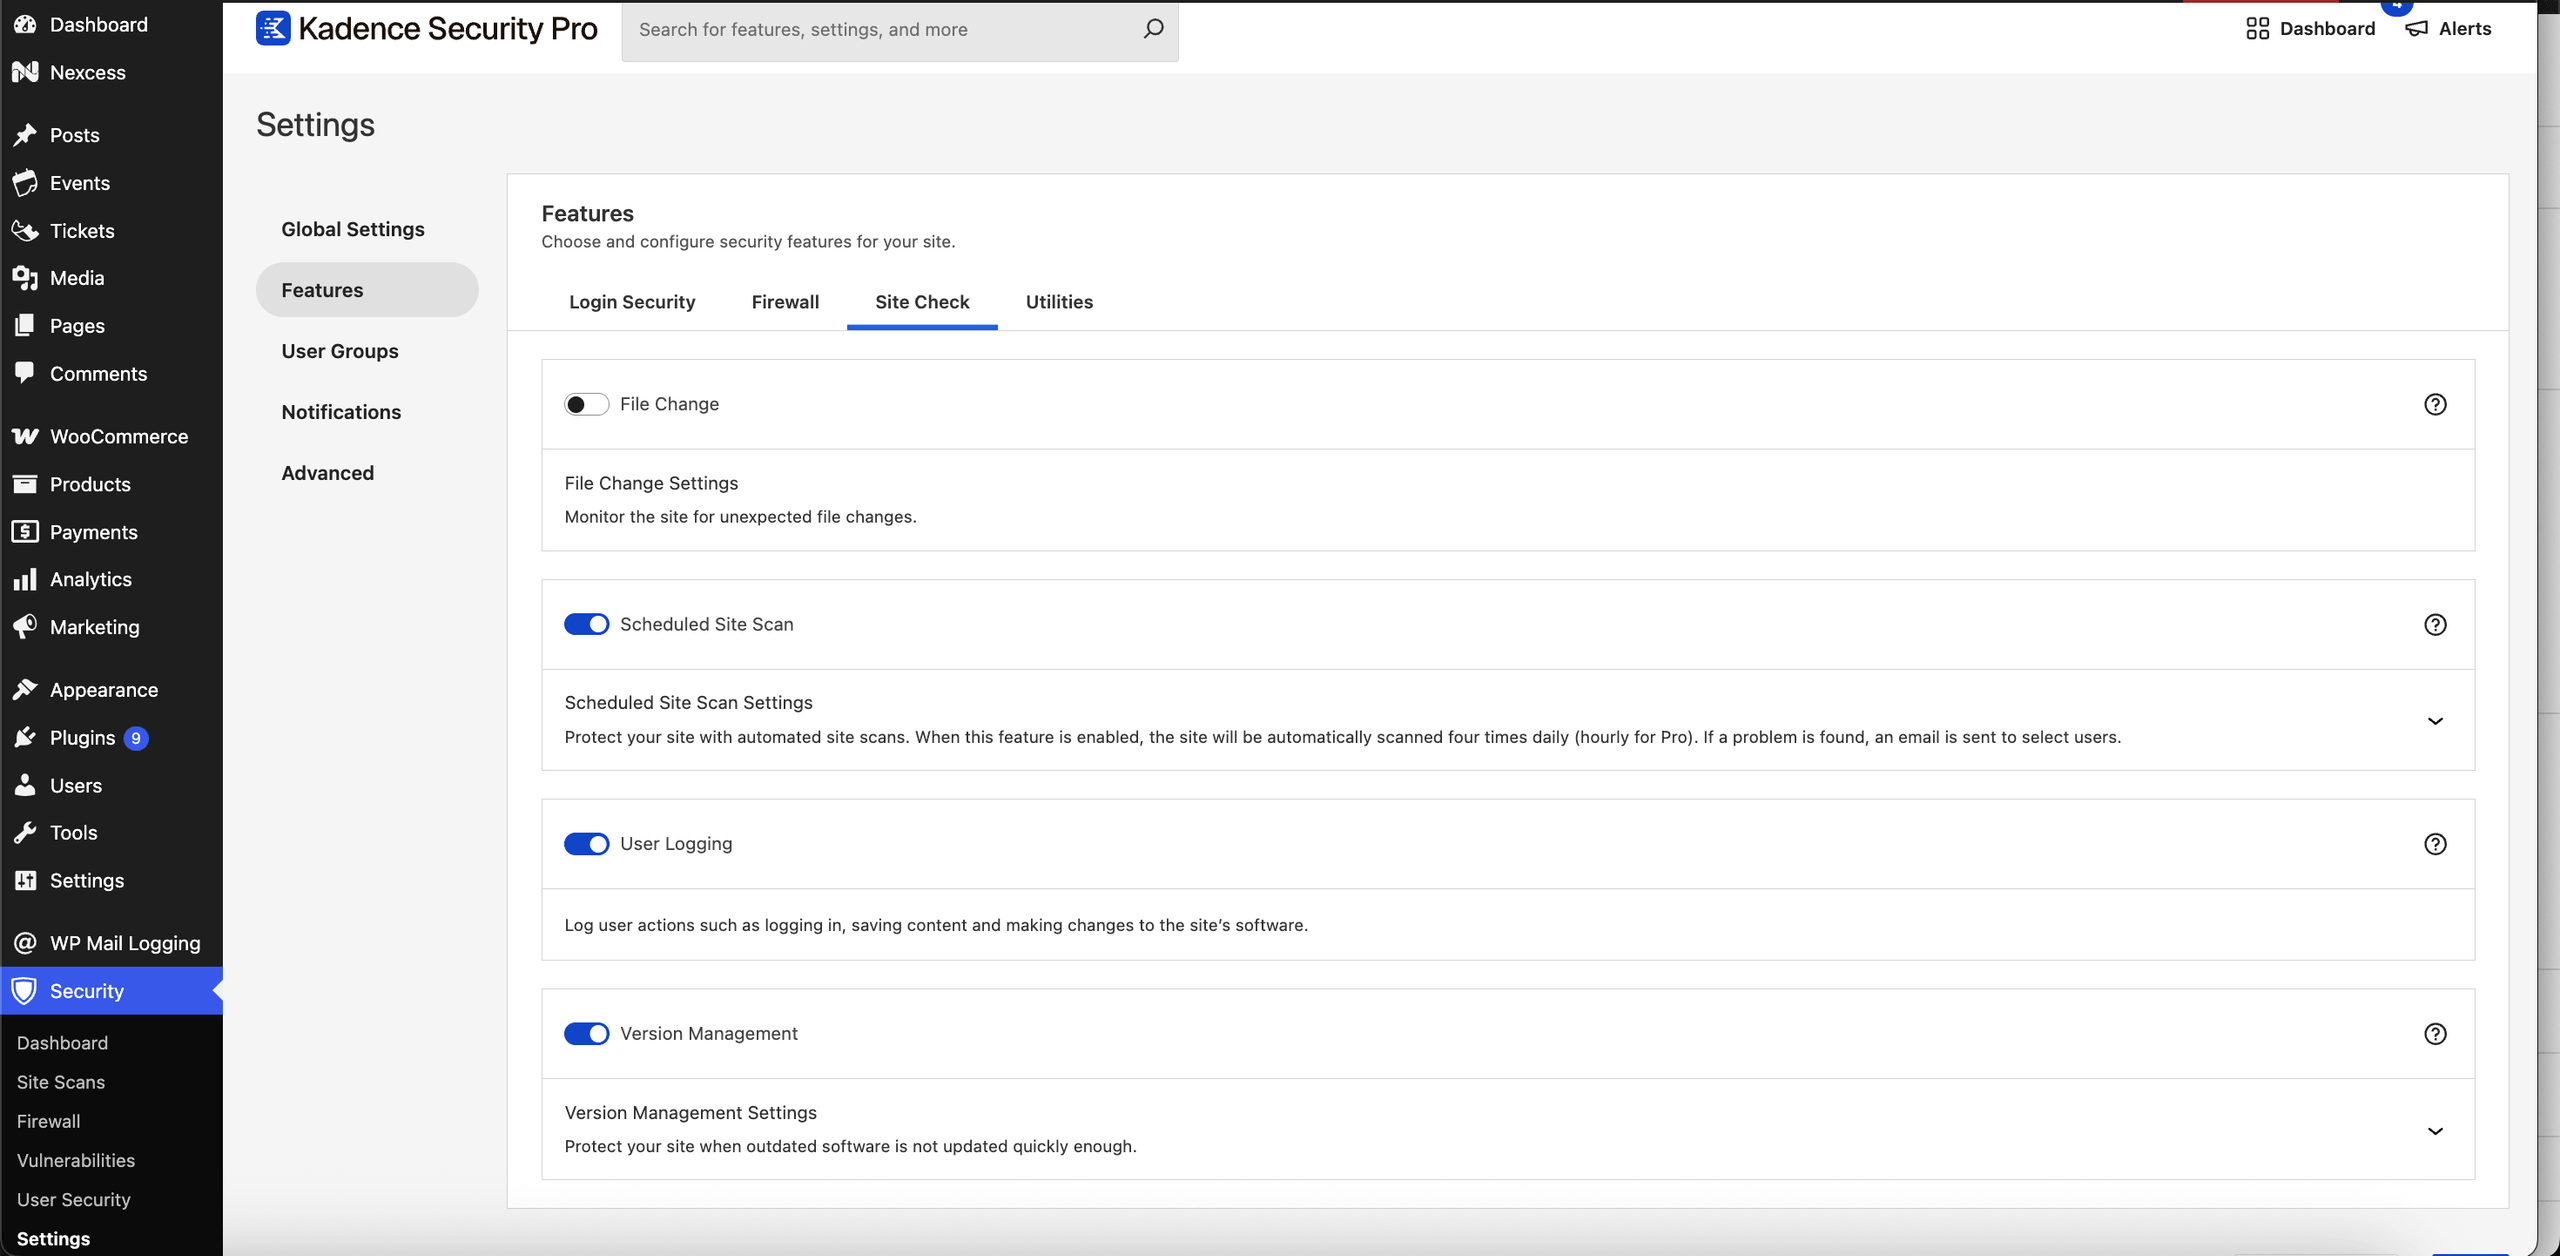
When Scheduled Site Scan is enabled, Kadence Security runs automatic site scans four times per day on Basic and every hour on Pro. If a scheduled scan finds issues that warrant a warning, Kadence Security can email Site Scan Results to selected users. For vulnerabilities, the email focuses on issues that meet the Vulnerability Notification Threshold (Scheduled Site Scan settings; default: medium and high priority) and were not already reported on the previous scan. Turn the email on or off and choose recipients under Notifications.
Muting a Site Scan issue
Whether you’re still waiting for a vulnerable software update or have confirmed that the Site Scan result is not an issue, Kadence Security gives you the ability to mute it so that you stop receiving notifications about a specific vulnerability/issue.
To mute a Site Scan result, open the “View Details” dropdown below the Action column and select the Mute Issue button.
All muted issues will not appear on the succeeding Site Scan “Scan Results” tab, but instead under the “Muted Results” tab. From there, you have the option to unmute the issue.
Does the Site Scan have an IP address I can whitelist?
Yes! In some cases, your host may block the Solid Security Scanner’s IP address. If this happens, you will need to have it whitelisted: 207.246.255.60
Allowlist this IP on your server firewall, security plugin, or CDN/WAF if scans fail with connection or forbidden errors. Kadence Central uses additional IPs; see Tips for troubleshooting Kadence Central if Central and scanning issues overlap.
For step-by-step help with scan error codes and log messages, see Troubleshooting Kadence Security Site Scan Errors.