

The Events Calendar
Setting Up Community Events and Tickets
This guide walks you through setting up Community Events so visitors can submit events to your calendar, and, if you like, sell tickets for them. To learn what Community Events can do for your site, see Introducing Community Events.
Before You Begin
- The Events Calendar must be installed and active. If you’re new to it, see Getting Started with The Events Calendar first.
- Install and activate Community. See How to Install and Update Your WordPress Plugins and Themes. If you’ve just purchased Community, its license key is added for you. The plugin works without an active license, but you need one for automatic updates. See Manage License Activations and Connected Sites and Using Your License on Staging and Development Sites.
- To sell tickets, you also need Event Tickets with Tickets Commerce set up, or Event Tickets Plus with WooCommerce.
- Optional: With Events Calendar Pro active, the submission form also lets submitters schedule recurring events and add virtual event details.
All Community settings are under Events > Settings > Community, on the tabs described below. Click Save Changes after you change the settings on each tab.
Step 1: Choose How Submissions Are Handled
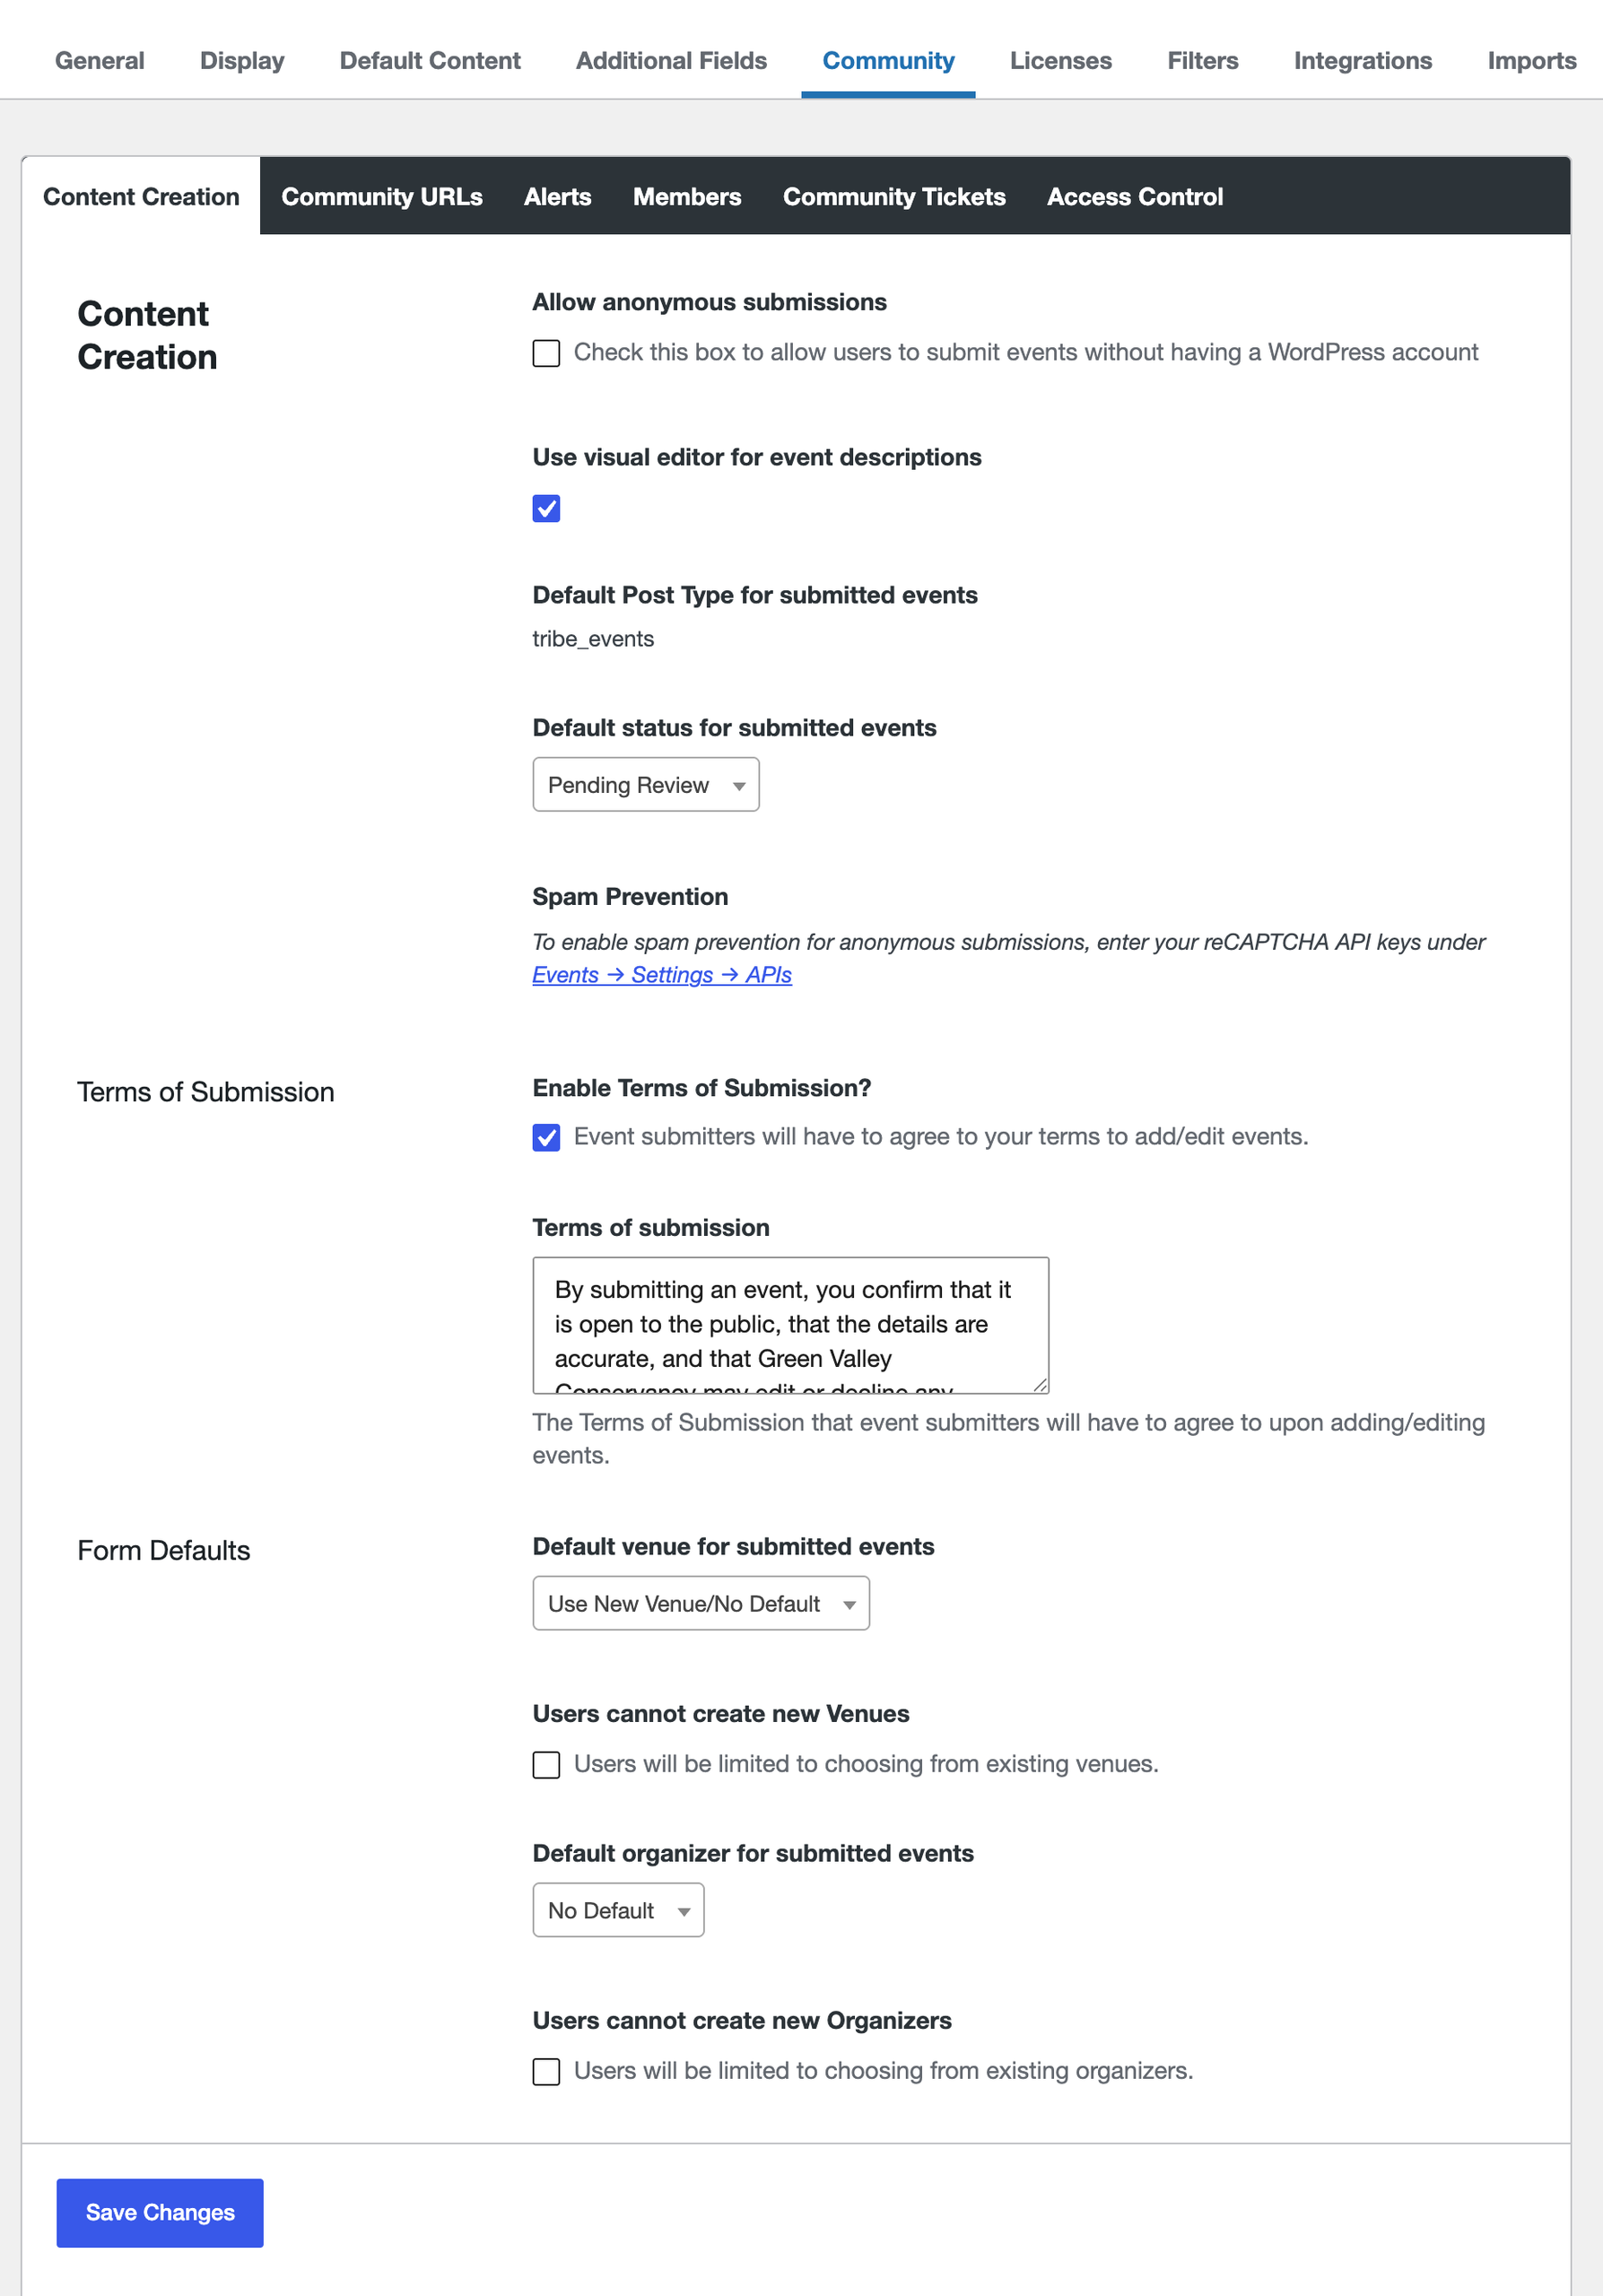
Open the Content Creation tab and configure these settings:
- Allow anonymous submissions: Off by default, so visitors must log in to submit an event. Check it to let anyone submit without a WordPress account.
- Use visual editor for event descriptions: Gives the description field a formatting toolbar instead of a plain text box.
- Default status for submitted events: Choose Draft (the default), Pending Review, or Published. We recommend Pending Review, so new submissions are easy to find in your Events list and nothing goes live before you check it.
- Spam Prevention: To add reCAPTCHA to the form, enter your reCAPTCHA keys under Events > Settings > Integrations in the reCAPTCHA API Keys section. reCAPTCHA is shown only to visitors who aren’t logged in.
- Terms of Submission: Check Enable Terms of Submission? and enter your terms. Submitters must check “I agree to the terms of submission” before they can submit or edit an event.
- Form Defaults: Choose a Default venue and Default organizer for new submissions, if you have one. Check Users cannot create new Venues or Users cannot create new Organizers to limit submitters to the ones already saved on your site.
If submitters need an account, make sure visitors can create one: go to Settings > General, check Anyone can register, and leave New User Default Role set to Subscriber.
Step 2: Decide What Submitters Can Change
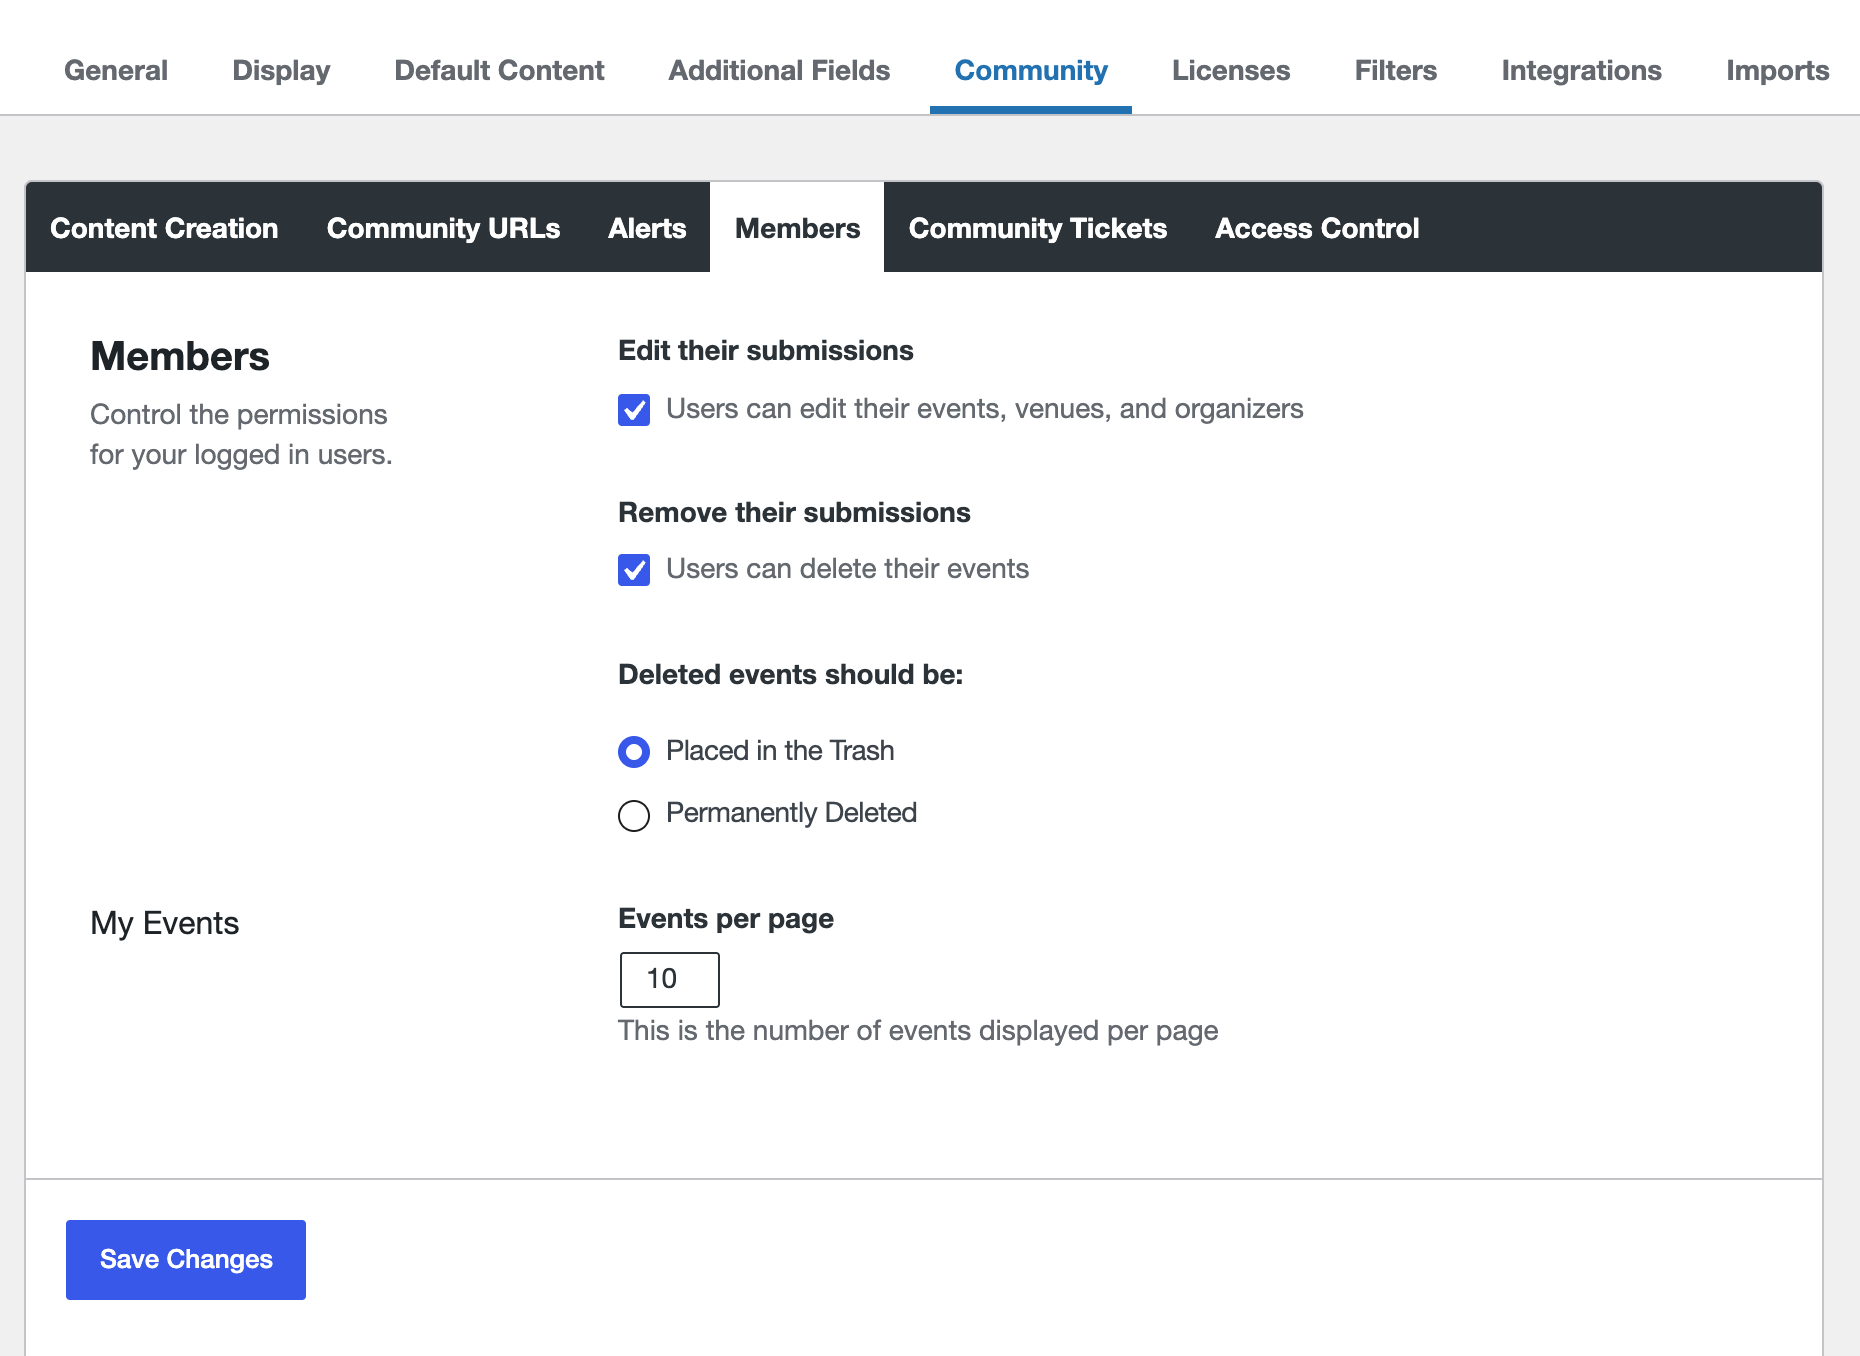
Open the Members tab. These settings apply to logged-in submitters:
- Edit their submissions: Lets users edit their own events, venues, and organizers.
- Remove their submissions: Lets users delete their own events. Under Deleted events should be, choose Placed in the Trash (the default) so you can restore an event deleted by mistake, or Permanently Deleted.
- Events per page: How many events each page of the My Events list shows. The default is 10.
Step 3: Get Notified About New Submissions
Open the Alerts tab and check Send an email alert when a new event is submitted. Under Email addresses to be notified, enter one address per line. It starts with your site’s admin email address. Each alert includes the event’s title in the subject line.
Step 4: Add the Submission Form to Your Site
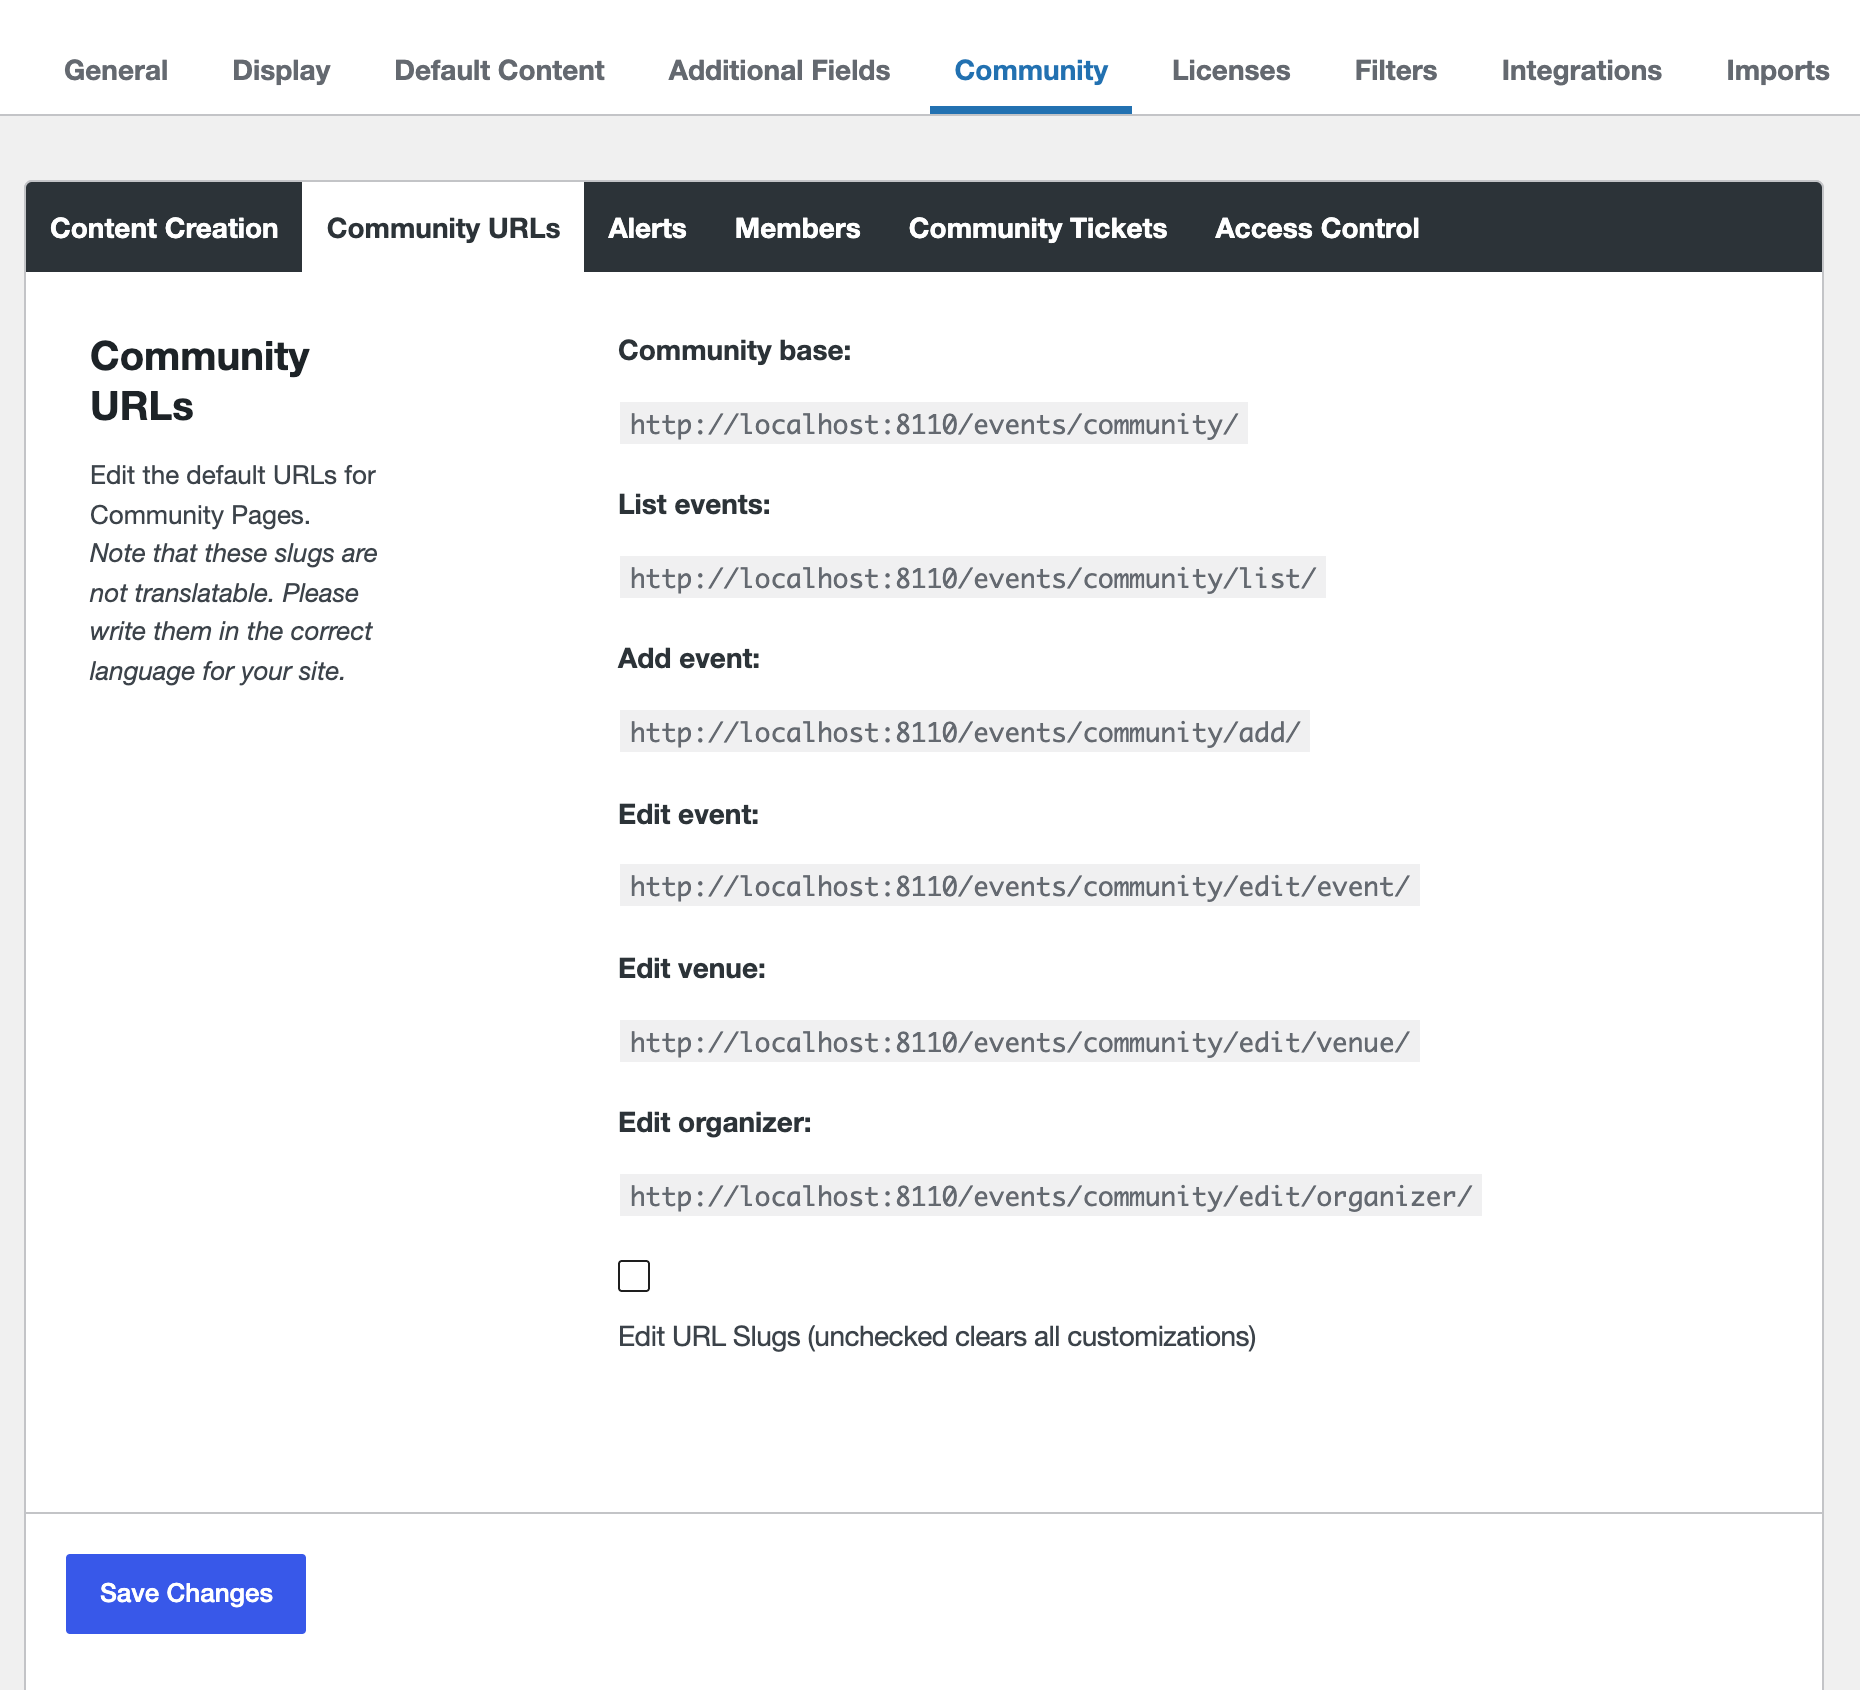
Community Events creates its pages for you. Open the Community URLs tab to see their addresses:
- Add event: The submission form, for example
https://yoursite.com/events/community/add/. - List events: The My Events page, where logged-in submitters see and manage their events, for example
https://yoursite.com/events/community/list/.
To change these addresses, check Edit URL Slugs and edit the slugs that appear. Slugs aren’t translated, so write them in your site’s language.
Next, link to these pages so people can find them:
- Classic themes: Go to Appearance > Menus, open Custom Links, enter the Add event URL with link text such as “Submit an Event”, and click Add to Menu. Add the List events URL the same way, with link text such as “My Events”.
- Block themes: Go to Appearance > Editor, select your site’s Navigation block, and add a custom link to each URL.
- Any page: Add the
[tribe_community_events]shortcode to show the submission form, or[tribe_community_events view="my_events"]to show the My Events list. See How to Use Community Events Shortcodes for more options.
Step 5: Review and Publish Submissions
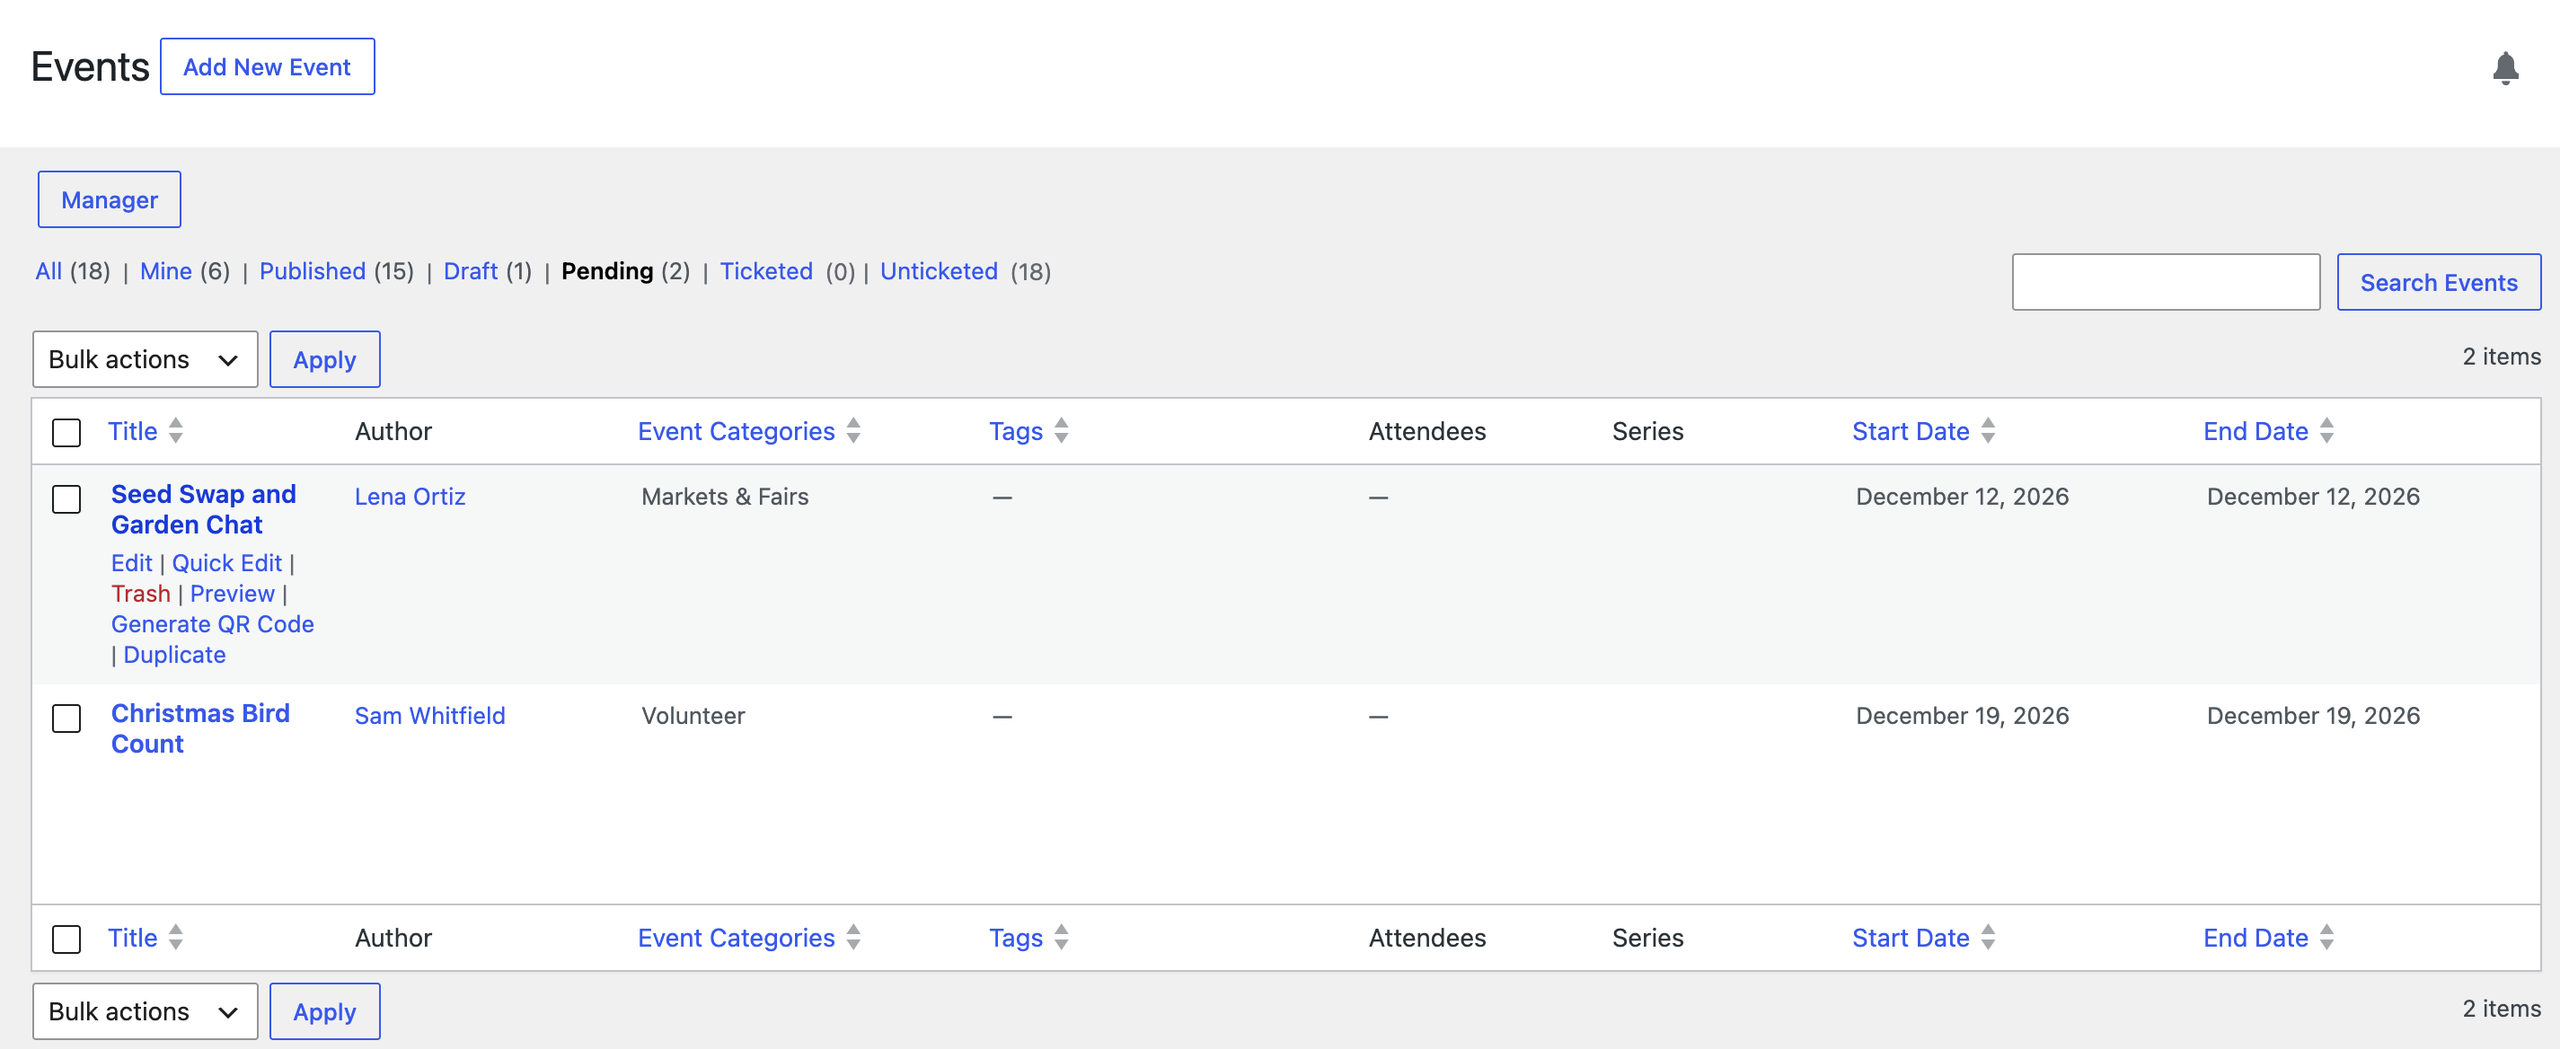
- Go to Events > Events and click Pending (or Draft, if you kept the default status). The Author column shows who submitted each event.
- Hover over an event and click Edit to review it. Correct anything that needs it, such as the category or venue.
- Click Publish. The event appears on your calendar, and its status changes to Published on the submitter’s My Events page.
For more on handling submissions, see Let Users Submit and Manage Events with Community Events.
Optional: Let Submitters Sell Tickets
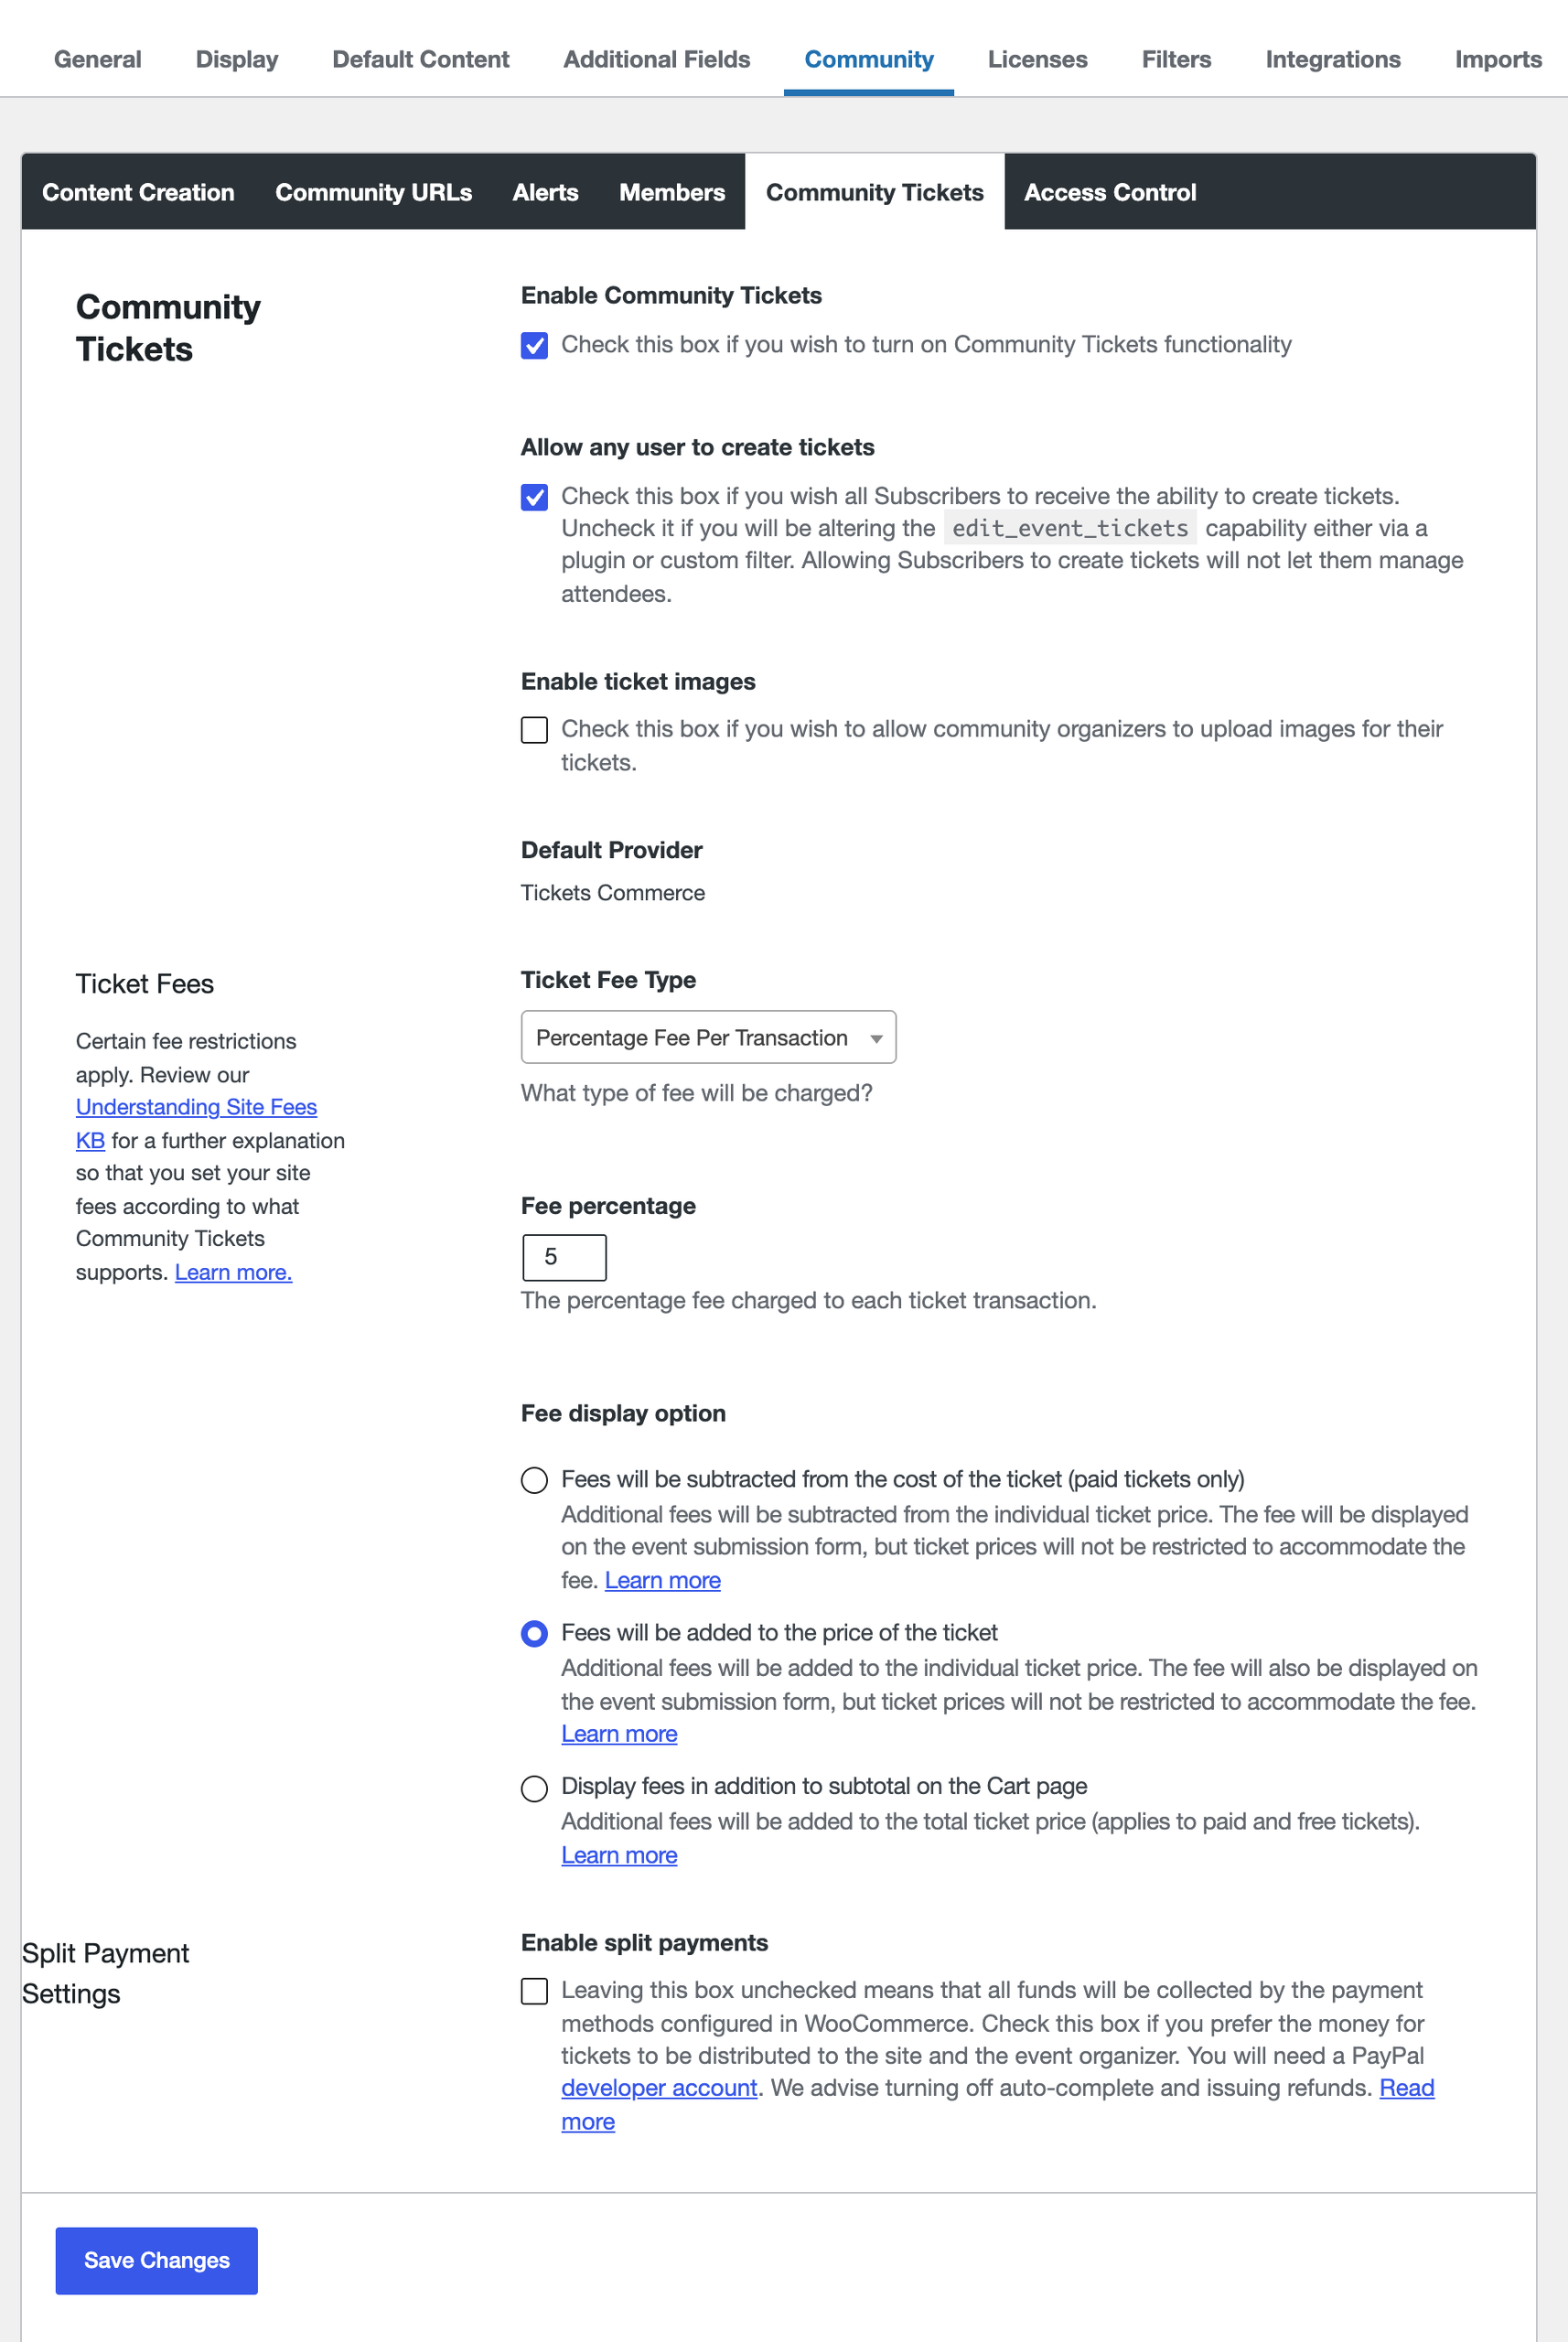
Open the Community Tickets tab:
- Enable Community Tickets: Adds a Tickets section to the submission form.
- Allow any user to create tickets: Lets every logged-in submitter, including Subscribers, add tickets. It doesn’t let them manage attendees. Uncheck it only if you control who can create tickets with the
edit_event_ticketscapability, for example with a roles plugin. - Enable ticket images: Lets organizers upload an image for each ticket.
- Default Provider: The e-commerce system that sells tickets created on the form. On a site with Event Tickets alone, this is Tickets Commerce.
- Ticket Fee Type: Choose None or a site fee: a flat fee per event or per ticket, a percentage per transaction, or a flat fee plus a percentage per event or per ticket. Enter the Fee percentage or Flat fee.
- Fee display option: Choose whether the fee is subtracted from the ticket price, added to the ticket price, or shown in addition to the subtotal on the Cart page.
- Split Payment Settings: When this is unchecked (the default), you collect every sale and pay organizers yourself. Automatic split payments through PayPal require WooCommerce.
Fee types, display options, split payments, and sales reports are explained in Selling Tickets for Submitted Community Events. If you collect a fee, also read Sales Tax and Marketplace Facilitator Laws for Community Events.
Note: An event with tickets or RSVPs can’t also be a recurring event.
Optional: Configure Access Control and Geography
Open the Access Control tab to limit what submitters see:
- Block access to WordPress dashboard: Keeps the roles you check under Roles to block out of the dashboard and hides the admin bar for them.
- Redirect URL: Where blocked users are sent when they try to open the dashboard. Leave it blank to send them to the My Events list.
- Single geography mode: Removes the country, state/province, and timezone fields from the submission form, which is useful when all your events are in one area.
Next Steps
Community Events is now set up. Explore these related guides:
- Introducing Community Events: See what Community Events can do, with common use cases.
- Configuring Community Events and Tickets: A reference for every Community setting.
- Customizing the Community Event Submission Form: Change the fields on the form.
- Customizing Community Events Pages: Change how the Community pages look.
- Troubleshooting Community Events: Fixes for common problems.