

Give
Analytics & Email Reports
Give’s Analytics & Email Reports Add-on allows you to receive donation statistics for specific time spans directly in your inbox. Analytics & Email Reports provides an easily digestible rundown of your donation income and changes over time, whereas per-donation notifications can fill your inbox and cause distraction. The following will guide you through the setup, configuration, and customization of the plugin.
Add-on Install and Activation
To get started, you will need to first have the Give plugin installed and activated. Next, you should download and activate the Add-on following these steps:
- Activate your license: Enter and save your Unified license at Give > Licensing. If you have an Individual license, enter and save your license at Give > Settings > Licenses. If you don’t see Give > Licensing yet, download the add-on from your portal and upload it under Upload and Activate an Add-on at Give > Settings > Licenses. The Licensing menu then appears.
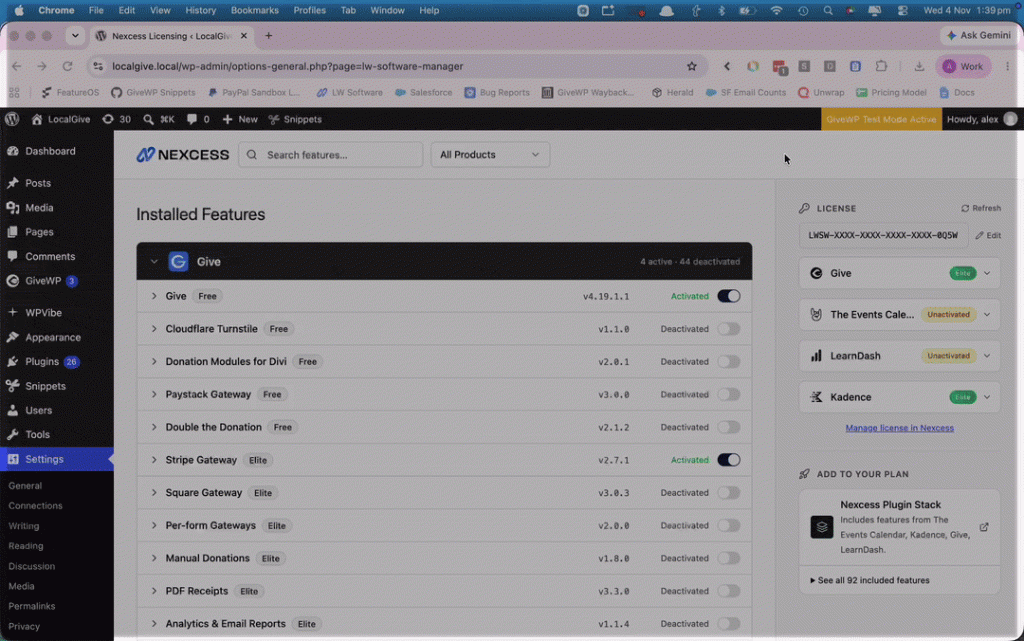
- Install and Activate the Add-on: Once the license is activated, navigate to Give > Licensing. There you will see a list of all the available add-ons. Find Analytics & Email Reports and toggle the button on the right-hand side. This will change the add-on’s status from Deactivated to Activated:
Note: You can always access your invoices, downloads, and licenses from your portal.
The Email Reports
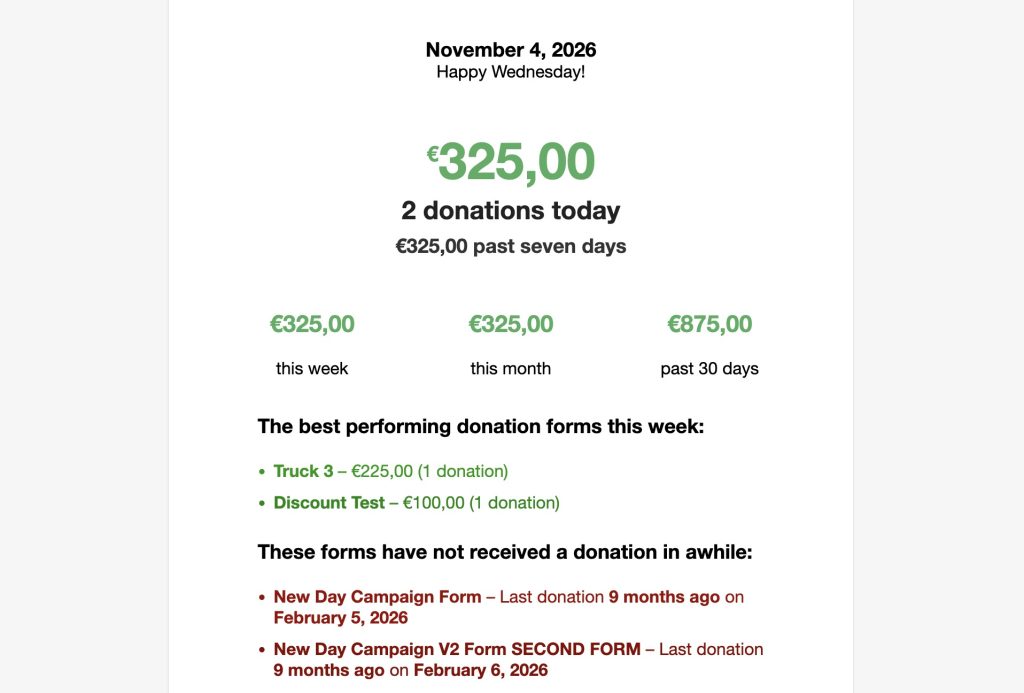
The add-on includes three email reports, all turned on by default. Here is a screenshot of the daily and monthly email reports:

Email Reports Settings
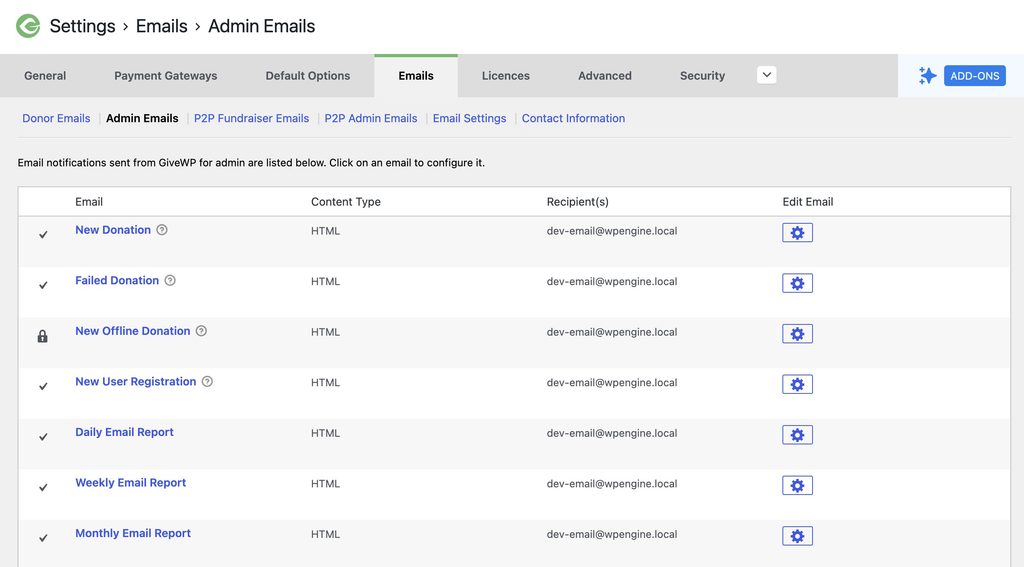
The main overview screen lists all available email reports alongside their current status.
To access it, go to Give > Settings > Emails > Admin Emails in your WordPress admin.
From this screen, you can toggle reports on or off at a glance: click the cross icon next to a report to activate it (it will turn into a checkmark). To configure the schedule, recipients, and content for a specific report, click the gear icon on the far right. If you turned a report off on its settings page, turn it back on from that same page and save.
Scheduling Reports
After clicking the gear icon for your chosen report (Daily, Weekly, or Monthly), you are taken to its individual settings screen.
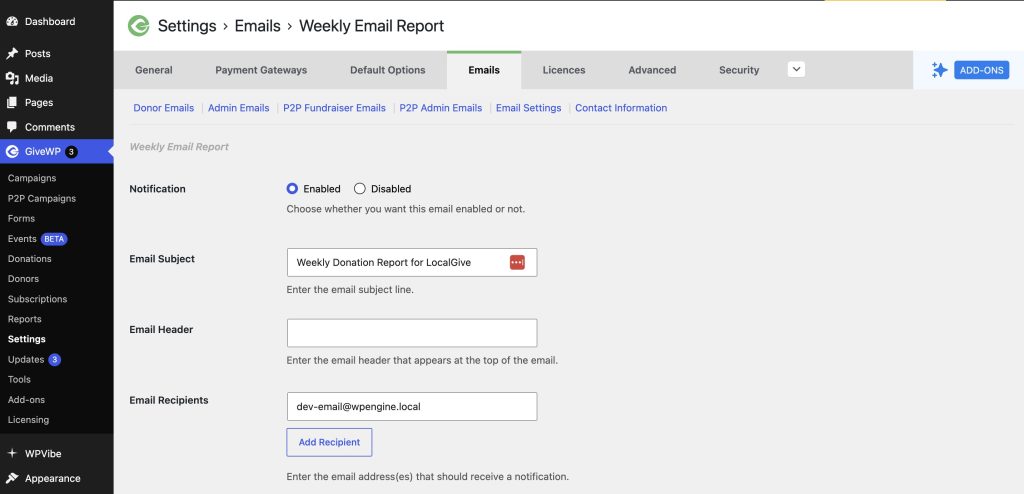
From here, customize the following settings to match your workflow:
- Notification: Choose whether you want this email enabled or not.
- Email Subject: Enter the email subject line.
- Email Header: Enter the email header that appears at the top of the email.
- Email Recipient: Enter the email address(es) that should receive a notification. You can add multiple recipients by clicking on the “Add Recipient” button.
- Email Template: Choose your template from the available registered template types.
- Email Delivery Time: Daily reports let you choose the time, weekly reports the day of the week and time, and monthly reports the first or last day of the month and time. If the fields are grayed out, the report is already scheduled. Click Reschedule, choose the new time, and save the page. If you click Reschedule without saving, the report will not send.
- Preview Email: Click the “Preview Email” button to preview the email in your browser. Click the “Send Test Email” button to send a test email directly to your inbox.
If you wish to customize the emails, we have provided the give_email_reports_recipients filter. This filter allows you to customize the email recipients using the following snippet:
/**
 * Customize the email report recipients.
 */
function my_custom_give_email_report_recipients($recipients, $frequency){

   $email_report_recipients = array( '[email protected]', '[email protected]', '[email protected]' );

   // This is an example of frequency based conditional email reports recipients.
   // if($frequency == 'daily') {
        // Emails specific to daily frequency here.
        // $email_report_recipients = array( '[email protected]' );
   // }

   // Example of new emails for all frequencies:
   return $email_report_recipients;

}

add_filter( 'give_email_reports_recipients', 'my_custom_give_email_report_recipients', 10, 2 );
To use this function, first review the How to Add Custom Functions to Your Site article and then customize the emails within the function’s array. You can use the commented conditional logic to send the various frequencies to different recipients.
Customizing the Reports
The various email reports (daily, weekly, monthly) are customizable and respect Give’s email templating system, which allows you to modify the content of each email.
How to Customize the Reports
To customize the content of each report, you will need some basic development knowledge in order to copy and adjust the template files to suit your needs.
To override the default template, copy the appropriate template file from give-email-reports/templates/emails/body-report-daily.php to a new directory in your theme called my-theme/give/emails/body-report-daily.php

Now, any changes you make within the new template file are safe from being overwritten by plugin updates. You can add, remove, or make changes to the stats sent within the email in order to meet your requirements.