

Give
Handling Custom CSS in Give
A common request from Give users is how to customize the look and feel of their donation forms. Because Give form styles are kept to a minimum, it’s relatively easy to apply a fully customized look to match your website’s branding.
In the past, adding custom CSS to Give was tricky. Most form templates use an iframe to display the form. A PHP snippet was required to inject CSS into the iframe.
Fortunately, adding custom CSS to your Give forms is now easier than ever with the custom CSS editor.
The Custom CSS Area
Give features a dedicated custom CSS area built into the plugin settings. This is the safest and most reliable place to add your form styling because your changes will remain intact even when you update your theme or the Give plugin. Note that this does not style the Donor Dashboard.
The Custom Styles Area was introduced with version 4.1.0. Any site using a previous version will require a snippet below.
To access the custom CSS editor, navigate to: Give > Settings > Advanced > Donation Forms > Custom Styles.
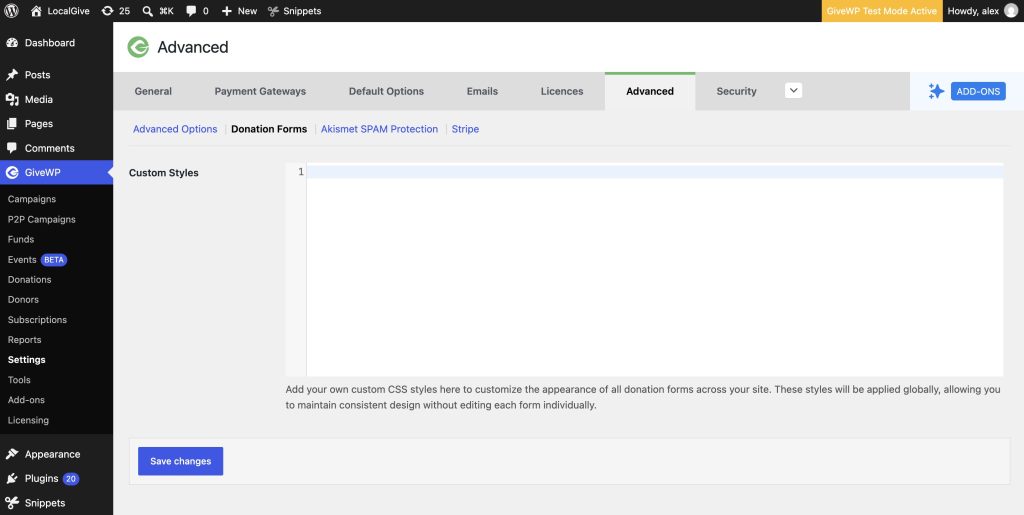
Simply paste your CSS rules into this field, save your changes, and your styles will be automatically applied to your forms.
Note:
Each Visual Form Builder form includes a dedicated Custom Styles box that applies CSS exclusively to that specific form. To access this setting, navigate to Design > Advanced > Custom Styles.
Important Note on Form Compatibility
The custom CSS you add in Give > Settings > Advanced > Donation Forms > Custom Styles will automatically style Visual Form Builder forms and Option-Based Form Editor forms using the Classic and Multi-Step templates.
However, there is one exception: This custom CSS affects all forms except the Option-Based Form Editor forms using the Legacy template.
If you are currently using Option-Based Form Editor forms with the Legacy template, the built-in Give CSS area will not apply to them. For those specific legacy forms, you will need to add your custom CSS through the standard WordPress Customizer (via Appearance > Customize > Additional CSS) or your child theme’s style.css file, or wherever you currently add custom CSS in your site.
Tips for Starting Out with CSS
1. Confirm the styles are working: Any time you begin attempting to customize styles, a great first step is to make sure that the styles are in fact being applied to the site. To quickly confirm that you are targeting the correct element, choose something conspicuous – like using red for the form’s first heading.
For example:
h1, h2 {
    color: #f00!important;
}
If the form header title turns red, you know you are in the right place! You can then remove that and continue with your actual desired CSS.
2. Use a Staging or Test Site: It is a general web-development best practice to avoid changing styles on a live site, as it can occasionally lead to unpredictable display issues for your donors. Use a staging site (many hosts provide them for free) or a local environment like LocalWP to create test installations. Once you get the styles looking exactly how you want them, you can safely copy and paste your CSS into the live site’s Give settings.
Using a CSS stylesheet
When styling iframe-based forms, you might prefer to keep your CSS organized in its own file – there is a method for that. The newer style Visual Form Builder forms are coded differently from the Option-Based Form Editor forms, so each has their own snippet.
The following snippets will enqueue a CSS file in your theme’s file structure. It first looks for the file and, if it can’t find it, stops the script.
In your theme’s file structure, you need a folder named givewp-css, and in that folder a file named givewp-form.css.
Important: folders and files within a parent theme may be overwritten when you update the theme. It’s best to use a Child Theme. Here is a guide on creating Child Themes.
Visual Form Builder snippet:
<?php
/**
 * Enqueue a custom stylesheet inside Visual Form Builder (VFB) forms.
 *
 * VFB forms render in an isolated iframe, so the theme's normal stylesheets do
 * not cascade in - anything you want applied must be enqueued on this hook.
 */
add_action( 'givewp_donation_form_enqueue_scripts', function () {
	// Path relative to the theme root.
	$relative_path = 'givewp-css/givewp-form.css';

	// get_theme_file_*() looks in the child theme first, then falls back to the
	// parent — so this resolves correctly whether or not a child theme is active.
	$path = get_theme_file_path( $relative_path );
	$uri  = get_theme_file_uri( $relative_path );

	if ( ! file_exists( $path ) ) {
		return;
	}

	wp_enqueue_style(
		'my-givewp-form-styles',
		$uri,
		[ 'givewp-base-form-styles' ], // load after Give's base form CSS so overrides win
		filemtime( $path )             // cache-bust on every save
	);
} );
Option-Based Form Editor and Donor Dashboard snippet:
This snippet will affect both the Option-Based Form Editor forms using the Multi Step and Classic templates, and the Donor Dashboard.
<?php
/**
 * Enqueue the custom stylesheet inside Give Option-Based Form
 * Editor forms using iframes
 * (Multi-Step / Classic — everything except the Legacy template).
 */
add_action( 'give_embed_head', function () {
	$relative_path = 'givewp-css/givewp-form.css';

	$path = get_theme_file_path( $relative_path );
	$uri  = get_theme_file_uri( $relative_path );

	if ( ! file_exists( $path ) ) {
		return;
	}

	wp_enqueue_style(
		'give-custom-form-styles',
		$uri,
		[],
		filemtime( $path )
	);
}, 5 );
If you need assistance implementing custom PHP code on your website, we have this guide.
Please note that this code snippet is provided as an example of how you can extend Give with code. It’s up to you to implement and customize to your liking. We cannot provide support for custom code on your website, only the code that we create and distribute.