

Give
Stripe Apple Pay/Google Pay
The Stripe add-on for Give includes functionality for accepting donations via Apple Pay and Google Pay on supported browsers. This documentation will walk you through how to configure your site to support that functionality.
Note:
This documentation covers the processes related to the Stripe integration for forms built with the Option-Based Editor. The most robust Stripe integration for Give is the Stripe Payment Element integration with the Visual Donation Form Builder. See the Stripe Payment Element documentation for more information.
Getting Started With Apple Pay and Google Pay
This documentation requires that the Option-Based Form Editor is enabled. To enable this, navigate to Give > Settings > Advanced and enable the Option-Based Form Editor.
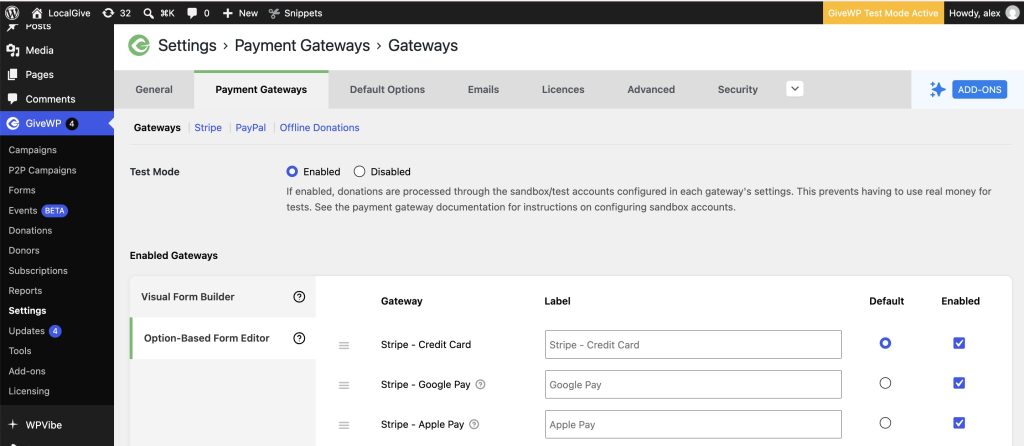
Next, navigate to Give > Settings > Payment Gateways, locate the Option-Based Form Editor section under enabled gateways, and toggle on Stripe – Apple Pay and Stripe – Google Pay. Save your changes before exiting.
Click the blue Stripe link at the top, then navigate to the Google/Apple Pay tab. Click the “Register Domain” button to finalize the setup of Stripe’s Apple Pay integration.

What’s going on behind the scenes here: Give is creating a file and saving it to a specific spot on your server so that Stripe and Apple can verify the domain from their side. All of that happens in one step on your site.
Note:
For servers/hosts like Pantheon who prevent file modification on the live site, the process needs to be done on development and then pushed to live, then click the “Register Domain” button on the live site again to complete the process. To manually move the file, it’s in the root of your give-stripe directory and should be moved to a (new) /.well-known/ directory at the root of your live site.
Save the settings at the bottom, and you’re all set.
Configuring The Donor’s Browser to Support Google Pay
There are two ways to save a card to Google Pay:
- In the browser itself, by accessing chrome://settings/payments
- In the Google Pay cloud, by accessing https://pay.google.com/
If a donor does not have the card saved in the browser itself, a message will display when using the Google Pay payment gateway about not having a card saved, and the Google Pay integration built into the Modal Stripe Checkout option will not display.
Below is an explanation for donors to set up their browser for use with Google Pay through Stripe and Give.
Enabling a credit card on Google Chrome
To find out what credit cards are saved within the browser (if any), potential donors can access chrome://settings/payments, and at the end of the page, there will be a section containing all the credit cards available for the user via their Google account and cards saved within the browser.
An easy way to differentiate credit cards saved within the Google account and credit cards saved within the browser is to check your credit card settings at chrome://settings/payments. A credit card saved within the browser will contain three dots on the right side of the expiration date.

On the other hand, a credit card saved within the Google account will have a square with an arrow on it, redirecting you to another page.

If you have no credit cards displaying the three dots, it means you do not have a credit card saved within the browser. If you try to donate with it, this error will display: “Either you do not have a saved card to donate with Google Pay or you’re using an older version of Chrome without Google Pay support.”
User’s address on Google Chrome
Depending on your version of Google Chrome, you may need to enable save and fill addresses within the browser. To activate it, navigate to chrome://settings/addresses and click on the right button to activate it.

Testing Apple Pay
Apple Pay and Stripe have a slightly different method of testing that can be a bit nerve-wracking, since it appears to use real money from a live card.
With a live card saved in your Apple Wallet, toggle Give into Test Mode and submit a donation. When the Apple Pay dialogue pops up, you are able to confirm, and it will appear as though real money was used. Rest assured that real money was not used, as long as Give was in test mode.
Testing Google Pay
In order to test Google Pay, save a test card in your device’s Google Wallet (on desktop Chrome, visit chrome://settings/payments to set that card). Use the number 4242 4242 4242 4242 and any CVC, as well as any date in the future. See Stripe’s test cards for additional numbers to trigger different responses.
With the test card saved, toggle Give into Test Mode and submit a donation. It’s a best practice to submit that donation from a logged-out (of the WordPress account) browser to most closely simulate what your donors will encounter.
Apple/Google Pay Frequently Asked Questions
Why is there no setup for Google Pay?
Unlike Apple Pay, there’s nothing to set in the Stripe account for Google Pay. As long as the donor is on a supported browser and has a payment method saved in their Google Wallet (or saved within chrome://settings/payments), Google Pay will “just work.” More info here on saving cards.
Why are donors sometimes not able to use Apple/Google Pay?
Apple Pay and Google Pay both require the donor to have a payment method saved in their “Wallet” for each respective service and to be on a supported device and browser in order for them to function. If those conditions aren’t met, a warning is displayed, and the Donate button disappears.
I’m still getting errors on the latest versions of the Stripe Addon related to Apple Pay
Try disconnecting the domain on the Stripe dashboard and reconnecting it.
Navigate to Payments > Apple Pay and delete the domains that are experiencing issues. Then, click the “reset” button on the back end of Give. Finally, follow the instructions above to reconnect, and save the settings when you’re done.
Is it possible to apply Dark/Light Mode styling to the Apple Pay button?
The Dark/Light Mode is available for Option-based forms only. Forms built with the new Visual Form Builder use a different method, relying on the colors you define in the form settings.