

Solid Central
Deployments 101
Coming soon: Solid Central is becoming Kadence Central. You may see both names used while we update the product, documentation, and customer experience.
Deployments is a Kadence Central Pro feature (formerly Solid Deployments in Solid Central).
Publishing file and database updates between sites on different servers can be slow and manual without the right tooling. Deployments in Kadence Central automate copying files and database tables from an origin site to a destination site.
This guide walks through the deployment process in Kadence Central. By the end, you should be able to deploy between two connected WordPress sites using Kadence Central.
How is a Deployment different from a Migration?
For Kadence Central customers, Deployment and Migration are related but different:
- Deployment involves publishing or promoting code or content from one environment to another (for example: development or staging to production). Use Deployments when you want to sync files and database tables between connected sites without the full domain cutover workflow of a migration.
- Migration is about moving an entire WordPress site from one host to another, including final domain and DNS steps so the live domain points at the new server. See Migrations 101.
How Deployments Work
Kadence Central automates most of the transfer from origin to destination. Below is each step.
Connecting the Origin and Destination Sites to Kadence Central
If the origin and/or destination sites are not already connected, make sure to connect each site to Kadence Central before you deploy.
For each site you connect, gather the following:
- WordPress Admin login for the origin site
- SFTP or SSH credentials for the server where your destination site is hosted
Navigate to the Sites list in Kadence Central and click on “Add Site”. This will then take you through the process of connecting the site to Central.
You’ll need your WordPress access credentials for the site. These are required so that Central can test the connection and add the site.
Once the site has been connected to Central, you will be prompted to enter the SFTP/SSH credentials so Central can verify the connection to the server before starting the deployment.
Getting Started with a Deployment
- Log in to Kadence Central.
- Open Sites and select the origin site (deploy from).
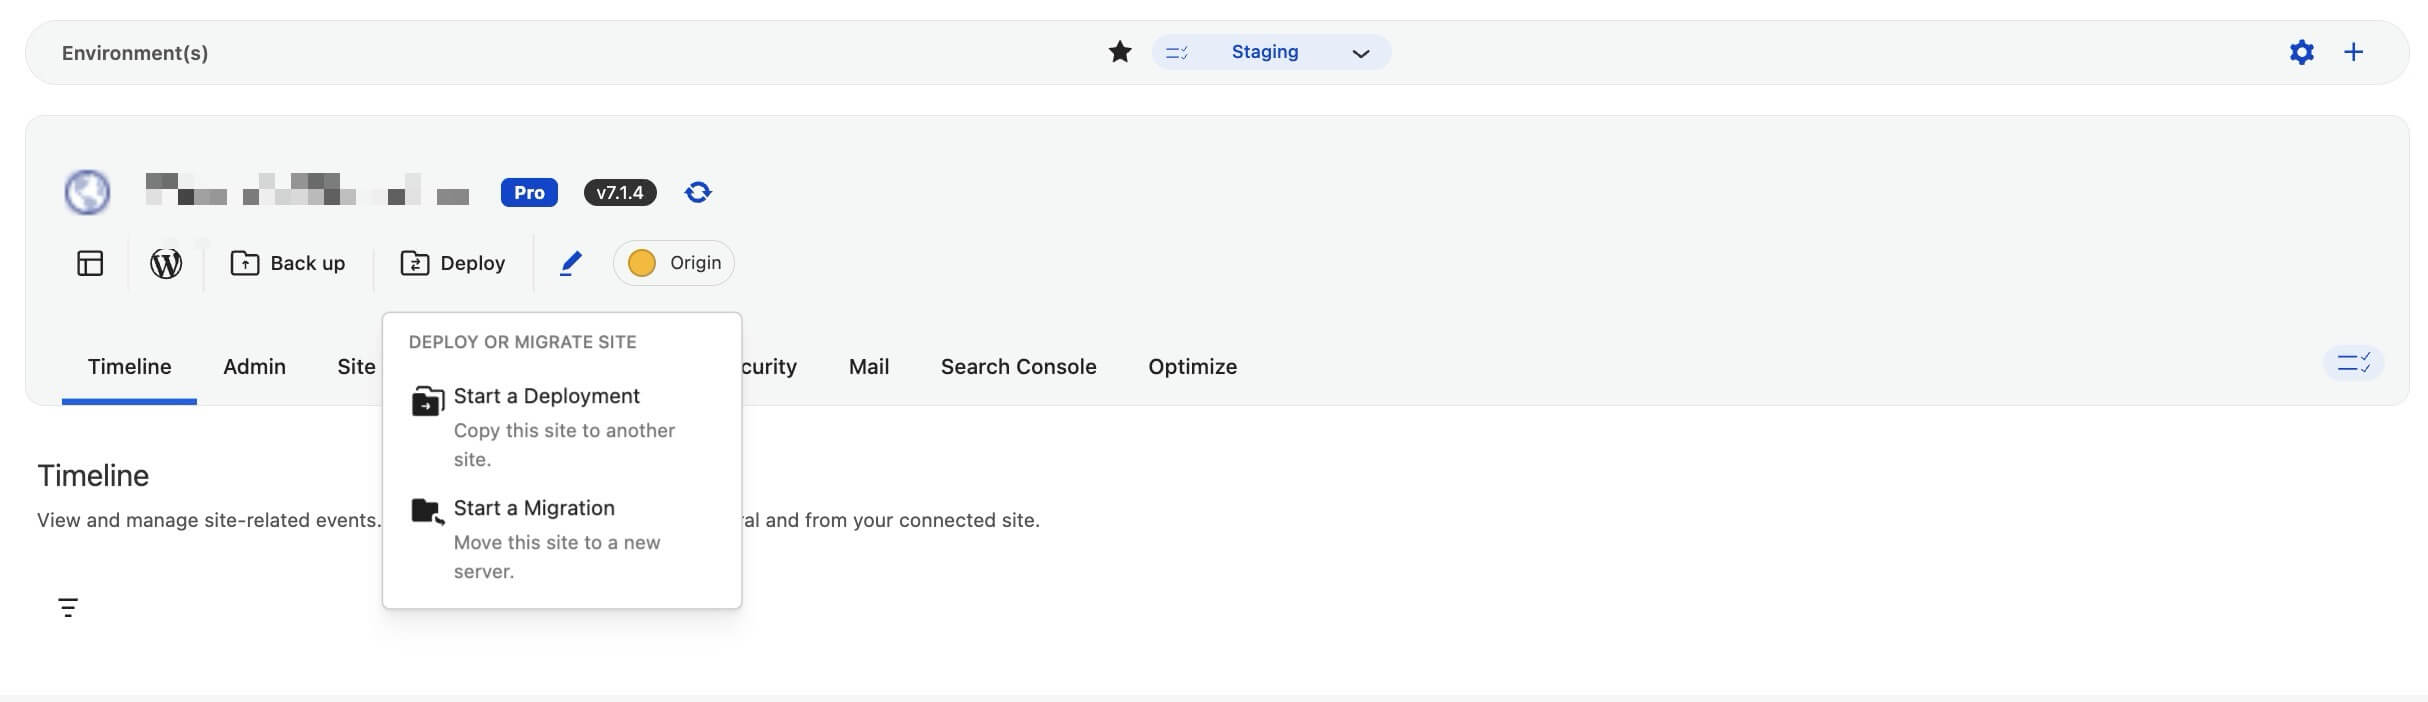
- On the site dashboard, click the Deploy icon, then select Start a Deployment.
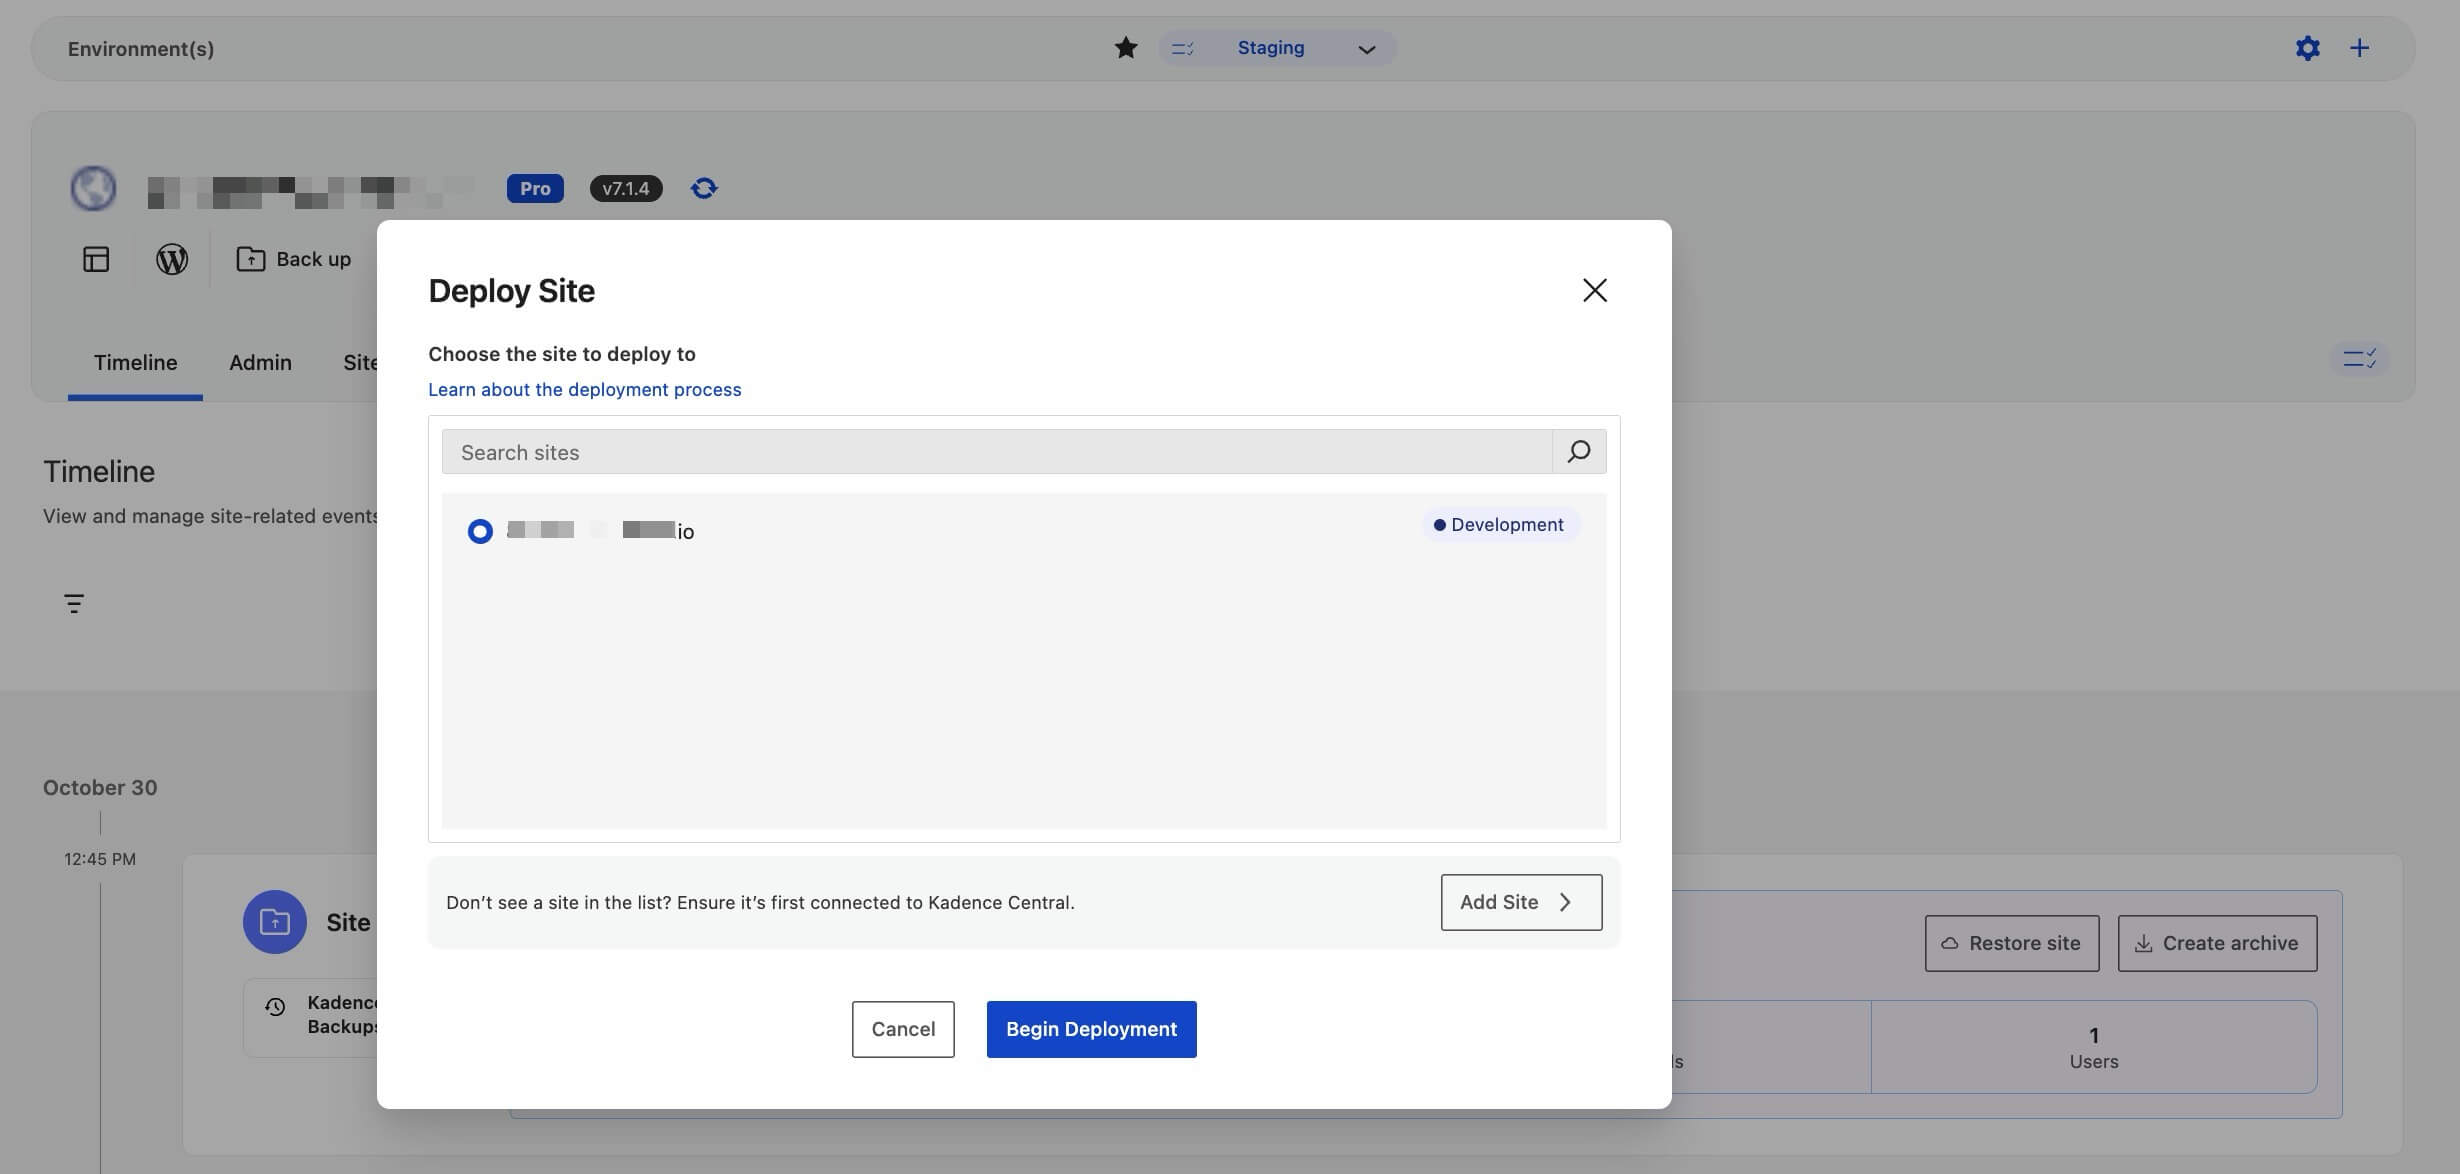
- Choose a destination site from sites already connected to Kadence Central.
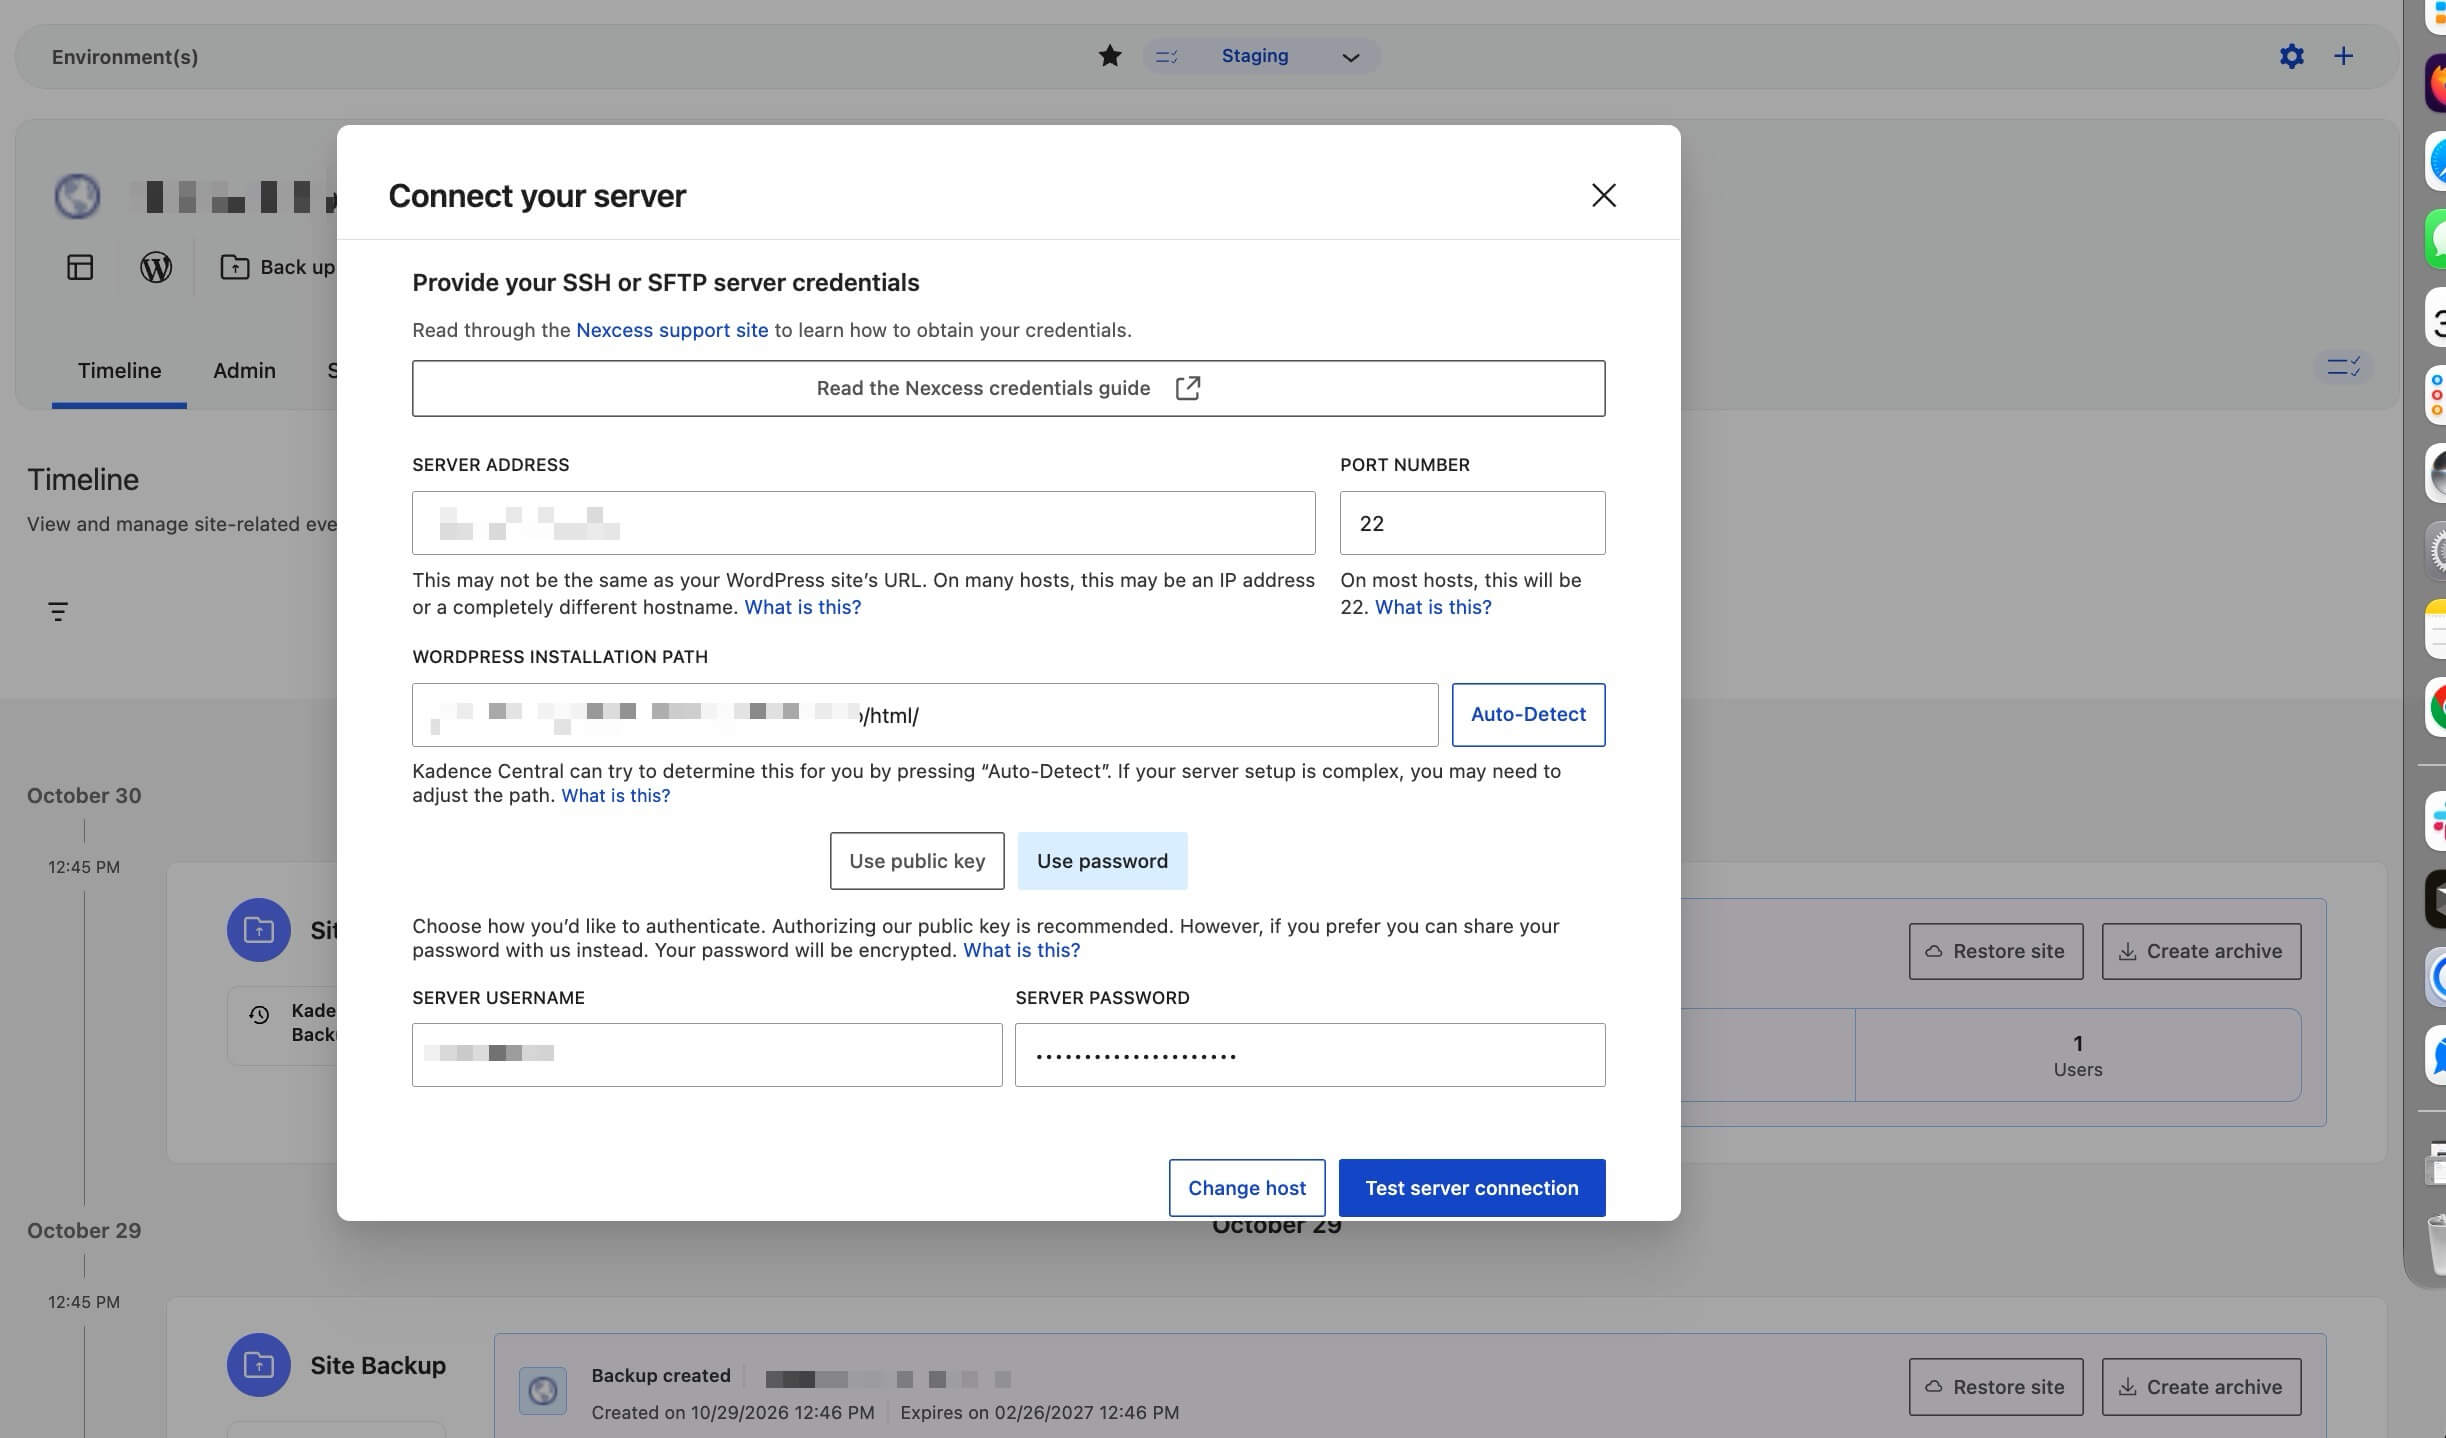
- If the destination does not yet have a verified server SSH/SFTP connection (for example, the site is connected to Central but not enrolled in Kadence Backups, or server credentials were never saved), Kadence Central prompts you to enter the destination server credentials and test the connection. Complete that prompt before the deployment can continue. Use the same credential types as in Kadence Backups Troubleshooting SSH/SFTP Connection Issues if the test fails.
- If the origin server connection is missing, Central may prompt for origin SSH/SFTP as well. Both environments need server access for file and database transfer.
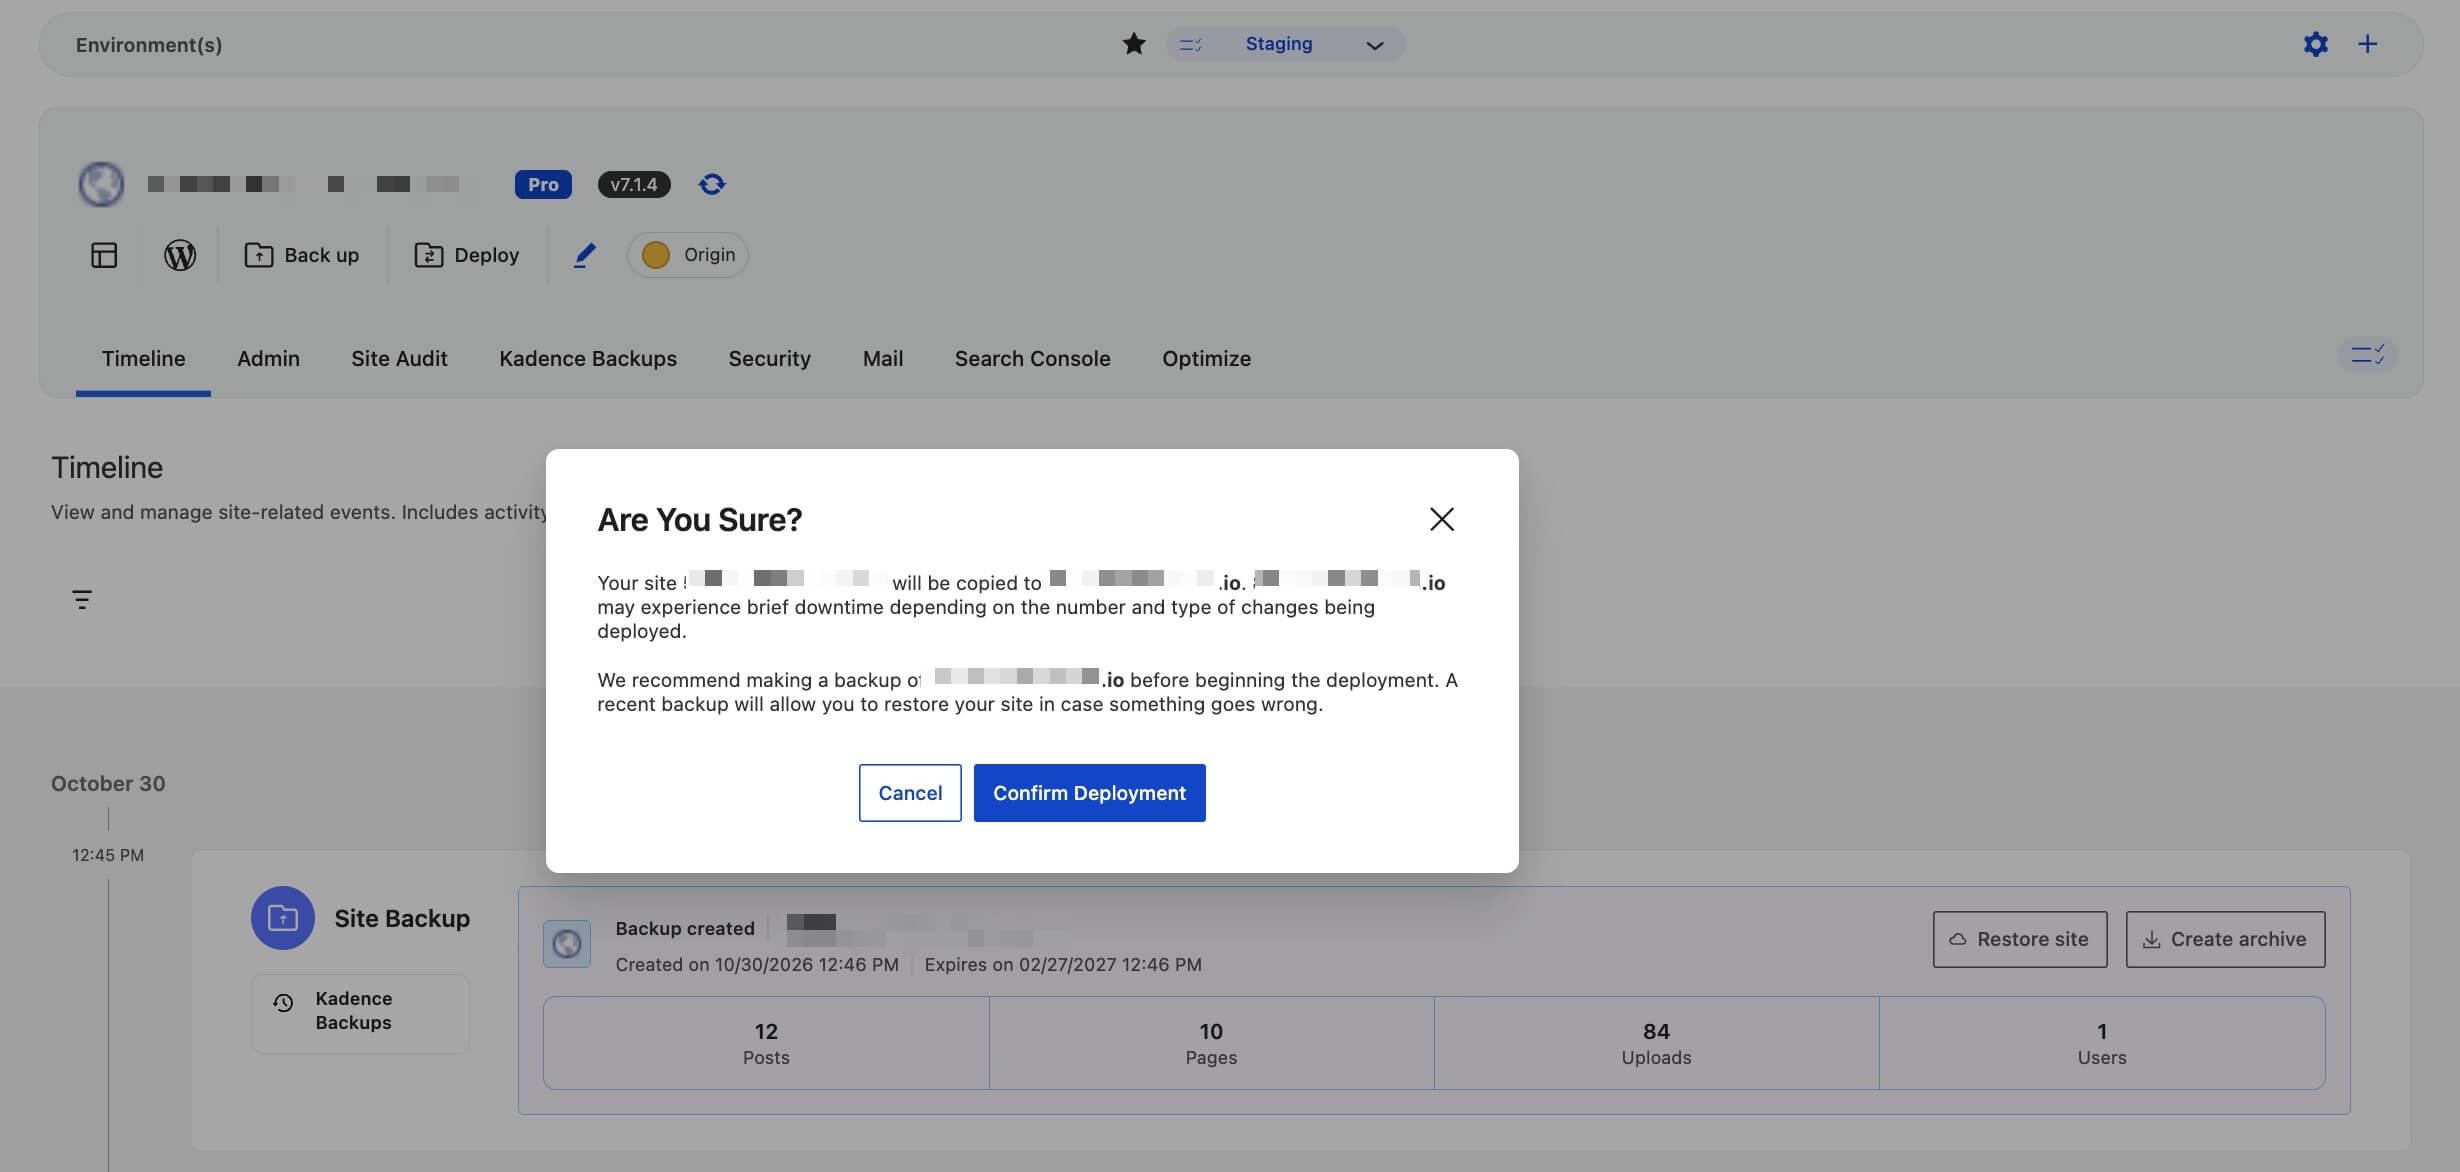
- Confirm that you want to proceed with the deployment.
Screenshots below show the deployment flow:
Copy the Files and Database to the Destination Site
Kadence Central copies site files (themes, plugins, media) and the full WordPress database to the destination environment. This overwrites the destination site as it exists on the server, so make sure to take a backup first if you need a restore point.
Deployment time varies. A typical WordPress site takes about 10–15 minutes to set up, depending on site size. Larger sites (big media libraries, many plugins, large databases) take longer.
You do not need to stay on the page. The deployment card in the site Timeline shows the current status. Use Read Logs for details on the progress.
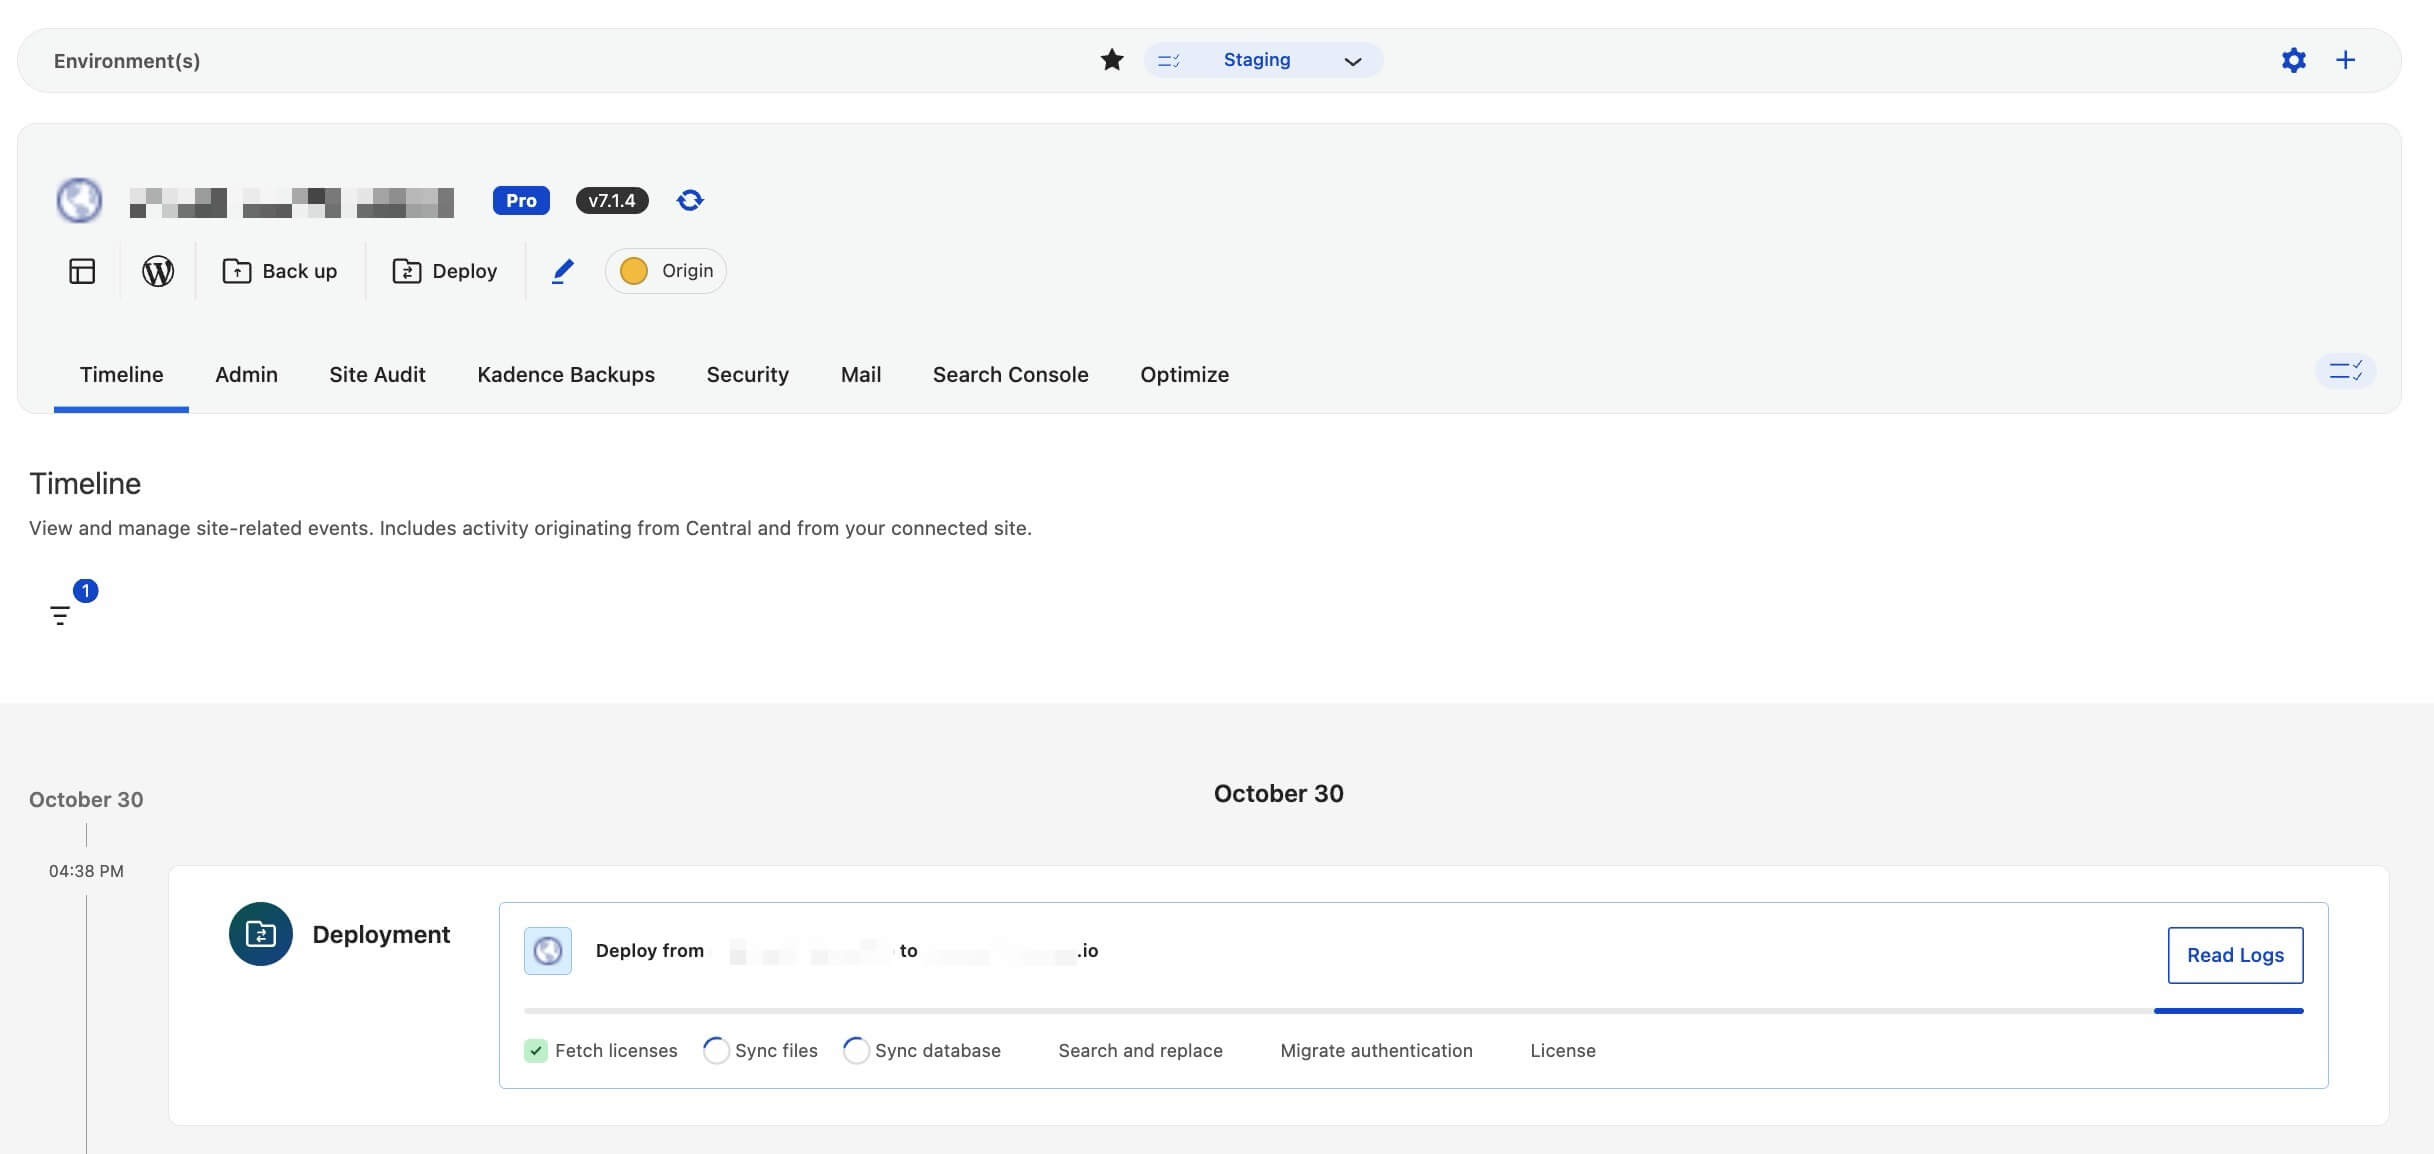
Replace the URLs and Paths on the Destination Site
Once the content has been successfully deployed and copied to the destination site, Kadence Central runs an automated search-and-replace for URLs, file paths, and environment-specific values so the destination reflects its own URL rather than the origin URL.

Post-Deployment Verification
Now’s your chance to browse through the destination site as a visitor would. Test the front end and admin, check for broken links and missing assets, and confirm login works.
A successful verification means the deployment successfully replaced the files and database tables on the destination site with content from your origin site.
Troubleshooting Common Deployment Issues
If the destination site has problems after deployment completes, here’s what to check:
- Confirm all files and database content copied correctly
- Check the destination server’s PHP error logs or WordPress debug log
- Re-run the deployment to repeat file and database transfer
- For SSH/SFTP connection failures, see Kadence Backups Troubleshooting SSH/SFTP Connection Issues (same server credential patterns Deployments uses)
- For Central connection issues, see Tips for troubleshooting Kadence Central.
A Recap of the Deployment Steps
Here’s a quick overview of the key steps in the deployment process:
- Ensure the origin and destination sites are connected to Kadence Central, and that SSH/SFTP connections are configured and verified.
- Select the origin site, click Deploy, choose Start a Deployment, and select the destination site.
- Start the deployment and wait for the file and database transfers and the URL/path replacement to finish.
- Verify the destination site works as expected.
Conclusion
Deployments in Kadence Central help you copy files and database tables between sites on servers you control, or from your server into StellarSites, with automated transfers, URL and path replacement, and integration with the Kadence Central dashboard and Timeline.
For full host moves with DNS finalization, use Migrations 101 instead.