

LearnDash
User Profiles
A profile page lets learners view their enrolled courses, track progress, see quiz results and download earned certificates. With the LearnDash 3.0 template, they can also open verification links for certificates created with the drag-and-drop builder.
Create a page and add the LearnDash Profile block or shortcode to show each learner their own information. You can also add the third-party tools covered below.
LearnDash Profile Block/Shortcode
The LearnDash Profile block and shortcode are included with LearnDash. No additional plugin is required.
How to Use It
To use the LearnDash Profile block:

- Create a new page in WordPress.
- Click the + icon to add a new block.
- Search for LearnDash Profile.
- Select the LearnDash Profile block.
To use the shortcode, add a Shortcode block with:
[ld_profile]
For the available options, see the LearnDash Profile section in our blocks/shortcodes documentation.
LearnDash 3.0 Template
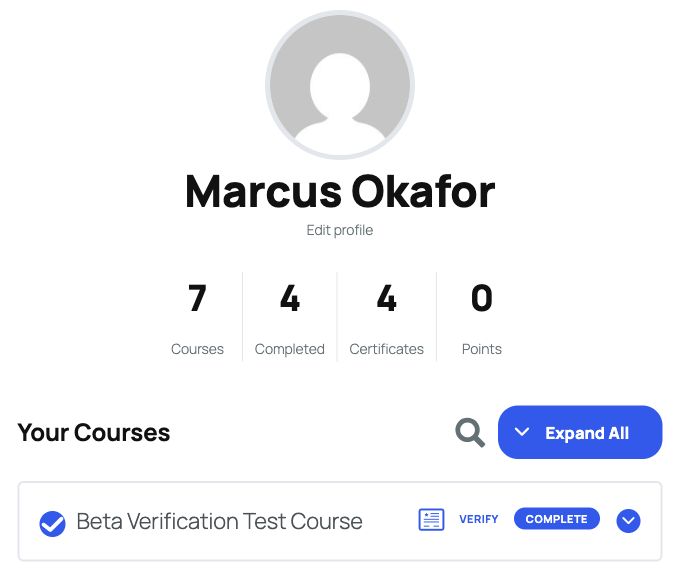
With the LearnDash 3.0 template enabled (check the Active Template setting), the LearnDash Profile will display the following information:
- Avatar (profile image)
- Name
- Link to edit profile
- Total number of courses enrolled in, courses completed, certificates awarded and points earned
- List of registered courses, which includes:
- ability to search courses
- course progress indicators
- links to download certificates
- Verify links for earned certificates created with the drag-and-drop builder
- quizzes taken, along with date, scores and statistics
Verify a certificate
For an earned certificate created with the drag-and-drop builder, a Verify link appears next to its certificate icon. Click Verify to open the public verification page in a new tab.
Learners can copy the verification page URL and share it. Anyone can open that page without logging in. An active LearnDash license is needed for the page to verify the certificate.
LearnDash Legacy Template
The LearnDash Legacy template does not show certificate verification links. Its profile includes the following information:
- Avatar (profile image)
- Name, Username, Email
- Course Points
- Link to edit profile
- List of registered courses, which includes:
- course progress indicators
- links to download certificates
- quizzes taken, along with date, scores and statistics

Display Enrolled Courses in a Grid
The LearnDash Profile will display all courses in which the user is enrolled. This might be all you need, but you can also use the Course Grid feature to show enrolled courses in a grid.
Course Grid is included in LearnDash 4.21.4 and later. In the WordPress block editor:
- Insert the LearnDash Course List block.
- Set My Courses to Show Enrolled Courses only.

Enable Show Progress Bar to show the learner’s progress in each course.
To show enrolled courses with a progress bar using a shortcode, add:
[ld_course_list mycourses="true" progress_bar="true"]
There are several other options you can use to customize the grid. Please see the Course Grid documentation for full details.
Uncanny Toolkit Course Dashboard
NOTE: This is a third-party add-on that requires the Uncanny LearnDash Toolkit Pro plugin.
Use the [uo_dashboard] shortcode in Uncanny Toolkit Pro to show a learner’s courses and progress. Compared with the LearnDash Profile, Course Dashboard:
- does not display the user’s profile information (avatar, name, email, etc.)
- also displays lessons & topics within each course (which the LearnDash Profile does not)
Learners can expand each course to view its content, progress, quiz information and earned certificates. Here’s an example:

The Uncanny Toolkit Course Dashboard is also available as a Gutenberg block. For the available options, see Uncanny Owl’s full documentation.
Resume Where You Left Off
The free Uncanny LearnDash Toolkit includes a Resume Button module. It adds a button that returns a signed-in learner to the last course, lesson, topic or quiz they visited.
To use this feature:
- Install and activate the free Uncanny LearnDash Toolkit plugin.
- Go to Uncanny Toolkit in WordPress.
- Find Resume Button and click Activate.
- Add the following shortcode where you want the button to appear, such as your profile page or sidebar.
[uo_learndash_resume]
Place the button on a profile or dashboard page outside the course content. It only appears for signed-in learners who have already visited LearnDash content.
The Uncanny Toolkit Resume Button is also available as a Gutenberg block.
List of All Certificates
The free Uncanny LearnDash Toolkit can list a signed-in learner’s earned certificates. In Uncanny Toolkit, activate Show Certificates, then add this shortcode to your profile page:
[uo_learndash_certificates]
For available options, see Uncanny Owl’s documentation.
WooCommerce Account Page
You can use WooCommerce to sell courses (see our integration guide). Its My Account page shows account details, addresses and order history. You can also add enrolled courses to this page.

If WooCommerce has already created a My Account page, use that page. If it is missing:
- Create a new page in WordPress.
- Add a Shortcode block with the following shortcode.
[woocommerce_my_account]
Save the page, then go to WooCommerce > Settings > Advanced. Under Page setup, select it as the My account page and click Save changes.
NOTE: The layout of the WooCommerce My Account page depends on your WordPress theme. If it does not display correctly, check with your theme developer.
Add the LearnDash Profile block or any of the tools above to this page. Content added beside the WooCommerce shortcode also appears on account subpages, such as Orders and Addresses. To give courses a separate account section, see Custom Endpoint below.

WARNING: By default, WooCommerce restricts customer access to the WordPress admin area and hides the admin bar. This can prevent learners from opening the WordPress profile editor. See WooCommerce’s guidance on customer admin access.
Custom Endpoint
NOTE: Development experience is highly recommended.
WooCommerce uses endpoints to display sections within My Account. The endpoint follows /my-account/ in the URL. Examples include:
- Orders –
/my-account/orders/ - Addresses –
/my-account/edit-address/ - Edit Account –
/my-account/edit-account/
WooCommerce provides the ability for anyone to create their own endpoint. The most obvious way to integrate this with LearnDash would be to create an endpoint for courses. Your endpoint could look something like this:
- Courses –
/my-account/courses/
A developer can add the profile or course information to this endpoint so learners have a separate course area within My Account.
View WooCommerce’s documentation on endpoints for details about account endpoints.
Other Options
Course Points
If you’re using LearnDash’s built-in points system, you could use the [ld_user_course_points] shortcode (or block) to insert the user’s total points onto a custom profile page. That would output this:
Earned Course Points: 100
LearnDash User Profiles Webinar
Watch this webinar for more ways to build and customize LearnDash user profiles.