

LearnDash
Creating LearnDash Certificates with the Drag-and-Drop Builder
Overview
LearnDash Certificates let you create customized certificates for learners when they complete a course, pass a quiz, or complete all courses assigned to a group.
The Certificates feature includes a drag-and-drop certificate builder where you can design certificates, add text and images, insert dynamic information about learners and their achievements, and generate certificates in PDF format.
Certificates can also be verified through a dedicated public verification page, allowing anyone to check the authenticity and integrity of an issued certificate without logging in.
This guide explains how to create certificates, assign them to courses, quizzes, or groups, customize certificate content, and verify issued certificates.
Requirements
Before using the Certificates feature, make sure your website meets the following requirements:
- LearnDash LMS version 5.3.0 or later.
- WordPress 6.9 or later is required to use the new Certificate Builder.
- An active LearnDash license is required for certificate verification. Certificate issuance and downloads do not require an active license.
Note: Existing certificates created with the previous shortcode or block-based builders continue to use their respective editors. They cannot be converted to the new drag-and-drop builder.
How to Create a Certificate
Follow these steps to create and customize a certificate.
Step 1: Open the Certificate Builder
- From your WordPress dashboard, navigate to LearnDash LMS > Certificates.
- Click Add New.
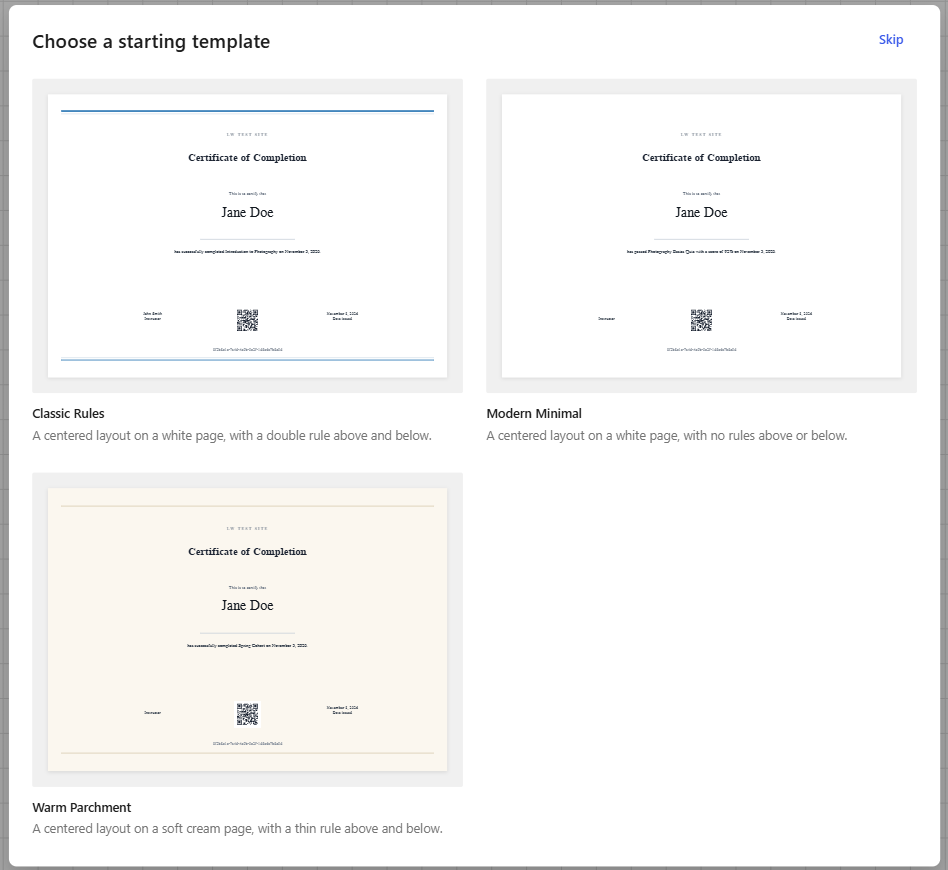
- The Certificate Builder opens and displays three starting templates:
- Classic Rules
- Modern Minimal
- Warm Parchment
- Select a template to use as your starting point.
- To create a certificate from scratch, click Skip to open a blank certificate.
Step 2: Customize the Certificate Layout and Background
Use the Certificate tab to configure the overall appearance of your certificate.
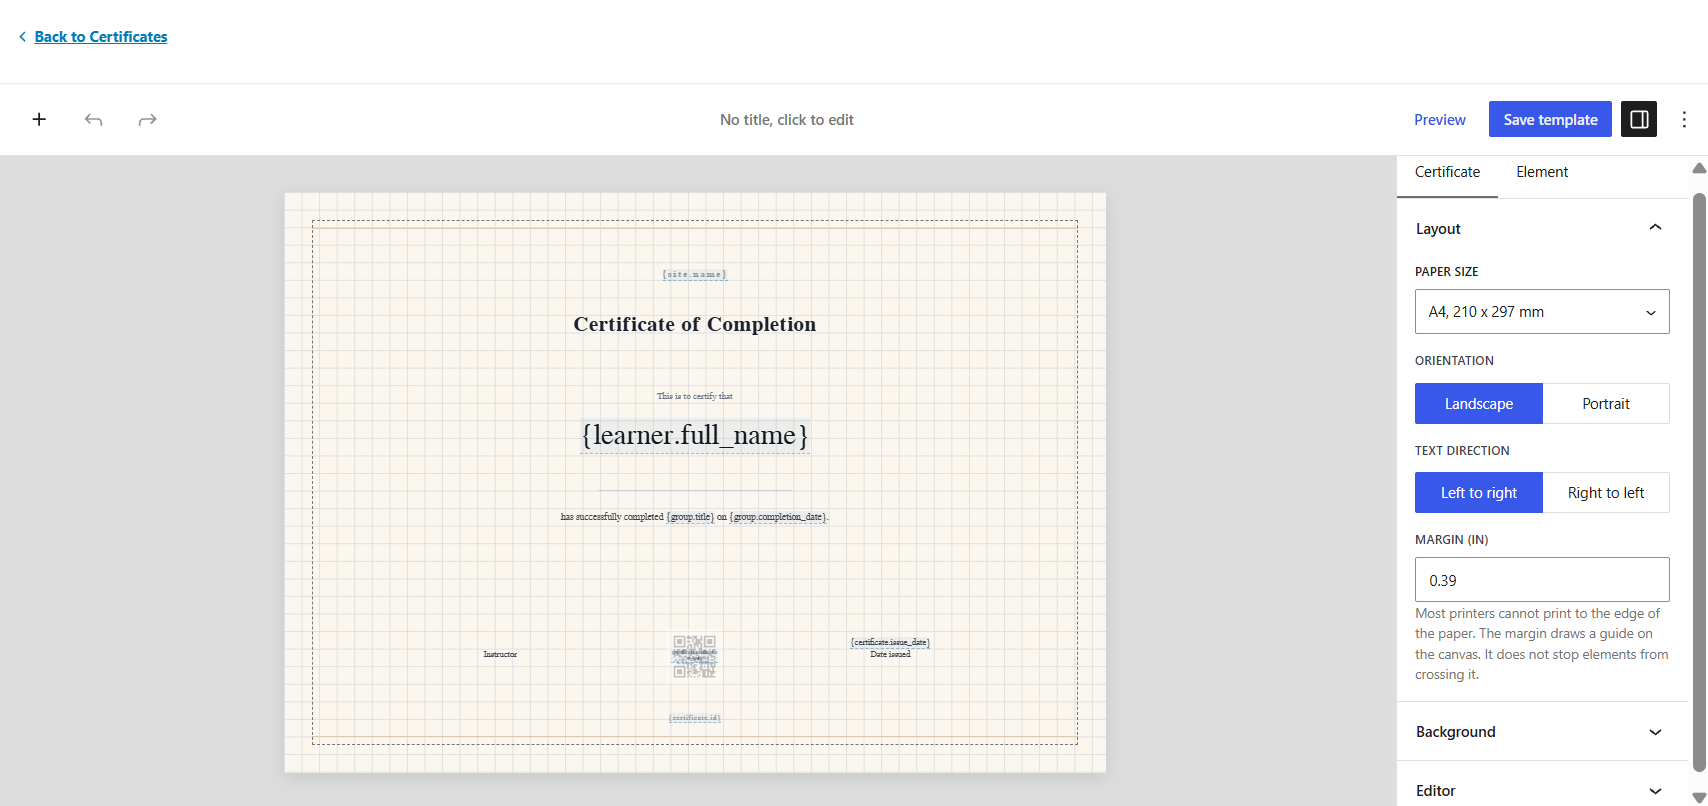
- On the Certificate Edit page, select an empty area of the certificate canvas to access the Certificate tab.
- Under Layout, select the paper size, orientation, text direction, and margin.
- Under Background, choose a background color or image.
- If you add a background image, select how it should fit the certificate page using the Image fit setting, which appears when a background image is selected.
- Under Editor, you can see the grid lines displayed on the certificate canvas while editing. These lines help you align and position Elements, but they will not appear on the actual certificate. You can also select your preferred measurement unit: Auto, mm, or in.
- Review the changes on the certificate canvas.
Step 3: Add, Arrange, and Customize Elements and Live Data
The Certificate Builder lets you add design Elements and dynamic information to your certificate, then arrange and customize them on the canvas.
Elements are the visual components you can add to your design:
- Heading: Adds a heading.
- Paragraph: Adds text.
- Divider: Adds a dividing line.
- Image: Adds an image.
- QR: Adds a QR code.
Live Data lets you insert dynamic information about the learner and the activity associated with the certificate. The available Live Data categories include:
- Learner
- Certificate
- Course
- Group
- Quiz
- Site
Follow these steps to add Elements and Live Data to your Certificate:
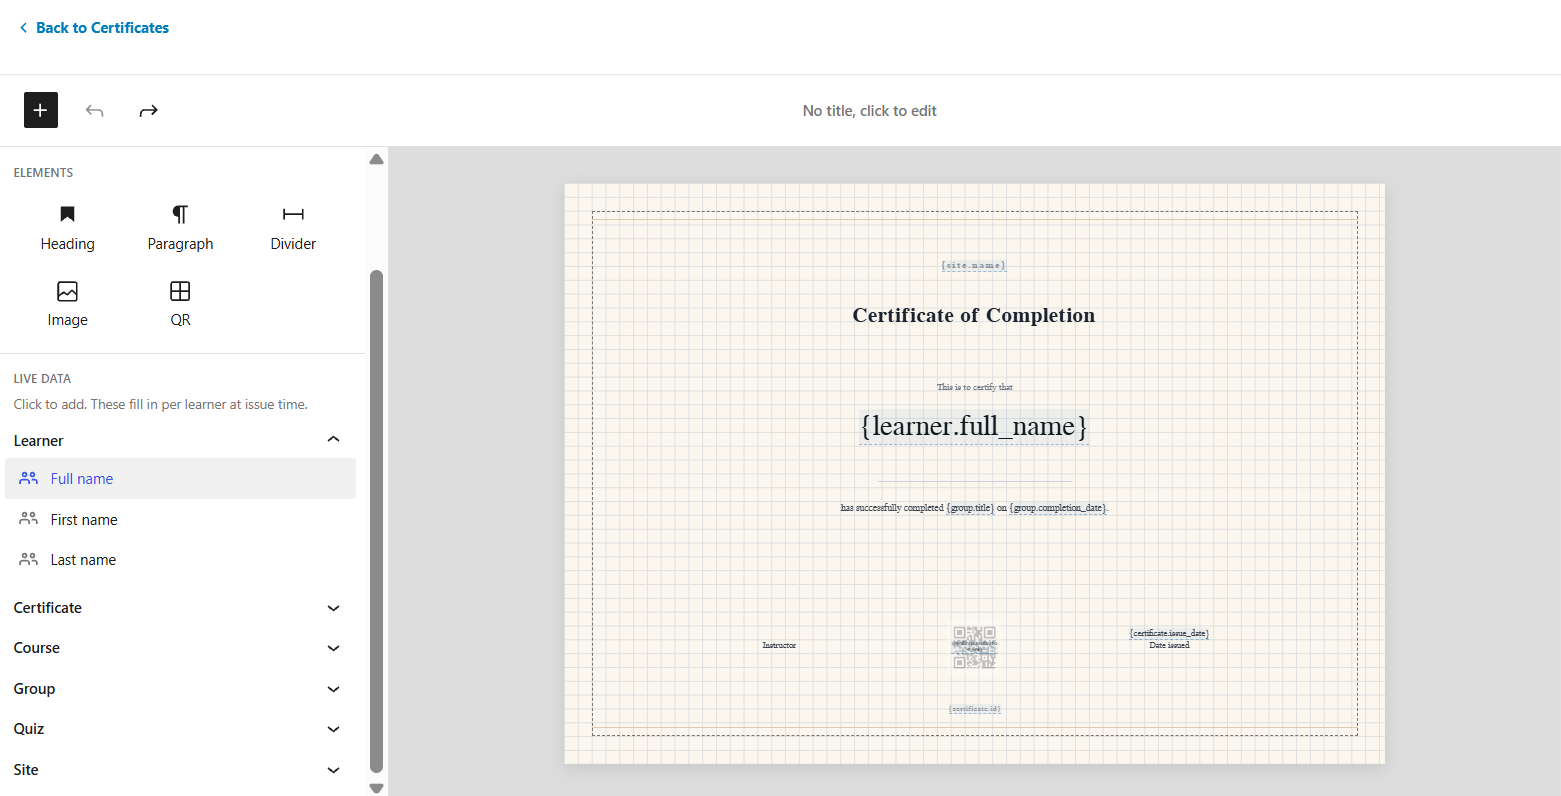
- In the Certificate Builder, click the + (Insert) icon to open the Insert panel.
- Browse the available Elements or Live Data categories, depending on what you want to add.
- Select the Element or Live Data item you want to use. It will appear on the certificate canvas. For example, select Learner > Full name to add the learner’s name.
- Drag the items on the canvas to arrange and organize the content of your certificate. Items automatically snap to the grid when dragged.
- Repeat the process to add other Elements or Live Data, such as a heading, course title, quiz score, or certificate ID.
- To remove an item, select it on the canvas and press the Backspace or Delete key on your keyboard.
You can also use the Undo and Redo controls in the editor toolbar to reverse or restore recent editing actions.
Important: Choose Live Data that matches the type of certificate you are creating. For example, course-specific information will not populate on a quiz certificate, and quiz-specific information will not populate on a course certificate.
Tip: Combine design Elements with relevant Live Data to create a certificate that includes your preferred design and the learner’s achievement details.
Step 4: Customize Individual Elements
After configuring the overall certificate settings, you can customize each Element using the Element tab.
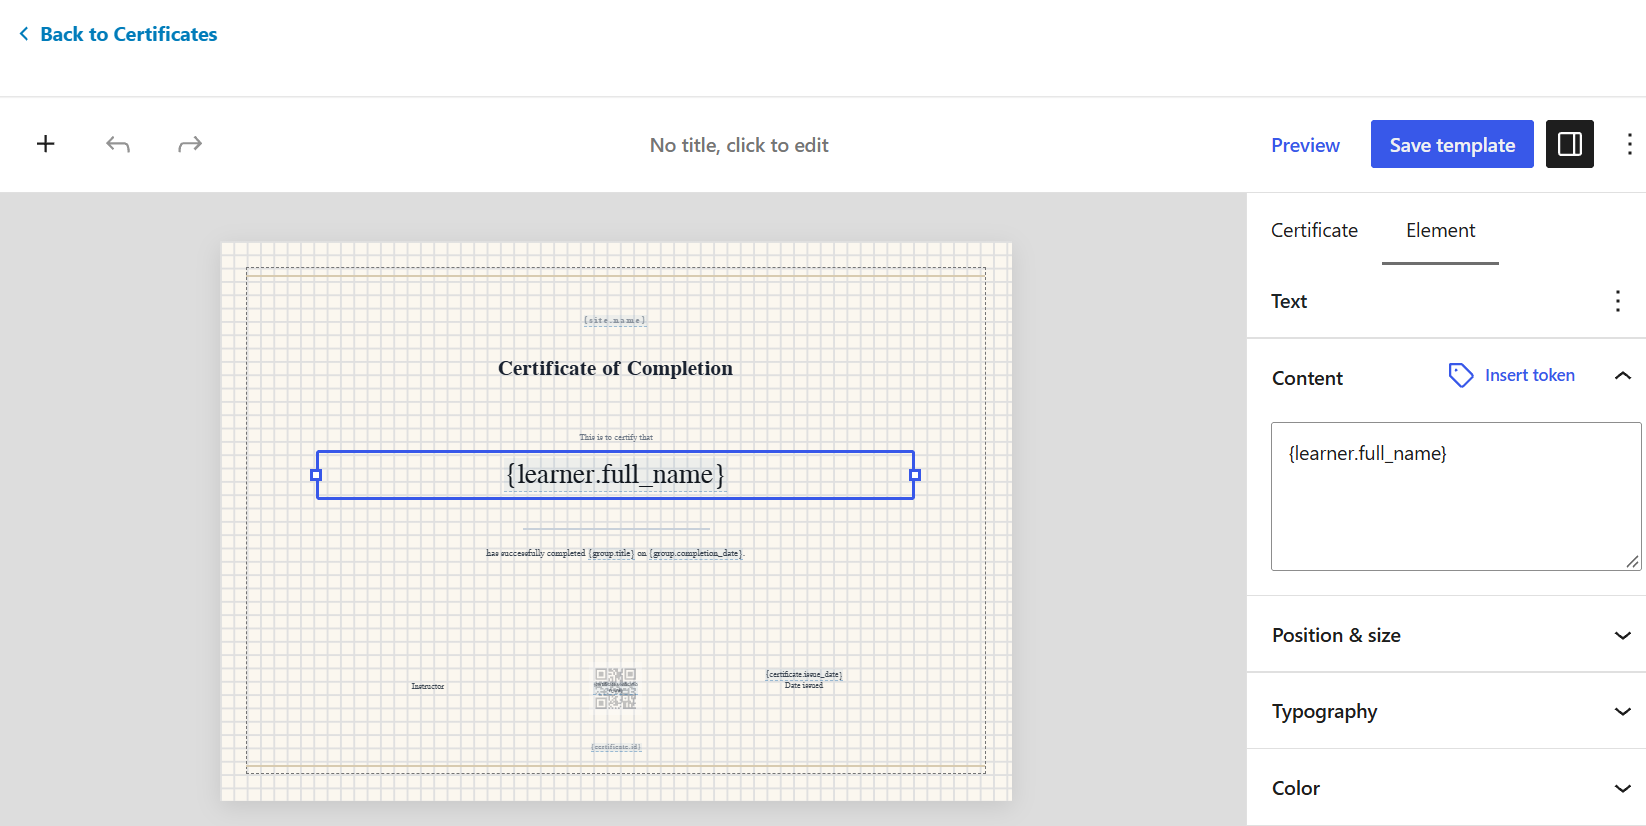
- Select an Element on the certificate canvas.
- The Element tab will automatically open in the Inspector panel.
- Review the available settings for the selected Element. These vary depending on the Element type.
- For Text Elements, you can edit the content, insert Live Data using Insert Token, adjust the position and size, and customize the typography and color.
- For QR Elements, you can configure the link, position, size, and colors.
- For Image Elements, you can choose an image, adjust its position and size, and change its opacity.
- For Divider Elements, you can adjust the position, width, line thickness, and color.
- Repeat these steps for the other Elements on your certificate.
Step 5: Preview and Test Your Certificate
The builder provides two options for checking your certificate before saving it.
Preview
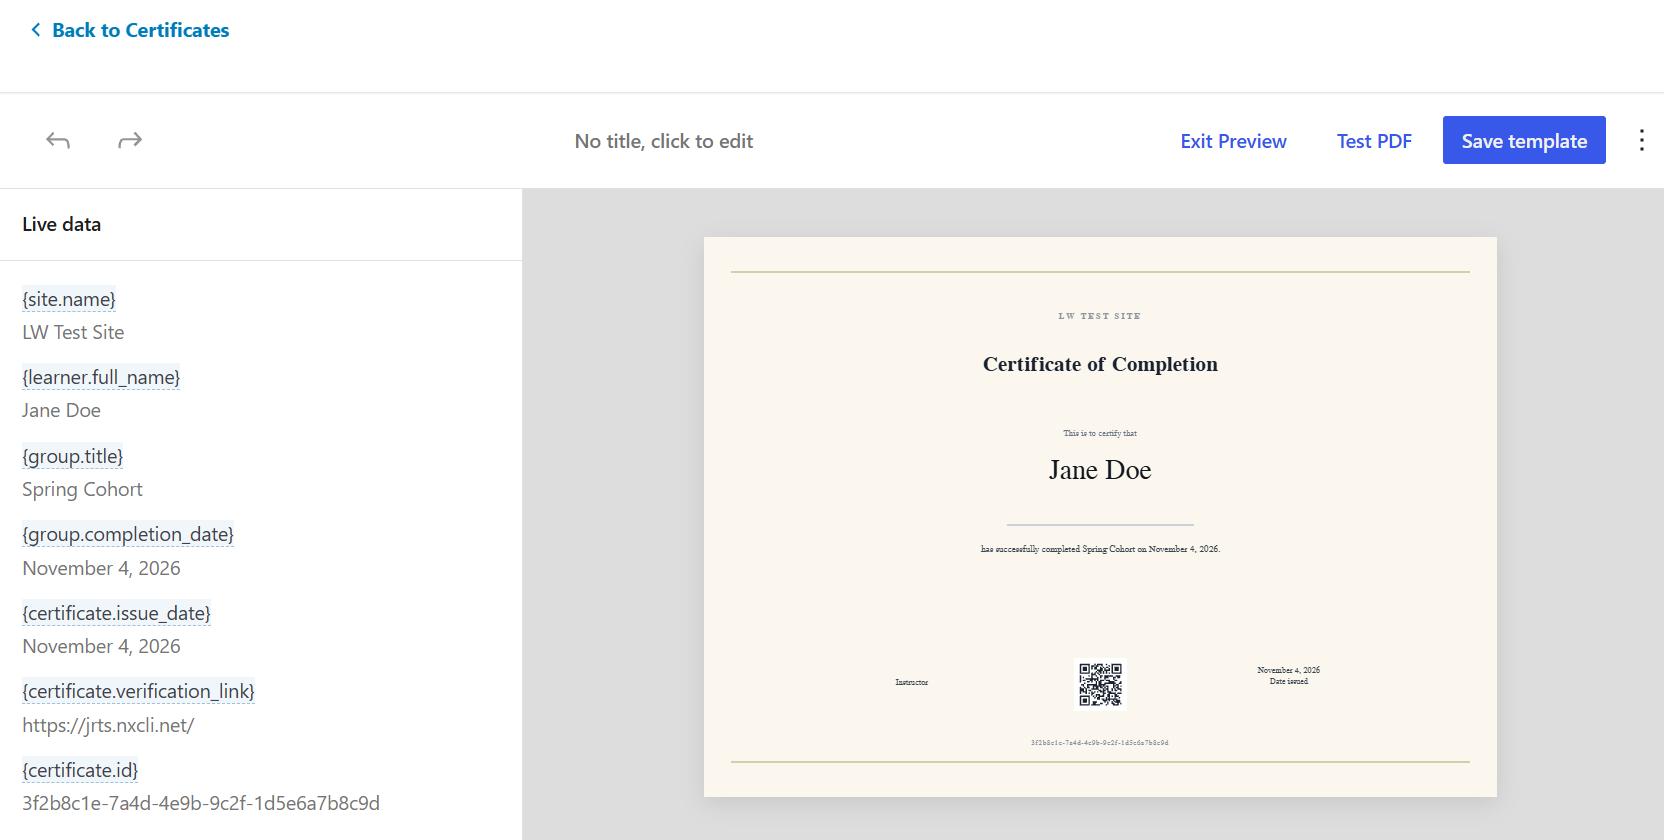
Click Preview to see how your certificate looks with sample data. Dynamic information is replaced with sample values so you can check the layout and content. You cannot select, move, or edit Elements while Preview is enabled. Exit Preview to return to the editor.
Test PDF
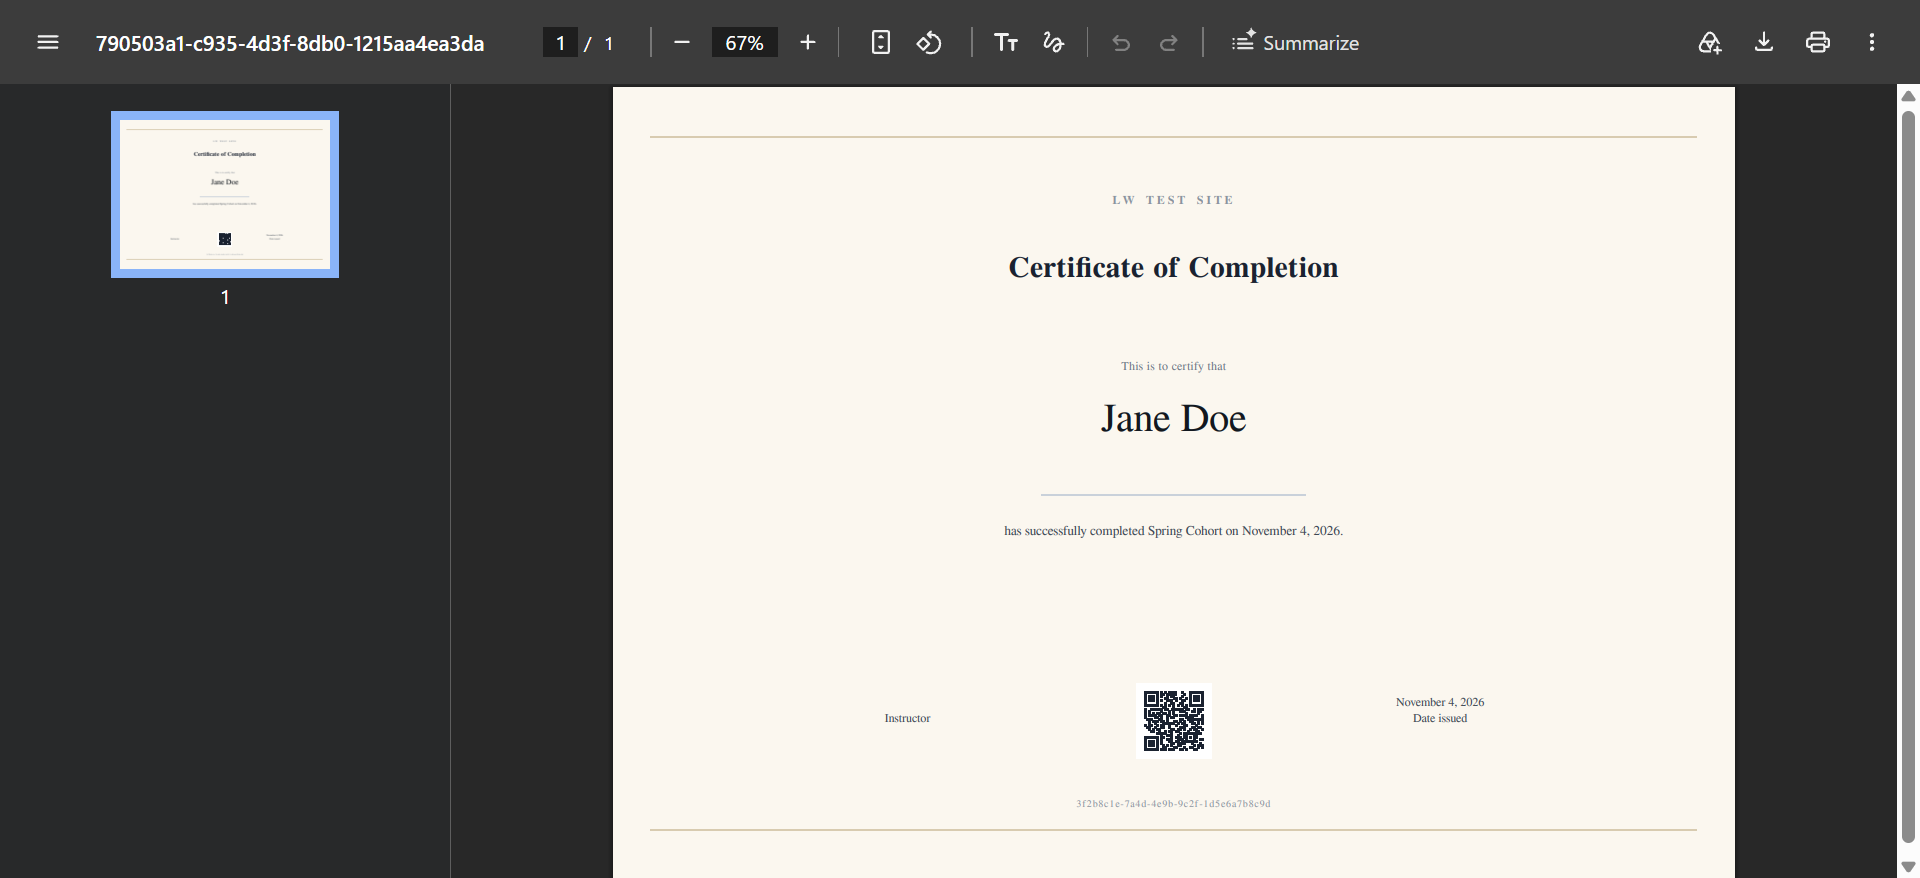
After clicking Preview, the Test PDF option becomes available. Click Test PDF to generate a PDF using the PDF rendering engine. This lets you check how the certificate will look when generated as a PDF. Test PDF also uses sample data. It does not save your changes or issue a certificate to a learner.
Step 6: Save Your Certificate
When you are finished designing your certificate, click Save template.
Your changes are saved to the certificate. Remember that the builder does not autosave, so save your work before leaving the page.
You can now assign the certificate to a course, quiz, or group.
How Certificate Changes Affect Previously Issued Certificates
When a learner earns a certificate, LearnDash stores a record of the certificate’s information and design at the time it was issued.
This means that changes made to the certificate template later do not affect certificates that have already been awarded.
When a learner downloads an issued certificate, LearnDash regenerates the PDF using the saved certificate information and design.
Understanding the Certificate Builder Settings
This section explains the available controls and settings in the Certificate Builder.
1. Certificate Title and Editor Toolbar
The title field appears in the editor toolbar. Click the title to edit it, enter your preferred certificate title, and press Enter to apply the change.
The editor toolbar also contains the following controls:
- Insert (+): Opens the Insert panel, where you can add Elements and Live Data.
- Undo: Reverses a recent editing action.
- Redo: Restores an action that was previously undone.
2. Insert Panel (+)
Click the Insert (+) icon to access the available elements and dynamic information.
The panel contains two main sections: Elements and Live Data.
Elements
You can add the following elements to your certificate:
|
Element |
Description |
|---|---|
|
Heading |
Adds a heading to the certificate. |
|
Paragraph |
Adds text to the certificate. |
|
Divider |
Adds a horizontal dividing line. |
|
Image |
Adds an image from your Media Library. |
|
QR |
Adds a QR code that can link to a URL, including a certificate verification link. |
You can click an Element to add it to the center of the canvas or drag it to your preferred position.
Live Data
Live Data provides dynamic information that can be inserted into your certificate. These values are populated when a certificate is issued.
The available information is organized into the following categories:
|
Live Data Category |
information |
|---|---|
|
Learner |
Full name, First name, Last name |
|
Certificate |
Certificate ID, Issue date, Verification link |
|
Course |
Course title, Course author, Completion date, Enrollment date, Time spent |
|
Group |
Group title, Group completion date, Group enrollment date |
|
Quiz |
Quiz title, Quiz percentage, Quiz points, Quiz correct answers, Quiz grade, Quiz time spent, Quiz completion date |
|
Site |
Site name |
Select a Live Data item to insert it into your certificate. You can also insert tokens into an existing text Element using the Insert Token option in the Element Inspector.
Important: Use Live Data that matches the type of certificate you are creating. For example, course-specific information will not populate on a quiz certificate, and quiz-specific information will not populate on a course certificate.
3. Certificate tab
The Certificate tab contains settings that apply to the overall certificate page.
Select an empty area of the certificate canvas to access the Certificate settings.
Layout
The Layout section lets you configure the certificate page.
- Paper Size – Choose the paper size for your certificate:
- A4: 210 × 297 mm
- Letter: 8.5 × 11 inches
- Orientation – Choose the page orientation:
- Landscape
- Portrait
- Text Direction – Choose the direction in which text is displayed:
- Left to right
- Right to left
- Margin – The Margin setting lets you adjust the margin guide displayed on the certificate canvas. This guide helps you position certificate Elements within the printable area, as most printers cannot print to the edge of the paper. It is only a visual reference and does not restrict Element placement or appear in the generated PDF.
Background
The Background section lets you customize the appearance of the certificate page.
- Background Color – Use the color picker to select a background color.
- Background Image – Click Choose Image to select or upload an image from your WordPress Media Library.
You can choose how the image fits the certificate page:- Cover: Crops the image to cover the page.
- Stretch: Stretches the image to fit the page.
- Repeat: Repeats the image across the page.
Editor
The Editor section lets you configure the grid lines displayed on the certificate canvas while editing. These grid lines help you align and position Elements on the canvas. The grid is spaced 5 mm apart, or a quarter inch when the Units setting is set to inches. When you drag an Element, its position snaps to the grid, but manually entered position values do not.
You can also choose the measurement unit used in the builder:
- Auto: Automatically selects the measurement unit based on the paper size.
- mm: Displays measurements in millimeters.
- in: Displays measurements in inches.
Changing the measurement unit only changes how measurements are displayed; it does not move certificate Elements. The grid lines are visible only while editing and do not appear in Preview mode or in the generated PDF.
4. Element tab
The Element tab displays settings for the currently selected element.
To access these settings, select an element on the certificate canvas. The available options depend on the type of element selected.
Text Elements
Text elements include Heading, Paragraph, and text-based Live Data elements.
Select a text element to access the following settings:
- Content – The Content field displays the text or token used by the selected element. You can edit the text directly in this field.
- Insert Token – Click Insert Token to add dynamic information to the text content. A selection window appears where you can choose the Live Data token you want to insert.
- Position & Size – Adjust the position and width of the selected text element. The fields contain automatically assigned values that you can adjust manually.
- Available fields:
- X (in): Horizontal position.
- Y (in): Vertical position.
- W (in): Element width.
- Available fields:
- Typography – Customize the appearance of the text:
- Font: Select the font family.
- Font Size: Enter a font size in points (pt) or use the range control to adjust it.
- Appearance: Choose Regular, Italic, Bold, or Bold Italic.
- Text Alignment: Adjust the text alignment.
- Letter Case: Change the capitalization of the text.
- Line Height: Adjust the spacing between lines.
- Letter Spacing: Adjust the spacing between characters.
- Color – Use the color picker to change the text color.
QR Elements
QR elements include manually added QR codes and the Verification Link Live Data item. Select a QR element to access the following settings:
- Link – Enter the URL that the QR code should open when scanned. You can also use the certificate verification link token.
- Position & Size – Adjust the position and width of the QR element:
- X (in): Horizontal position.
- Y (in): Vertical position.
- W (in): Element width.
- Color – Customize the QR code’s bar color and background color.
Image Elements
Select an image element to access its settings.
- Image – Click Choose Image to select an existing image or upload a new one through the WordPress Media Library.
- Position & Size – Adjust the image’s position and width, The image maintains its aspect ratio when resized:
- X (in): Horizontal position.
- Y (in): Vertical position.
- W (in): Image width.
- Appearance – Use the opacity range control to adjust the transparency of the image.
Divider Elements
Select a Divider element to access its settings.
- Position & Size – Adjust the divider’s position and width:
- X (in): Horizontal position.
- Y (in): Vertical position.
- W (in): Divider width.
- Line – Adjust the thickness of the divider line in points (pt). You can enter a value directly or use the plus (+) and minus (-) controls.
- Color – Use the color picker to change the divider line color.
Assigning Certificates to Courses, Quizzes, and Groups
After creating and saving your certificate, you can associate it with a course, quiz, or group through the corresponding LearnDash settings.
- Courses: See Course Display & Content Settings.
- Quizzes: See Quiz Access & Progression.
- Groups: See Group Display and Content Settings.
Make sure your certificate design uses Live Data appropriate for the type of certificate being awarded.